Home Blog Page 879

Aadhaar-PAN Link: How to Check Status of Aadhaar link with PAN card, How to Link, Deadline, and More

0

Highlights

  • The Indian government has made it mandatory for all taxpayers to link their Aadhaar numbers with their PAN.
  • The purpose of linking Aadhaar with PAN is to streamline the tax filing process and prevent fraudulent activities.
  • The process of linking Aadhaar with PAN can be done online or offline.
  • The government has set a deadline for linking Aadhaar with PAN, and failure to do so can result in a penalty.
  • Linking Aadhaar with PAN is important to ensure compliance with government regulations and avoid any consequences.
  • In this blog, we are sharing a complete guide on the Aadhaar-PAN link including how to check the status of the Aadhaar link with their PAN card, how to link the Aadhaar-PAN, the deadline to do so, and more.

The Indian government has made it mandatory for all taxpayers to link their Aadhaar number with their PAN (Permanent Account Number) in order to file their tax returns. The process of linking Aadhaar with PAN has been made simple and straightforward, with both online and offline methods available for taxpayers to choose from.

The purpose of linking Aadhaar with PAN is to streamline the tax filing process and reduce fraudulent activities. By linking the two, the government can verify the identity of taxpayers and prevent individuals from creating multiple PANs to evade taxes. Additionally, linking Aadhaar with PAN can also help in detecting black money transactions and improving tax compliance.

Aadhaar-PAN Link

The process of linking Aadhaar with PAN can be done online through the Income Tax e-filing website. All that a taxpayer needs to do is visit the website and follow the instructions provided on the page. Alternatively, taxpayers can also link their Aadhaar with their PAN Card offline by visiting a PAN service centre or sending a request through the post.

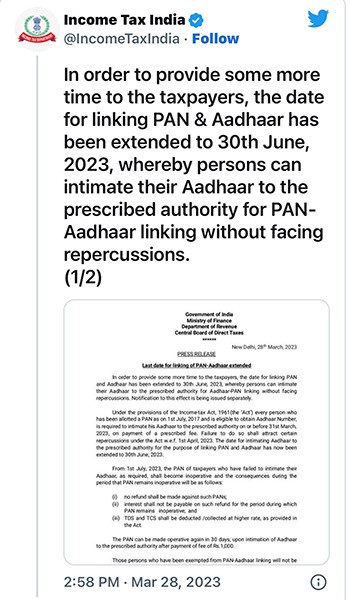
It is important to note that the government has set a deadline for linking Aadhaar with PAN, and failure to do so can result in a penalty or consequences. The deadline, which was previously 31st March 2023 with the penalty, has been recently extended till 30th June 2023 with the penalty. Therefore, it is recommended that taxpayers link their Aadhaar with their PAN as soon as possible to avoid any issues.

Linking Aadhaar with PAN is a crucial step in the tax filing process in India. By doing so, taxpayers can ensure compliance with government regulations and avoid any penalties or consequences. The process has been made simple and convenient, and taxpayers can choose the method that best suits their needs.

What is the Fees and Deadline for Aadhaar PAN Card Linking?

Aadhaar-PAN Link

The PAN-Aadhaar linking was free till 31 March 2022.

If you linked PAN-Aadhaar after 31 March 2022, but before 30 June 2022, a penalty of Rs.500 was imposed.

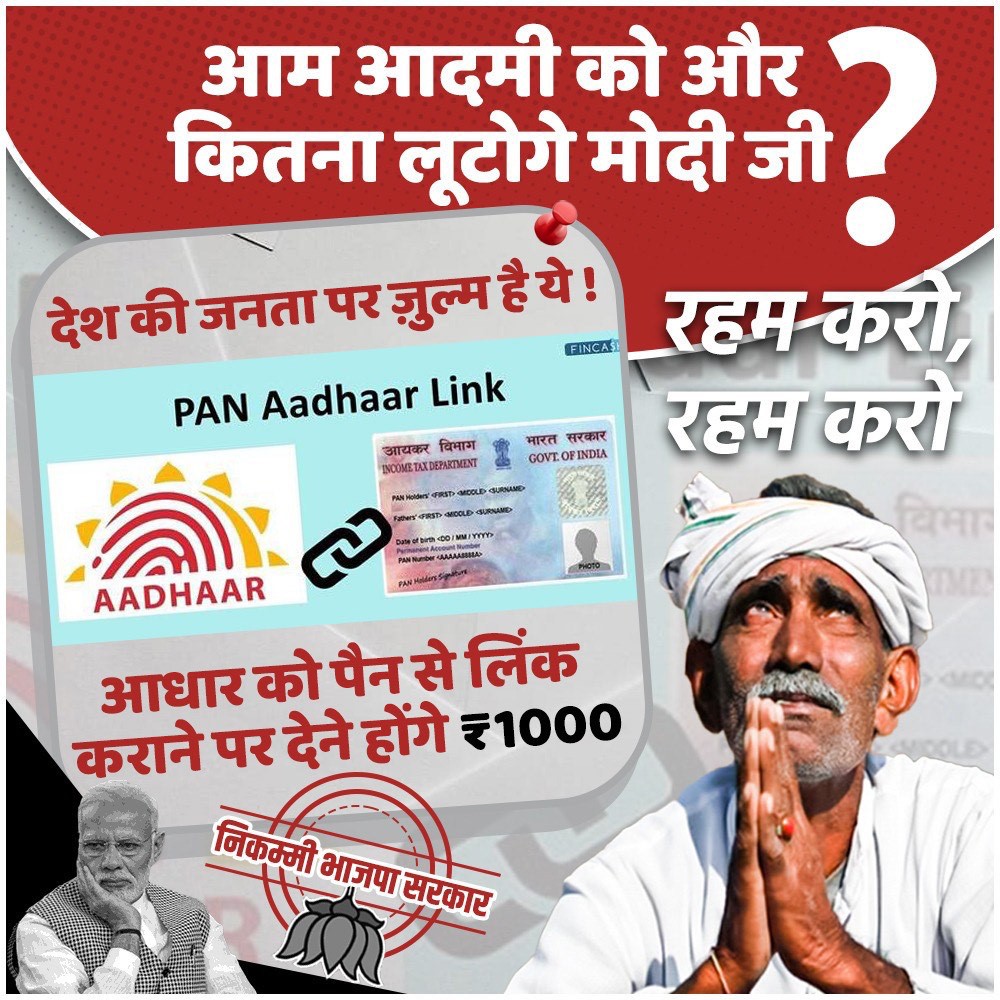
However, after 30 June 2022, a penalty of Rs.1,000 is imposed to link PAN with an Aadhaar card.

Thus, you must first pay the penalty of Rs.1,000 to link your Aadhaar with your PAN before 30 June 2023. When the PAN and Aadhaar cards are not linked before 30 June 2023, PAN cards will become inoperative from 1 July 2023.

Who Should Link Aadhaar with a PAN Card?

Aadhaar-PAN Link

  • All Indian taxpayers are required to link their Aadhaar with their PAN card.
  • This includes individuals, Hindu Undivided Families (HUFs), companies, and any other entities that are eligible to obtain a PAN card.
  • Any person who wishes to file their income tax return must link their Aadhaar with a PAN card.
  • If an individual has multiple PAN cards, they must link all their PAN cards with their Aadhaar and declare the inactive PAN cards as invalid.
  • It is also mandatory for individuals who are not eligible to obtain an Aadhaar card to provide proof of enrollment or application for an Aadhaar to link it with a PAN card.
  • Failure to link Aadhaar with a PAN card before the deadline set by the government can result in a penalty or consequences.

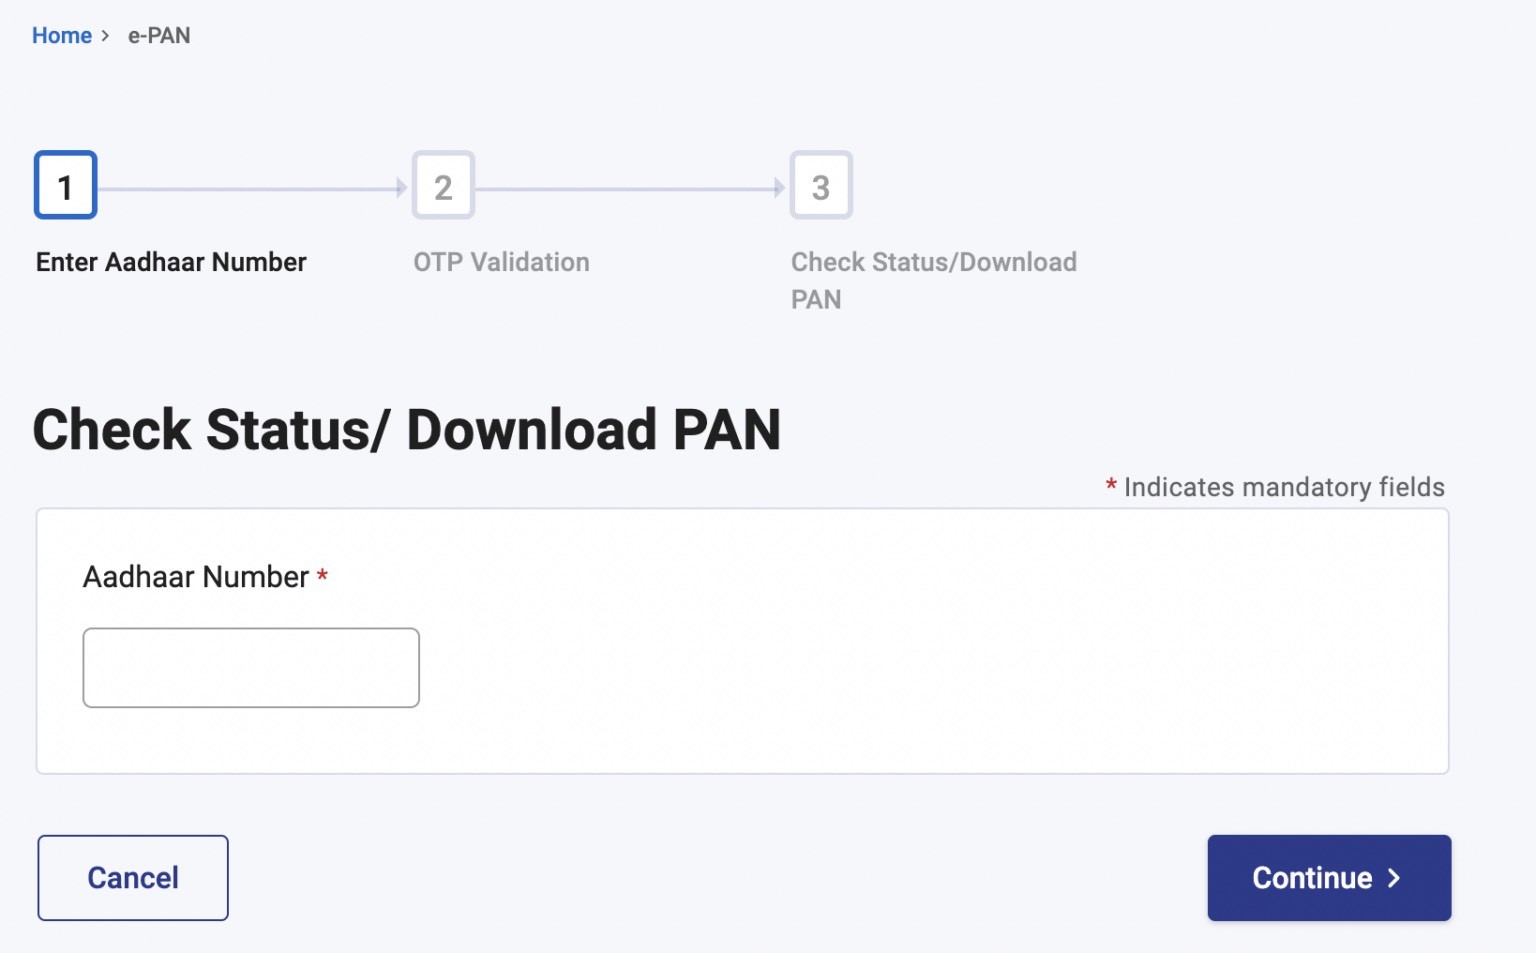
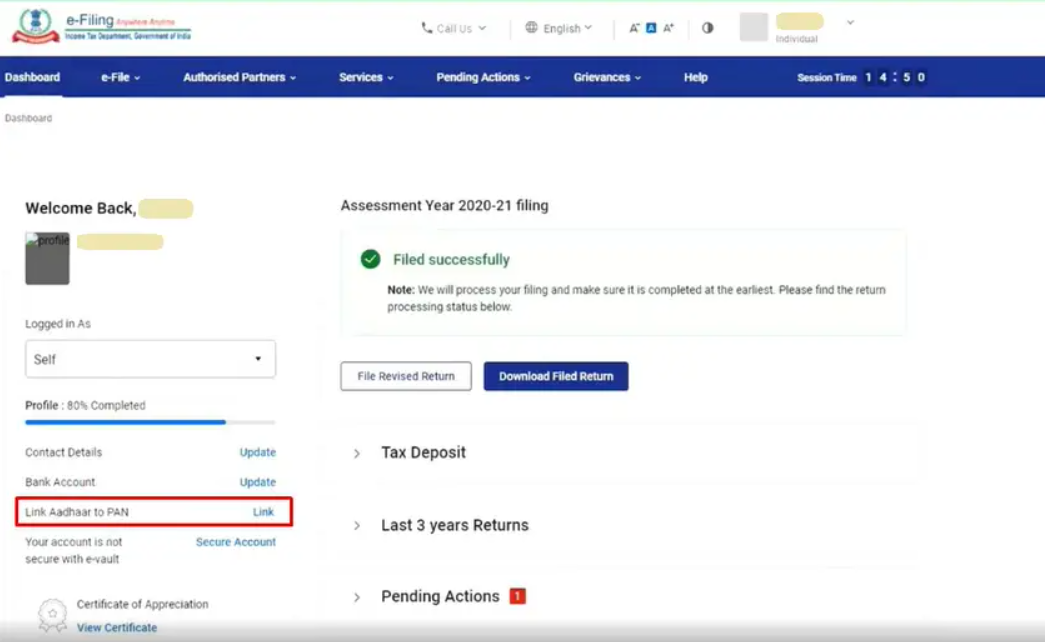
How To Check Aadhaar Card – PAN Card Link Status via the Income Tax Portal?

Aadhaar-PAN Link

  • Login into the Income Tax e-filing portal.
  • Go to ‘Dashboard’ on the homepage and click the ‘Link Aadhaar Status’
  • Next, navigate to the ‘My Profileoption and click on the ‘Link Aadhaar Status’

If your Aadhaar number is linked to your PAN card, the Aadhaar number will be displayed. If your Aadhaar is not linked with your PAN card, ‘Link Aadhaar Status’ will be displayed.

In case the request to link your Aadhaar with your PAN card is pending with the Unique Identification Authority of India (UIDAI) for validation, you will have to check the status later.

How To Check Aadhaar Card – PAN Card Link Status Online?

Aadhaar-Pan Card Link Status: How To Check Online If Both Are Linked or Not?

Here is the direct link to check the Aadhaar PAN card link status https://eportal.incometax.gov.in/iec/foservices/#/pre-login/link-aadhaar-status

  • Enter your PAN.
  • Aadhaar numbers.
  • Click ‘View Link Aadhaar Status’.

The PAN-Aadhaar linking status will be displayed on the screen.

How To Check Aadhaar Card – PAN Card Link Status via SMS?

  • Compose an SMS – UIDPAN <12 digit Aadhaar number> < 10 digit PAN number>
  • Send the SMS to ‘567678’ or ‘56161’.
  • Wait for the response from the government service.

If Aadhaar is linked with PAN, the message will appear as follows – “Aadhaar is already associated with PAN (number) in ITD database. Thank you for using our services.”

If Aadhaar is not linked to PAN, the message will appear as follows – “Aadhaar is not associated with PAN (number) in ITD database. Thank you for using our services.”

How to link Aadhaar with a PAN card online?

PAN-Aadhaar Linking Last Date Is 30 June 2023, Here How You Can Check Aadhaar Card & PAN Card Linking Status Online With Easy Steps

Anyone linking their Aadhaar with their PAN card after 31st March 2022 will have to first pay a late penalty of Rs.1,000 on the Income Tax website. So, there are two main steps for linking your Aadhar with your PAN now –

  1. Payment of fee on https://www.incometax.gov.in/iec/foportal/ under Major head (0021) and Minor head (500) for AY 2023-24.
  2. Submit the Aadhaar-PAN link request.

How to Submit the Fee Online?

  • Go to the e-Pay Tax page on E-filing page

https://eportal.incometax.gov.in/iec/foservices/#/e-pay-tax-prelogin/user-details

Aadhaar-PAN Link

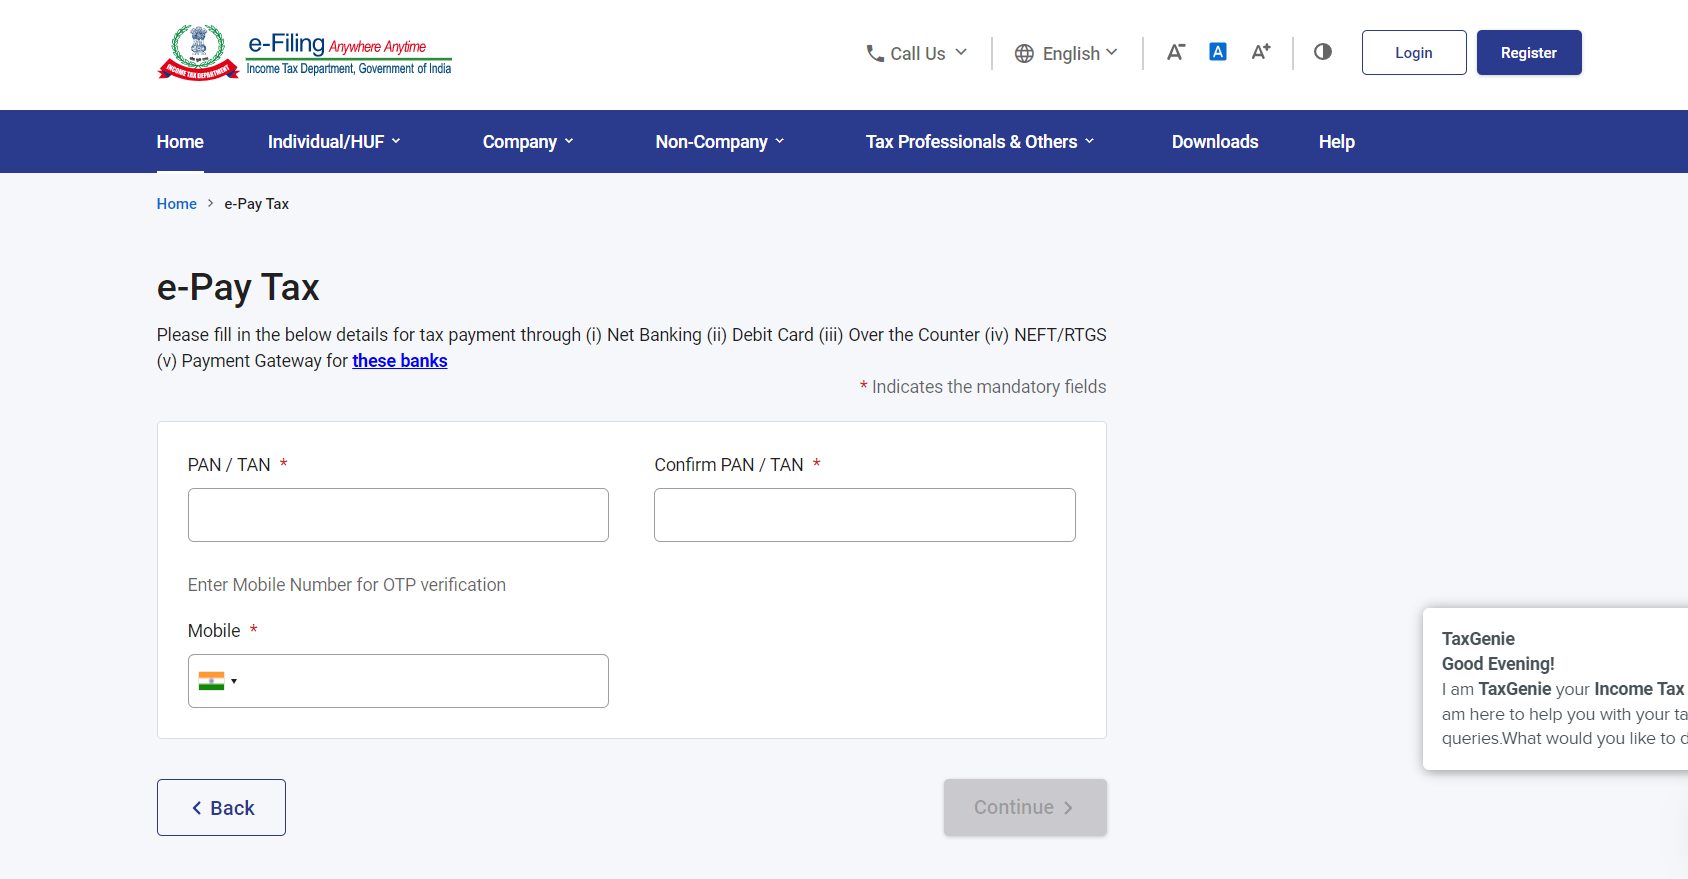
  • Enter Your PAN Card, Confirm PAN Card, and Enter Your Mobile Number linked with Aadhaar Card in the field provided. And click on Confirm.
  • Verify OTP on next page and click on Continue.

Aadhaar-PAN Link

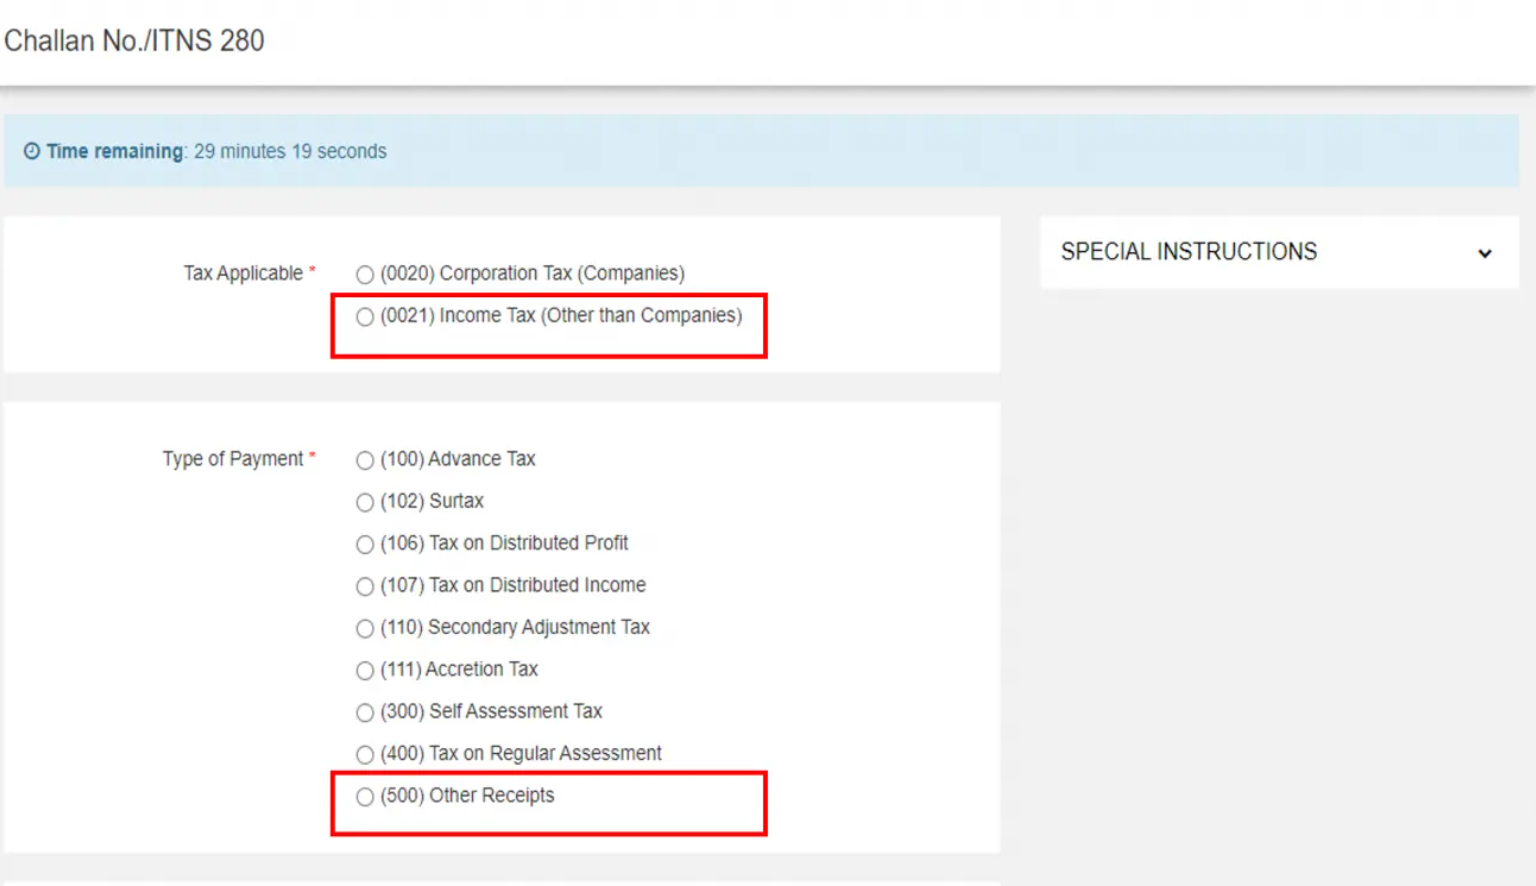
  • On the next screen, select head ‘(0021)’ and then ‘(500)’

Aadhaar-PAN Link

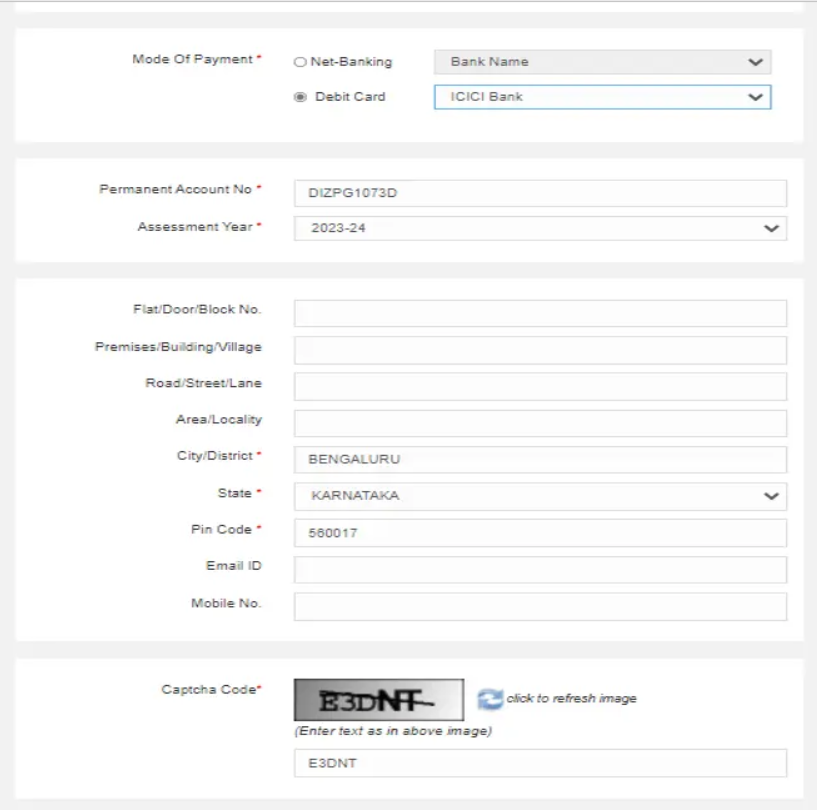
  • Scroll down to select the mode of payment and enter the required details (like your PAN, for Assessment Year select 2023-24, address, etc.)
  • Proceed to make the payment and follow the next steps to submit the PAN-Aadhaar link request.

NOTE – It is advisable to wait 4-5 days before submitting the request.

How to link Aadhaar with the PAN card?

There are three ways of linking your PAN to your Aadhaar:

  1. Linking of Aadhaar Number and PAN via SMS
  2. Without logging in to your account (2-step procedure)
  3. Logging in to your account (6-step procedure)

 Let’s take a look at each one by one.

Linking of Aadhaar Number and PAN via SMS

Link PAN-Aadhaar Via SMS by March 31, 2023. A Step-by-Step Guide Here

Now you can link your Aadhaar and PAN through SMS.

The income tax department has initiated an SMS-based facility for linking Aadhaar with PAN. It can be done by sending an SMS to either 567678 or 56161.

Send SMS to 567678 or 56161 from your registered mobile number in the following format:

 UIDPAN<SPACE><12 digit Aadhaar><Space><10 digit PAN>

 Example: UIDPAN 123456789123 AKPLM2124M

Linking of Aadhaar Number and PAN  Without Logging in to Your Account

Aadhaar-PAN Link

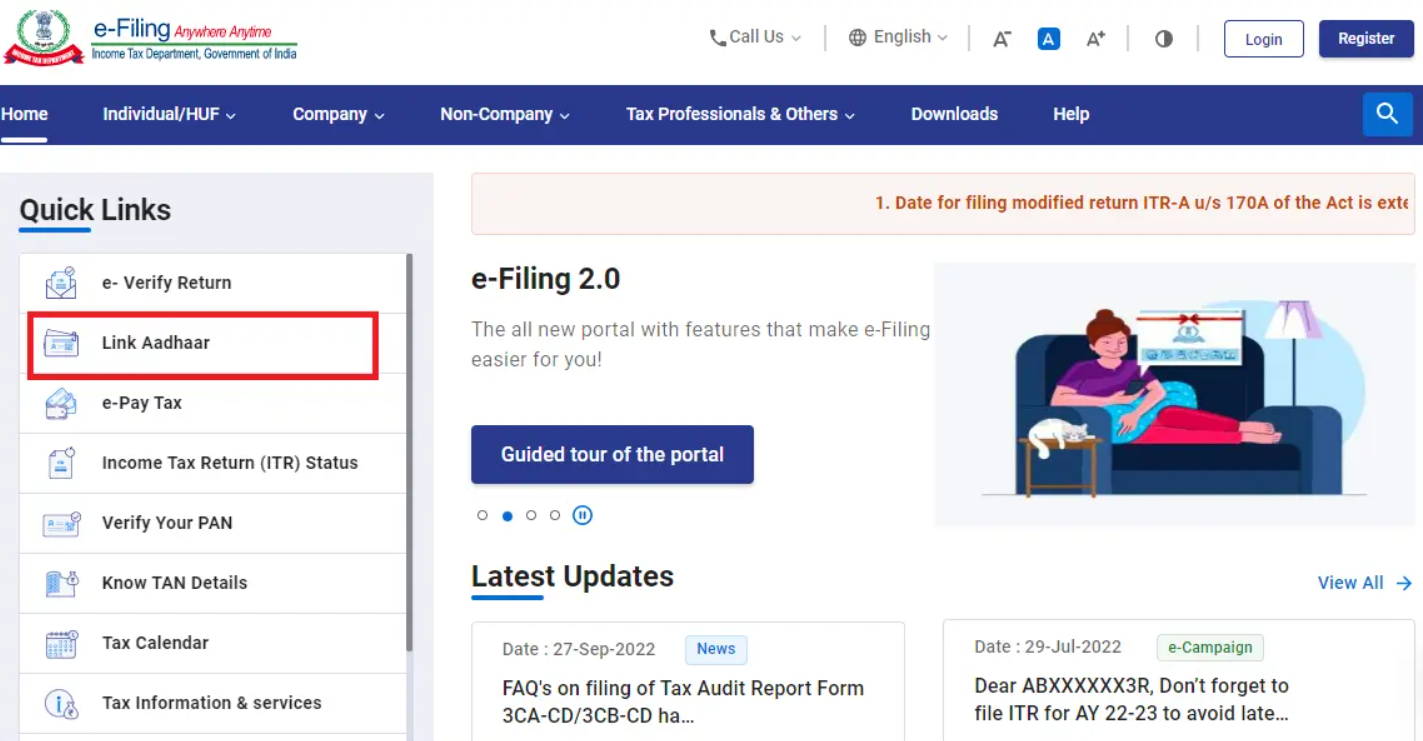
  • Go to the Income Tax e-filing portal. Under quick links, click on the ‘Link Aadhaar’ tab.

Aadhaar-PAN Link

  • Enter your PAN, Aadhaar number and click on Validate.

Aadhaar-PAN Link

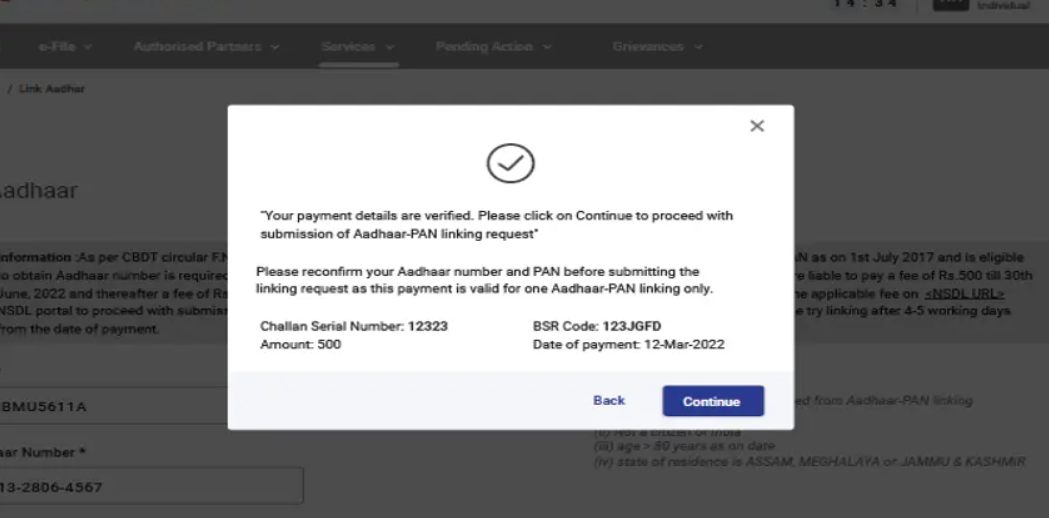
  • After validating PAN and Aadhar, you will see a pop-up message “Your payment details are verified”. Click the ‘Continue’ button to submit the ‘Aadhaar link’

Aadhaar-PAN Link

  • Enter the required details and click the ‘Link Aadhaar’ button.  

Aadhaar-PAN Link

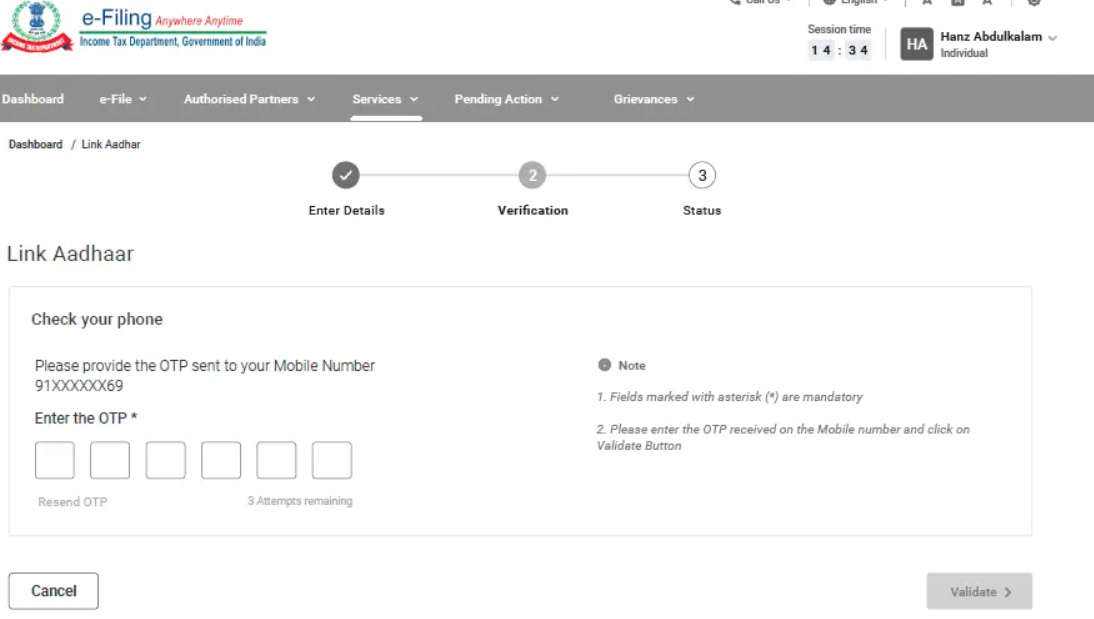
  • Enter the 6-digit OTP received on your mobile number and validate.

Your request see a success message on the screen. You may now check your Aadhaar-PAN link status.

Linking of Aadhaar Number and PAN Logging in to Your Account

  • Register yourself at the Income Tax e-filing portal, if you are not already registered.

Aadhaar-PAN Link

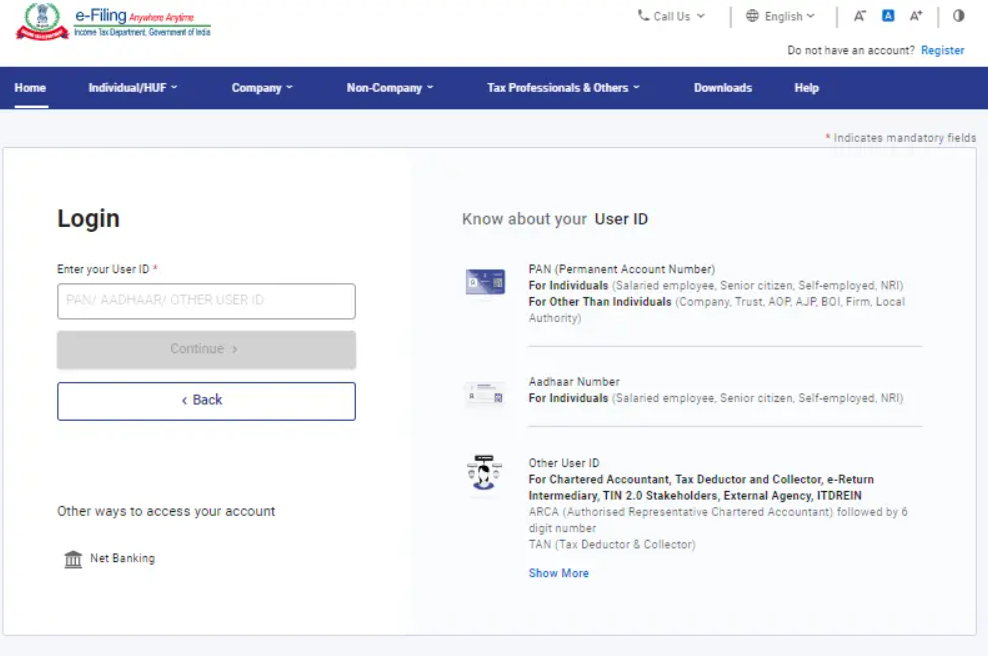
  • Log in to the e-filing portal of the income tax department by entering the user ID.
  • Confirm your secure access message and enter the password. And click ‘Continue’ to proceed further.

Aadhaar-PAN Link

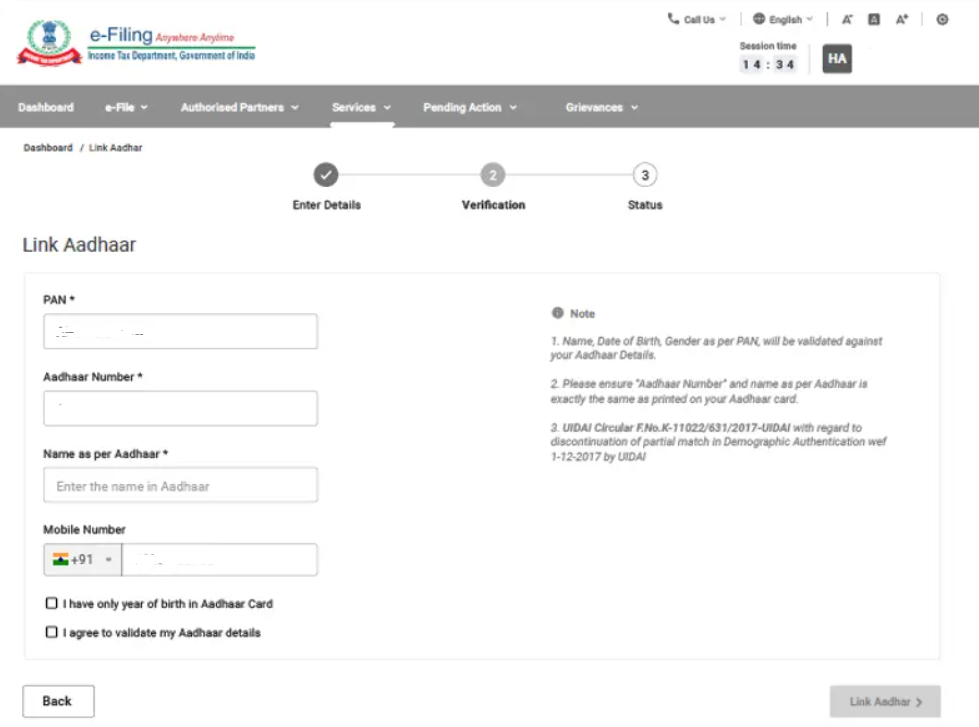
  • After logging in to the website, click on ‘Link Aadhaar’. Alternatively, go to ‘My Profile’ and select ‘Link Aadhaar’ under the ‘Personal Details’ option.
  • Enter details, enter your Aadhaar number and name as per Aadhaar. Verify the details on the screen with the ones mentioned on your Aadhaar card.
  • Click on the check box ‘I Agree to validate Aadhaar details’.
  • In case only the year of birth is mentioned in your Aadhaar card, then select the check box asking ‘I have only year of birth in Aadhaar card’.
  • Click on ‘Link Aadhaar’ button

Aadhaar-PAN Link

A pop-up message will inform you that your Aadhaar number has been successfully linked to your PAN card.

Alternatively, you can also link your Aadhaar with your PAN while filing your income tax return. The process is similar to the one mentioned above and can be done at the time of filing the return.

It is important to note that you should ensure that the details entered while linking your Aadhaar with your PAN match the details mentioned on both documents. If there is any discrepancy, the linking process may fail, and you may need to rectify the details first. Also, ensure that your Aadhaar card and PAN are not linked with any other PAN or Aadhaar card to avoid any issues.

FAQs

1) Who should link Aadhaar with a PAN card?

Ans) According to Section 139AA of the Income Tax Act, taxpayers with a PAN card should link it to their Aadhaar cards. Thus, all taxpayers must mandatorily link their PAN with their Aadhaar cards by 30 June 2023 by paying the penalty of Rs.1,000 else their PAN cards will become inoperative.

However, Non-Residents Indians (NRIs), citizens aged above 80 years, and residents of Assam, Meghalaya and Jammu and Kashmir need not link their Aadhaar with PAN cards since they come under the exempt category. Thus, check your Aadhaar-PAN link status to find out if your Aadhaar is linked with your PAN card. If it is not linked, ensure to link it by 30 June 2023 to prevent your PAN card from being inoperative.

2) Is it mandatory to link PAN and Aadhaar?

Ans) Yes, it is mandatory to link PAN and Aadhaar as per the Income Tax India rules. Failure to link PAN and Aadhaar by June 30, 2023, can result in the deactivation of your PAN.

3) What is the deadline for linking PAN and Aadhaar?

Ans) The deadline for linking PAN and Aadhaar has been extended several times. The latest deadline to link PAN with Aadhaar is June 30, 2023.

4) Can I link multiple PAN cards to one Aadhaar card?

Ans) No, you cannot link multiple PAN cards to one Aadhaar card. Each individual can only link one PAN card to one Aadhaar card.

5) Can I link my Aadhaar card to someone else’s PAN card?

Ans) No, you cannot link your Aadhaar card to someone else’s PAN card. Each individual must link their own Aadhaar card to their own PAN card.

6) Can I link my Aadhaar card to my PAN card if there is a mismatch in my name?

Ans) No, you cannot link your Aadhaar card to your PAN card if there is a mismatch in your name. You will need to correct the name on either your Aadhaar card or PAN card before linking them.

7) How can I correct the name on my Aadhaar card or PAN card?

Ans) You can correct the name on your Aadhaar card or PAN card by visiting the respective official websites and following the instructions for name correction.

8) How to link Pan-Aadhaar with penalty

Ans)

Step:1 Visit e-Filing portal Home page and click on Link Aadhaar in Quick Links section.
Step:2 Enter your PAN and Aadhaar Number
Step:3 Click on Continue to Pay Through e-Pay Tax.
Step:4 Enter your PAN, Confirm PAN and Mobile number to receive OTP
Step:5 Post OTP verification, you will be redirected to e-Pay Tax page.
Step:6 Click on Proceed on the Income Tax tab.
Step:7 Select AY as 2023-24 and type of Payment as Other Receipts (500) and click Continue.
Step:8(a) Applicable amount will be pre-filled against Others.
Alternatively, if you have a Bank account which is not listed for payment through e-Pay Tax, please follow the steps as under:
Step:8b(i) Click on hyperlink given below on e-Pay tax page to redirect to Protean (NSDL) portal
Step:8b(ii) You will be redirected to Protean portal. Click Proceed under Challan No./ITNS 280
Step:8b(iii) Select Tax applicable as 0021 and Type of Payment as 500
Step:8 b (iv) Provide other mandatory details and Proceed.

Please select the Assessment Year 2023-24 for making late fee payment for Aadhaar PAN linkage.

Post payment of fee you can link your Aadhaar number with PAN on the e-Filing Portal.

9) How to link PAN-Aadhaar after penalty payment?

Ans) Login income tax website, under Dashboard, in Profile Section under the Link Aadhaar to PAN option, click Link Aadhaar.

10) Who needs to link Aadhaar and PAN?

Ans) Section 139AA of the Income Tax Act provides that every individual who has been allotted a permanent account number (PAN) as on the 1st day of July, 2017, and who is eligible to obtain an Aadhaar number, shall intimate his Aadhaar number in the prescribed form and manner. In other words, such persons have to mandatorily link their Aadhaar and PAN before the prescribed date (31.03.2022 without fee payment and 31.03.2023 with prescribed fee payment For more details refer to CBDT circular No.7/2022 dated 30.03.2022.

11) For whom is Aadhaar-PAN linkage not compulsory?

Ans) Aadhaar-PAN linkage requirement does not apply to any individual who is:

Residing in the States of Assam, Jammu and Kashmir, and Meghalaya;
a non-resident as per the Income-tax Act, 1961; of the age of eighty years or more at any time during the previous year; or not a citizen of India.

Note:

1. The exemptions provided are subject to modifications depending on subsequent government notifications on this subject

2. For further details refer to Department of Revenue Notification No 37/2017 dated 11th May 2017”

3. However, for users falling in any of the above category, voluntarily desires to link Aadhaar with PAN fee payment of specified amount is required to be done.

12) How to link Aadhaar and PAN?

Ans) Both registered and unregistered users can link their Aadhaar and PAN on the e-Filing Portal, even without logging in. You can use the quick link Link Aadhaar on the e-Filing home page to link Aadhaar and PAN.

13) What will happen if I don’t link Aadhaar and PAN?

Ans) Kindly, refer to the Circular No. 7/2022 dated 30/3/2022

14) I cannot link my Aadhaar with PAN because there is a mismatch in my name/phone number/date of birth in Aadhaar and PAN. What should I do?

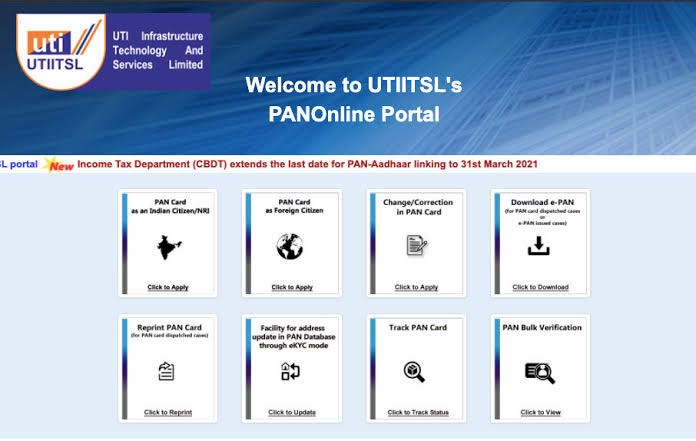
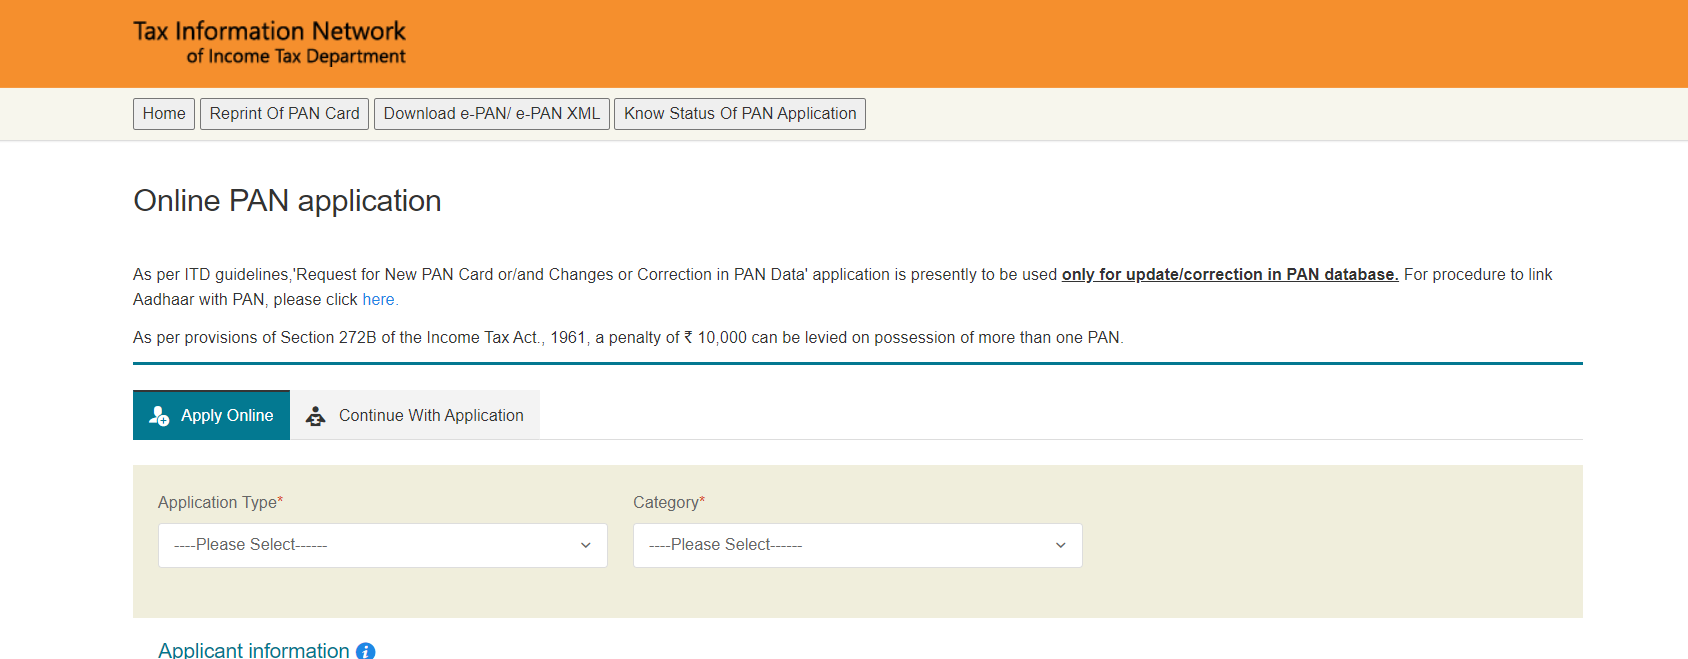
Ans) Correct your details in either PAN or Aadhaar database such that both have matching details. You can correct your PAN details on:

The TIN-NSDL website ), or
UTIISL’s PANOnline Portal ).
In case of Query/Assistance, please contact on NSDL /UTI helpline number: 033 40802999 ,03340802999 or write on e-mail id: utiitsl.gsd@utiitsl.com

You can correct your Aadhaar details on the UIDAI website ).

In case of Query/Assistance, please contact on toll-free number 18003001947 or 1947

15) What should I do if my PAN becomes inoperative?

Ans) Kindly, refer to the Circular No. 7/2022 dated 30/3/2022.

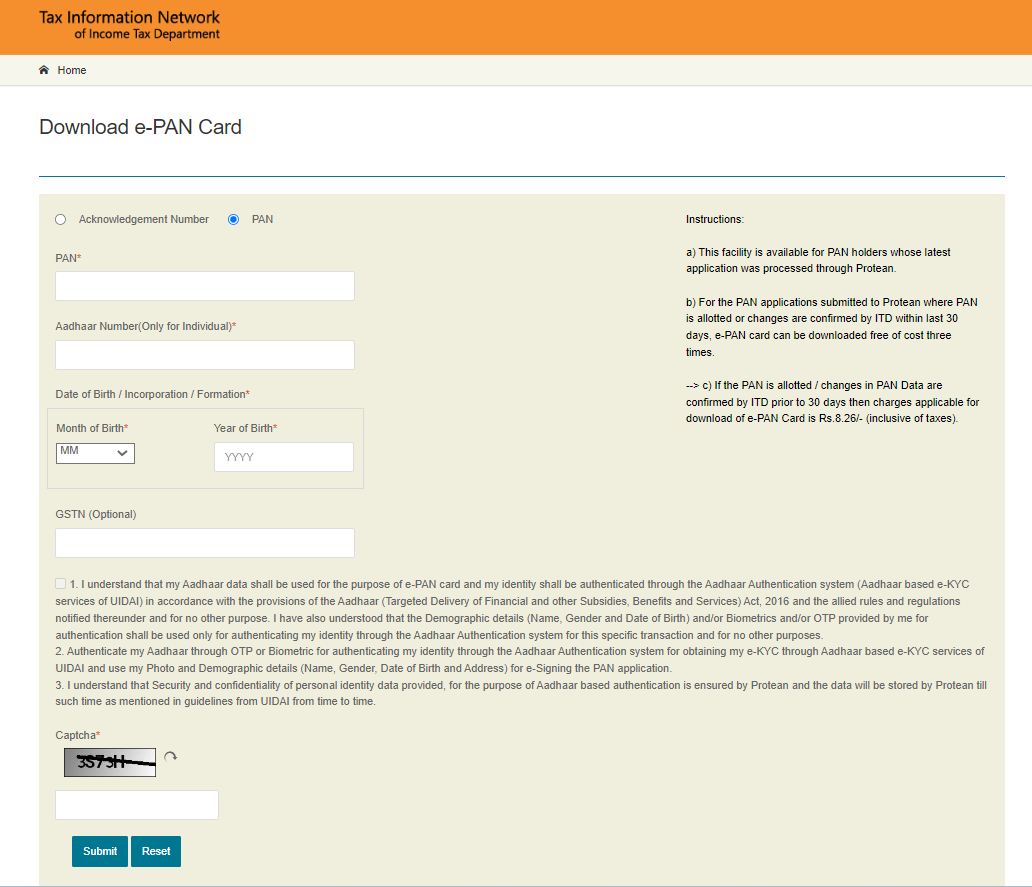
Also Read: PAN Card Online Apply: How to Apply for PAN Card Online, Check Status, and Download e-PAN?

Also Read: DigiLocker:What is DigiLocker? Registration, How to Delete Digilocker Account? How to access Aadhaar, PAN Card, driving license etc on your WhatsApp Importance of digilocker, Digilocker Mobile Application and More

Also Read: How to Download Aadhaar, PAN card on Your WhatsApp

How to Convert Word to PDF for Free

0

Free methods that let you convert Word documents into PDF files on mobile and on your computer.

PDF is one of the most popular file formats, from government circulars to ebooks. We’ve already shown you how to convert PDF to Word, and now we’re going to show you how to convert Word to PDF. Word to PDF is a relatively easy conversion because there are really simple Word to PDF converters available. You can convert Word to PDF for free without installing any apps too. Follow this guide to see how to convert Word to PDF.

HIGHLIGHTS

* You can easily make changes to a Word doc
* Learn to convert Word docs to PDF for free
* It isn’t very easy to modify a PDF file

How to convert Word to PDF

The first method we are going to show doesn’t require you to install any app on your device. It works across all devices, be it smartphones, tablets and computers. With that said, follow these steps.

1. Visit the website, www.hipdf.com.
2. Once the website is loaded, click on the third option from the top that says, Word to PDF.
3. After that, click Choose File > select the Word document from your phone’s or computer’s local storage and open it.
4. Once the document is finished uploading, hit Convert > wait for the file to finish the conversion > click on Download.
5. That’s it. Your Word document will now be converted into a PDF file.

If you want to convert Word to PDF offline, you can do so via Apple’s Pages app, which is a Word alternative for iOS and macOS. Here’s how to convert Word to PDF via Pages.

Convert Word to PDF using Google Docs on Mac or PC

1. Locate the Word document and open it in Pages.
2. Once the document is loaded, on Pages for Mac, click on File > Export To > PDF.
3. On Pages for Mac, a menu will pop-up, set the quality to Best and click on Next.
4. You’ll now be asked to enter the file name and edit the save location. Once done, hit Export. With this done, you have just now successfully converted a Word doc into a PDF file on a Mac.
5. On Pages for iOS, open the document, tap the three-dots icon on the top right > Export > PDF. The share sheet will open now and you can save it via the Files app, copy it to other apps, or share it with others.

That brings us to the last method that we’ll be suggesting to convert Word to PDF. This method is for the ones who have a Windows 10 machine and want to convert Word documents into PDFs. Simply, follow these steps.

Use iLovePDF to convert Word to PDF on Mac using a browser

1. Locate the Word document on your Windows 10 computer and open it in Microsoft Word.
2. Once the document is loaded, click on File > Save As > edit the file name.

Save Word file as PDF on iPhone Below that when you click, you’ll see a drop-down menu > select PDF.
3. Once done, hit Save and your Word file will now be downloaded as a PDF on your computer.

By following these simple methods, you can now easily convert Word documents into PDF files.

Use Print to convert Word to PDF on iPhone

Faqs on How to Convert Word to PDF for Free

1) How to convert Word to PDF on Mac?

Ans) You can use any of the three ways mentioned below to export a Word document as a PDF on Mac.

1. Use the Pages app

Pages is a free app from Apple and you can download it from the macOS App Store. Once you have the app, follow these steps to change a Word file into a PDF.

1) Right-click on the Word file in the Finder folder and select Open With > Pages.
2) Click File from the top left.
3)Select Export To and choose PDF.
4) Optionally, set the image quality and explore other options like adding password protection to the PDF.
When done, click Next.
5) Change the name and location if desired and click Export.

You have effortlessly converted a Word file into a PDF.

2. Use Google Docs

If you don’t have the Pages app, downloading it may take a while if your internet connection isn’t fast . In these situations, you can use Google Docs in your Mac’s web browser (Chrome, Safari, Firefox, etc.) to convert a Word file to PDF.

Here’s how to use Google Docs to export a Word document as a PDF:

1) Visit Google Docs at docs.google.com and make sure you’re signed in to your Google account.
2) Click Blank to start a new document.
3) Press Command + O or click File > Open.
4) Choose Upload and drag the Word file here or select from the Finder folder.
5) Once the Word file is uploaded, it should open in Google Docs. If not, click Open.        6)Select File > Download > PDF Document
The Word file will instantly convert and save as a PDF to your Mac

3. Use iLovePDF.com

If you have some non-sensitive Word files, you can use this method to convert them instantly to PDF. The best part is, even in the free version, you can convert up to three Word files to PDF in one go. And if you subscribe to their premium plan, this number can go up to 10.

Here’s how to use iLovePDF to change a Word file to PDF:

1) Visit iLovePDF.com in a web browser and go to its Convert WORD to PDF page.
2) Drag the Word files here or click Select Word files and add from your Finder.
3) Click Convert to PDF.
4) Once done, click Download PDF.

2) How to convert Word to PDF on iPhone and iPad

Ans) Making a Word file into a PDF is effortless on iPhone and iPad. The best part is you don’t even need an additional app!

1. Use the Files app

Files app comes preinstalled on all recent versions of iOS and iPadOS. In case you deleted it, download it from the App Store. After that, make sure the Word file is saved inside the Files app.

If the Word file is in some other app, open it, tap the share icon and choose Save to Files. And in case the Word file is in a third-party cloud storage service like Google Drive, Dropbox, etc., you can simply enable these services .

Here’s how to use the iPhone Files app to convert a Word file to PDF:

1) Open the Files app, tap Browse and go to the folder where the Word file is saved.
2) Tap the Word file, and it will open inside the Files app.
3) Select the share icon.
4) On the Share Sheet, choose Print.
5) Put two fingers on the page thumbnail and pinch out.                                      6)Tap the share icon again and choose Save to Files > choose any location > Save.

You have successfully converted a Word file into a PDF, all from the iOS Files app. To be sure, press the newly created document and tap Get Info. You will see that it’s a PDF.

2. Use an iOS shortcut

Ans) With the help of this simple shortcut that I built, you can instantly convert a Word file to PDF in just a few taps.

Follow these steps to use an iOS shortcut to convert a Word document into PDF:
1) Tap this iCloud link and then tap Add Shortcut to get the Save As PDF shortcut.
2) Go to the Files app or the app where the Word file is saved. From here, open the Word file and tap the share icon.
3) In the Share Sheet, select Save As PDF.
4) The shortcut will swiftly convert the Word file to PDF. Finally, choose a folder and tap Done to save the PDF version of the document.

Go to the Files app folder where you saved the final converted file to access it.

3. Use the Pages mobile app
Apple’s Pages app is also available free download on the iOS & iPadOS App Store.
Get the app and follow these steps to convert a Word document into a PDF file.

Here’s how to use Pages to change a Word file to PDF on iPhone or iPad:

1) Open Pages and tap Browse. Now, go to the location where the Word file is saved and tap to open it.
2) Choose the more icon (three dots inside a circle).
3) Select Export and choose PDF from the list of formats.
4) Tap Export, and it should show the Share Sheet.
5) From the Share Sheet, tap Save to Files > choose any location > Save.

This is how you can quickly and easily convert Word files to PDF on your iPhone, iPad, or Mac.

Besides the above options, you can also use dedicated iOS, iPadOS, or macOS apps that can do this job for you. Simply open the App Store and search for Word to PDF converter. Go through the search result and download an app with good ratings. However, keep in mind that, unlike the above methods, most third-party apps will either require payment or show several ads before you can complete the Word to PDF conversion.

3) How to convert Word to PDF

Ans) Follow these easy steps to turn Microsoft Word files into PDFs:

1)Click the Select a file button above, or drag and drop your Word doc into the drop zone.
2)Select the RTF, TXT, DOCX, or DOC file you want to convert into the PDF format.
3)Watch Acrobat automatically convert the file.
4)Download your new PDF or sign in to share it.

4) How to Convert a Document to PDF Using Word?

Ans) If you have the desktop version of Microsoft Word installed on your Windows PC or Mac, the easiest way to convert your document to PDF is right in Word itself.
Open the document you want to convert and then click the “File” tab.

On the backstage screen, select “Save As” from the list on the left.

Next, from the Save As screen, select where you would like the PDF to be saved (OneDrive, This PC, a particular folder, or wherever).

Click the dropdown arrow on the right side of the “Save As Type” box and select “PDF (*.pdf)” from the dropdown menu.

If you want to, you can change the filename at this time. When you’re ready, click the “Save” button.

After saving the PDF, you’ll be returned to your Word document, and the new PDF will open automatically in your default PDF viewer.

If You Don’t Have Microsoft Word

If you don’t have Word, but need to convert a document someone sent you to PDF, you do have a few options:

* Google Drive: You can upload a Word document to Google Drive, save it as a Google Document, and then convert it to PDF. This works well enough if you have a simple, mostly text Word document without much formatting (and if you already have a Google account).
* A Conversion Website: There are a lot of sites out there that offer to convert Word documents to PDF for free. We recommend freepdfconvert.com. It’s a safe site, it works fast, and it does a pretty good job on Word documents with even a modest amount of formatting. And it really is free if you just need to convert the occasional Word document to PDF. A paid subscription gets you additional features like unlimited conversions (multiple documents at once), and the ability to convert more types of files.
* LibreOffice: LibreOffice is a free, open-source office app that offers a lot of the same features as Microsoft Office. You can even open Microsoft Word documents, and convert them to PDF.

5) Why convert Word files to PDF?

Ans) Word files (.doc or docx) can be easily edited, while PDF files (.pdf) require special apps to make edits. So, if you plan to send a document like a resumé, rent agreement, bill, or research paper that you don’t want to be edited, PDF is an ideal choice.
Secondly, if you use a fancy font in Word files, the same may look different if someone opens that file in some other Word app on a mobile or computer. However, PDF is great for preserving style, format, and looks.

Besides that, certain websites like those related to tax and such might only allow you to upload PDF files. If you try to upload a Word file, it will show an error.
So, if you want to change a Word document to PDF due to a specific reason or one mentioned above, here are some safe, free, and swift ways to do that.

Also Read: How to Remove Password from PDF?

Also Read: Secret Essential Windows Keyboard Shortcut Keys You Didn’t Know Existed on Your Keyboard

Motorola teases Razr 2023 smartphone launch, to feature a larger cover display & Higher Refresh Rate

0
Motorola Razr+ (2023)

HIGHLIGHTS

* The upcoming phone will likely launch as the Motorola Razr+ 2023 in some regions, including China and Canada.
* The foldable will be powered by the Qualcomm Snapdragon 8+ Gen 1 SoC.
* It will feature a new and improved cover display which is expected to measure 3.2 inches.
* The Moto Razr+ 2023 is tipped to feature a larger secondary display.
* The device might be powered by Snapdragon 8+ Gen 1 processor.
* The handset is expected to run Android 13 OS with My UX on top.

Motorola has recently announced the upcoming release of its new foldable screen phone, the Moto Razr 2023.

The company claims that the phone represents the “ultimate form of small foldable screens” due to its large external screen and high screen-to-body ratio. Although the release date of the vertical foldable has not yet been confirmed, it is speculated that the phone will launch sometime next month and feature a familiar design, as depicted in a teaser poster on Weibo.

Motorola Razr Pro


While the teaser poster does not disclose the device’s name, it is likely that the phone will be called the “Moto Razr Pro 2023” or the “Razr 40 Ultra”. One of the most notable features of the Moto Razr 2023 is its nearly edgeless cover display, which is rumored to be 3.26 inches in size, an upgrade from the 2.7-inch OLED panel on the Motorola Razr 2022.

The Moto Razr 2023 has already obtained certification from several global agencies, and it has also been seen on India’s BIS certification, revealing some critical specifications.


Moto Razr 2023

Lenovo-owned Motorola is preparing for the launch of the new phone in the Moto Razr series. The upcoming handset is tipped to be named as the Moto Razr+ 2023, and the company has now officially teased the arrival of this smartphone.

Though the brand has not revealed the launch date of the phone yet, it has posted a teaser on Weibo revealing that the handset will have a large external display and a higher refresh rate. As disclosed by Motorola through the teaser, the upcoming Razr+ 2023 will have a vertical folding design.

Motorola Razr 2023 Specifications (ZRumoured)

Moto Razr 2023

The Moto Razr 2023 is rumoured to come with a 6.7-inch OLED foldable panel with Full HD+ resolution and a 120Hz refresh rate. The handset will feature a much larger cover display standing at 3.26 inches, which is said to span half the length of the phone.

At its heart, the Razr 2023 will likely be powered by the Qualcomm Snapdragon 8+ Gen 1 SoC paired with up to 12GB RAM and 256GB storage. As for the cameras, the Razr 2023 is expected to retain the dual-camera setup with a 50MP primary camera with support for Optical Image Stabilization (OIS), along with a secondary 13MP ultra-wide-angle camera. The handset will also come with a 32MP camera for selfies and video calls.

Moto Razr 2023

The handset will ship with Motorola My UX 5 based on Android 13 out of the box along with a promise of 2 future Android version updates. The handset passed China’s quality certification center, revealing that it will have a 3,640mAh battery and support 33W fast charging.

6-72
8-44
5-92
6-72 8-44 5-92

MOTOROLA RAZR 2023 KEY SPECIFICATIONS

Key Specs

RAM 8 GB
Processor Qualcomm Snapdragon 8 Plus Gen 1
Rear Camera 64 MP + 13 MP
Front Camera 32 MP
Battery 4000 mAh
Display 6.7 inches (17.02 cm)

General

Launch Date June 21, 2023 (Unofficial)
Operating System Android v12

Performance

Chipset Qualcomm Snapdragon 8 Plus Gen 1
CPU Octa core (3.2 GHz, Single core, Cortex X2 + 2.75 GHz, Tri core, Cortex A710 + 2 GHz, Quad core, Cortex A510)
Architecture 64 bit
Fabrication 4 nm
Graphics Adreno 730
RAM 8 GB

Display

Display Type P-OLED
Screen Size 6.7 inches (17.02 cm)
Resolution 1080 x 2400 pixels
Aspect Ratio 20:9
Pixel Density 393 ppi
Screen Protection Corning Gorilla Glass v5
Bezel-less display Yes with punch-hole display
Touch Screen Yes, Capacitive Touchscreen, Multi-touch
Refresh Rate 144 Hz

Design

Waterproof Yes, Splash proof

Camera

MAIN CAMERA
Camera Setup Dual
Resolution 64 MP, Primary Camera
13 MP, Ultra-Wide Angle Camera
Autofocus Yes
Flash Yes, LED Flash
Image Resolution 9000 x 7000 Pixels
Settings Exposure compensation, ISO control
Shooting Modes Continuous Shooting
High Dynamic Range mode (HDR)
Camera Features Digital Zoom
Auto Flash
Face detection
Touch to focus
FRONT CAMERA
Camera Setup Single
Resolution 32 MP, Primary Camera

Battery

Capacity 4000 mAh
Type Li-Polymer
Removable No
Quick Charging Yes, Fast
USB Type-C Yes

Storage

Internal Memory 128 GB
Expandable Memory No

Network & Connectivity

SIM Slot(s) Dual SIM, GSM+GSM
SIM Size SIM1: Nano, SIM2: Nano
Network Support 5G Not Supported in India, 4G Supported in India, 3G, 2G
VoLTE Yes
SIM 1
4G Bands:
TD-LTE 2300(band 40)
FD-LTE 1800(band 3)
3G Bands:
UMTS 1900 / 2100 / 850 / 900 MHz
2G Bands:
GSM 1800 / 1900 / 850 / 900 MHz
GPRS:
Available
EDGE:
Available
SIM 2
4G Bands:
TD-LTE 2300(band 40)
FD-LTE 1800(band 3)
3G Bands:
UMTS 1900 / 2100 / 850 / 900 MHz
2G Bands:
GSM 1800 / 1900 / 850 / 900 MHz
GPRS:
Available
EDGE:
Available
Wi-Fi Yes, Wi-Fi 4 (802.11 b/g/n)
Wi-Fi Features Mobile Hotspot
Bluetooth Yes, v5.2
GPS Yes with A-GPS, Glonass
NFC Yes
USB Connectivity Mass storage device, USB charging

Multimedia

Loudspeaker Yes
Audio Jack USB Type-C

Sensors

Fingerprint Sensor Yes
Fingerprint Sensor Position On-screen
Fingerprint Sensor Type Optical
Other Sensors Light sensor, Proximity sensor, Accelerometer, Compass, Gyroscope

Faqs on Moto Razr + 2023

1) Moto Razr+ 2023 Launch Teased? details

Ans) The teaser revealed by Motorola doesn’t explicitly reveal the name of the upcoming Razr handset. However, as mentioned above, the device could debut as the Moto Razr+ 2023, or as the Motorola Razr 40 Ultra. As far as the specifications go, the phone is said to feature a larger external display than 2.7-inches, which the Moto Razr 2022 has. Under the hood, the smartphone is expected to come with Snapdragon 8+ Gen 1 SoC. The handset is said to pack up to 8GB or 12GB of RAM. Furthermore, the phone is tipped to run Android 13 OS with My UX on top. As far as the other details of the device go, it is tipped to ship with a 3,640mAh battery which could offer 33W fast charging support.

Recently, the device also had made an appearance at India’s BIS certification with the model number XT2321-1. As mentioned above, the official launch date of the Moto Razr+ 2023 is vet to be revealed by Motorola. However, now that the company has started teasing the handset, we can expect its launch to happen in the upcoming few weeks.

2) What are the specifications of Moto Razr +2023?

Ans) The upcoming Moto Razr+ 2023 will succeed the Moto Razr 2022 which debuted back in August last year. To recall, the device features a 6.7-inches foldable AMOLED display with a Full HD+ 1080 x 2400 pixels resolution. The secondary display on the device is of 2.7-inches and it has a 573 × 800 pixels resolution. Powering the handset under the hood there is a Snapdragon 8+ Gen 1 SoC which is accompanied with a 12GB of RAM and 512GB of internal storage. The handset runs Android 13 out of the box.

In terms of optics department, the handset features a dual-camera setup which consists of a 50MP main camera and a 13MP ultra-wide lens. The other key specifications of the Razr 2022 include a 32MP selfie camera, stereo speaker setup, a 3,500mAh battery, a side-mounted fingerprint sensor, and 30W fast charging support.

Also Read: Motorola Razr+ (2023) To Feature 33W Fast Charging, Revealed by 3C Certification Ahead of Launch

Also Read: Motorola Razr 2023 takes the outer screen to a whole new level, leaked design renders reveal bigger cover display, a probable under-display selfie camera & more

Free Fire Advance Server OB33 update: How to Download OB33 update, release date in India and more

0

Garena has finally announced the details for its new Free Fire advance server update. The popular battle royale game allows users to try out new features before they go public. Through the Free Fire or Free Fire Max Advanced Server OB update, you can experience them in the main application.

The latest version of the Advanced Server, the OB33 update, has a release date for this month. But what is so special about the Free Fire Max OB33 update, what features can you expect and how to register for the Advanced Server OB33 update. Here’s everything you need to know about the Free Fire Advance Server OB33 update, including its launch date and an easy step-by-step guide on how to download it.

What is Free Fire Advance Server OB33 update?

Free Fire Advance Server OB33 update

As we have mentioned (above), Free Fire (Free Fire Max) Advance Server OB33 update is the best way for gamers to experience upcoming, beta features of the game before it releases globally. The new patch called Advance Server OB33 will be available in March 2022. Developers at Garena rely on select users to help them test the game, report any bugs and suggest to them how to make the game even better.

The Advance Server works through a different application, which can be downloaded only from Free Fire’s official website. So, if you love playing Garena Free Fire, don’t miss the chance to explore the yet-to-release features of the game.

Free Fire Advance Server OB33 update release date and time

Free Fire Advance Server OB33 update

Garena Free Fire Advance website has shared the release date for the Advance Server OB33 update. You can head over to the Garena Free Fire website between 10th March and 17th March to register for the latest Advance Server patch. The Advanced Server opening date is 10th March.

How to register for Free Fire Advance Server OB33 update

Free Fire Advance Server OB33 update

Now that you know everything about the Free Fire aka Free Fire Max Advance Server and what it brings to the table. How does one register to experience the new features? We’ve got you covered. Just follow these steps to get started:

* Go to Free Fire Advance Server website.
* Tap on the ‘Login Facebook’ or ‘Login Google’ button (as seen above) to register
* Fill in personal details like Full name, email ID and mobile number
* Click on the Join Now button
* Download the APK file from the website when the server is live
* Install the APK file on your mobile and start playing the test version of Garena Free Fire
* Note: You need to activation code to gain access to the Free Fire Advance server

How to get Free Fire Advance Server activation code

Free Fire Advance Server OB33 update

There is no way you can access the Free Fire Advance Server without having the activation code. So, it is crucial that you register for the Advanced Server when the window opens on 10th March as there are limited Advance Server codes. Many players who register for Free Fire Advance Server access may not get the activation code.

Free Fire Advance Server OB33 registration start and end date

How to download Free Fire Advance Server OB33 update APK for Android (March 2022)

Garena has disclosed the latest registration dates for Free Fire Advance Server OB33. The server goes live on March 10, and it will be available for a period of one week, up to March 17th. Use this time to test the new features and report bugs to the developer.

Why is Free Fire Advance Server a big deal?

Getting early access to any feature helps gamers acclimatise to the new settings quicker, giving them an edge over other players when the feature officially rolls out. You can also try new tools, weapons that are being developed behind the scenes, and get a feel of what is coming in the next few weeks. Advance Server is your gateway to achieve more success on Garena Free Fire and win more rewards.

Information about Free Fire Advance Server OB33 update APK Direct download link and procedure

The steps specified below can help users download the Advance Server:

Step 1: First, users must reach the official Advance Server of Garena Free Fire.

Step 2: As a next step, individuals must sign in via the platform they used in registration.

Step 3: A ‘Download APK’ button will be displayed, and clicking on it will begin the download process.

They can subsequently install the file on their devices. Individuals can then open it and enter the Activation Code to enjoy the OB33 Advance Server.

Note: It is necessary to have the Activation Code to access the Advance Server.

Features

A few of the features of the Advance Server include:

1) Mystery Character

Ability: Swordsman’s Wrath
The Mystery Character in the OB33 Advance Server has the Swordsman’s Wrath ability, which is of the active type. Upon usage, it creates a shield, blocking weapon damage coming from the front. However, it resets when users fire a shot.

2) Weapons

There are also two new firearms, the G36 and the F2000. Both are in the AR category and have their functionality. The former has two distinct firing modes, whereas the latter is very stable and balanced.

3) Zasil pet

Skill: Extra Luck
Zasil is the name of the new pet, and while it is equipped, players have a 25% chance of receiving a new inhaler, medkit, or repair kit after using them. However, it has a 120-second cooldown. Readers can learn more about the Advance Server features

FAQs

1) Not able to download Free Fire OB32 Advanced Server?

Ans) Since there is limited access to Free Fire Advance Server, you may not be able to check upcoming features this time. However, you can register for the next Advance Server update, when Garena officially announces it.

2) Will Garena delete Free Fire account if you get Free Fire OB33 Advance Server access?

Ans) Thankfully, anyone registering for Free Fire OP33 Advance Server will not lose their Garena Free Fire account. The company has made it clear that a user will retain their Free Fire account, even if they are able to test using the Advance Server OB33.

3) What is the difference between Free Fire Advance and Free Fire?

Ans) The difference between Free Fire Advance and Free Fire is that the first one offers an advanced server with experimental weapons and features that are not available in the final version of Free Fire or Free Fire Max.

4) Do I need an invitation code to play Free Fire Advance?

Ans) Yes. You need an invitation code to play Free Fire Advance for free. Without it, you can download and install it, but you won’t be able to access the server and, thus, play.

5) How can I get an activation code?

Ans) To get an activation code to play Free Fire Advance you need to place a specific request on their official site. It is not recommended to trust any other site that claims to offer codes.

6) How do I download Free Fire Advance on Android?

Ans) To download Free Fire Advance on Android, just enter the Uptodown catalog and find the APK file. After you download the APK, you can finish the installation as long as you’ve allowed the installation of external applications on your Android device.

7) When does the advanced Free Fire Advance server open?

Ans) The advanced Free Fire Advance server opens in July 2022. In order to request access to the server, you’ll need to be registered on the official website. After you request access, you’ll receive a code that you can use to enter and enjoy the game.

8) How do I install the advanced Free Fire Advance server?

Ans) To install the advanced Free Fire Advance server, you must first request access from the official Free Fire Advance website. Once you get the access code for the server, you can play without any problems. The game can be installed by anyone.

Also Read: Sigma Free Fire Lite APK Download link : Download latest version Sigma Battle Royale apk, Read All Details Below

Also Read: How to Hack Free Fire Diamond for Garena Free Fire?

Instagram Reels Video Download: How to Download Instagram Reels Online on Mobile and Laptop

0
Instagram Reels Video Download:

Highlights

  • Instagram Reels is a feature of the social media platform Instagram that allows users to create and share 15-second video clips with a range of creative tools and effects.
  • Reels has experienced rapid growth since its launch in August 2020, with over 220 million Reels created in September 2021 alone.
  • Reels can be a valuable tool for businesses looking to showcase their products and services in a creative and engaging way and have been shown to increase engagement compared to regular Instagram posts.
  • Music is a key feature of Reels, with over 75% of Reels including a music track.
  • In this article, we are sharing everything you need to know about Instagram Reels and how to download them online on Mobile and Laptop so that you can refer to them later.

Since its introduction, Instagram Reels has become one of the most popular and engaging social media features. One of the main reasons for the popularity of Instagram Reels is that it provides a fun and creative way for users to express themselves. With features like AR effects and music tracks, users can easily create high-quality videos that are sure to capture the attention of their followers.

Another reason for the success of Instagram Reels is that it provides an opportunity for businesses to connect with their audience in a more engaging way. Brands can use Reels to showcase their products or services, share behind-the-scenes glimpses, and promote their offerings in a way that is both informative and entertaining.

As Instagram Reels continues to gain popularity, many users want to know how to download their favourite videos. Whether you want to save a Reel for later or share it on other platforms, downloading Instagram Reels is a simple process that can be done in just a few steps.

In this blog, we will discuss everything you need to know about Instagram Reels and how to download them so that you can enjoy all the benefits that this exciting feature has to offer.

However, before we get to that, let’s take a closer look at the Instagram Reel feature itself.

What are Instagram Reels?

Introducing Instagram Reels | Meta

In 2020, Instagram introduced a new feature called Reels, and it has since become a popular way for users to create and share short-form videos. Instagram Reels allows users to create 15-second video clips that can be edited with various filters, music, and effects.

These short videos are perfect for sharing quick, attention-grabbing content that can engage viewers and increase engagement.

With Reels, users can add music from Instagram’s music library or their own original audio, and choose from a range of visual effects and filters to enhance their videos. Reels also allow users to speed up or slow down their footage and adjust the timing of their transitions.

Instagram Reels Video Download

One of the key features of Reels is the ability to share them on the Explore page, where they can be discovered by a wider audience. This feature allows users to reach new followers and grow their online presence beyond their existing network.

Reels can also be a valuable marketing tool for businesses, as they provide a unique opportunity to showcase products or services in a creative and engaging way. Brands can use Reels to create product demos, tutorials, or behind-the-scenes glimpses into their operations, helping to build a stronger connection with their followers and attract new customers.

Whether you’re a casual user looking to have fun with video content or a business owner looking to promote your brand, Reels provides a powerful tool for sharing your message with the world.

Instagram Reels Stats

Instagram Reels Video Download

  • In its first year, Reels experienced rapid growth, with Instagram reporting that users created over 220 million Reels in September 2021 alone.
  • In a survey conducted by Instagram, 81% of users said that Reels helped them discover new products or services.
  • Brands have also embraced Reels, with 65% of the top-performing Reels including a product or service featured.
  • The use of music is a key feature of Reels, with over 75% of Reels including a music track.
  • Instagram has made a concerted effort to promote Reels, featuring it prominently on the Explore page and in user feeds.
  • Reel content has been shown to be highly engaging, with a study finding that Reels receive 17.2% more engagement than regular Instagram posts.
  • The most popular Reels categories include dance, comedy, and beauty and fashion, with these topics consistently performing well on the platform.
  • Reels have also been used to promote social causes and raise awareness, with many users creating Reels that educate and inform their followers about important issues.

How to Download Instagram Reels Online on Mobile and Laptop?

Instagram Reels Video Download

Sure, here’s a step-by-step guide on how to download Instagram Reels online on mobile and laptop:

On Mobile

  • Open the Instagram app on your mobile device.
  • Find the Reel you want to download.

Instagram Reels Video Download

  • Tap the three dots in the top right corner of the Reel.

Instagram Reels Video Download

  • Select “Copy Link” from the options that appear.
  • Open your preferred Instagram Reels downloader app or website.

Instagram Reels Video Download

  • Paste the link you copied from Instagram into the downloader.
  • Select the quality and format in which you want to download the Reel.
  • Click the “Download” button.
  • Once the download is complete, you can find the Reel in your device’s gallery.

On Laptop or Computer

  • Open Instagram on your web browser and log in to your account.

Instagram Reels Video Download

  • Find the Reel you want to download.
  • Click on the Reel to open it.

Instagram Reels Video Download

  • Copy the URL from the web browser’s address bar.
  • Open your preferred Instagram Reels downloader website on your laptop.

Instagram Reels Video Download

  • Paste the copied URL into the downloader’s text box.
  • Choose the format and quality in which you want to download the Reel.
  • Click the “Download” button.
  • Once the download is complete, the Reel will be saved in your laptop’s default download folder.

And that’s it! By following these simple steps, you can easily download Instagram Reels on both mobile and laptop devices.

Popular Instagram Reels Downloader Websites and Apps

Instagram Reels Video Download

Instagram Reels downloader apps and websites are becoming increasingly popular as more people want to save and share their favourite Reels. With these tools, you can easily download Instagram Reels and watch them offline anytime you want.

There are many different apps and websites available that allow you to download Reels, and they all offer different features and capabilities. Some are free and some require a fee, but all are easy to use and can save you time and frustration.

Whether you’re using an app on your phone or a website on your computer, Instagram Reels downloader tools are a great way to enjoy your favourite content on your own terms.

Here are some popular Instagram Reels downloader websites and apps along with a brief description of each:

Instagram Reels Video Download

InstaDownloader.co – This website allows you to download Instagram Reels quickly and easily without any extra software. You just need to copy the link of the Reel you want to download and paste it into the website to start the download.

Instagram Reels Video Download

Snapinsta.app – This website is another popular option for downloading Instagram Reels. It offers a simple interface and lets you choose the resolution and format of the Reel before downloading it.

Instagram Reels Video Download

Video Downloader for Instagram – This app is available for both Android and iOS and is one of the most popular apps for downloading Instagram Reels. It has a simple interface and allows you to download Reels with just a few clicks.

Instagram Reels Video Download

InSaver for Instagram – This app is available for Android and iOS and allows you to save not only Instagram Reels but also other content like photos and videos. It offers a simple and user-friendly interface and lets you save content with just one tap.

These are some of the most popular Instagram Reels downloader websites and apps available. They are all free and easy to use, making it simple for you to download and save your favourite Reels to watch later.

How To Download Your Own Instagram Reels?

How to Download Instagram Reels on iPhone, Android, and Desktop

If you posted an Instagram Reel a while back and now want to use that video for something else or share it on your other social media accounts. Here’s how to download your own Instagram Reels that are already Live on your account –

  • Open Instagram and go to your account.

Instagram Reels Video Download

  • Navigate to the Reels tab.
  • Find the Reel you want to save, then tap on it to open the video up in full-screen mode.
  • Tap on the three dots in the bottom right corner to pull up the menu.

Instagram Reels Video Download

  • Tap the Save to Camera Roll option.
  • Once done, the Reel will automatically save to your device.

How to Save Instagram Reels on Your Phone without Third-Party Apps?

Here’s a step-by-step guide on how to save Instagram Reels on your phone app without third-party apps to watch later:

  • Open the Instagram app on your mobile device.
  • Scroll through your feed until you come across an Instagram Reel that you want to save.
  • Tap the Reel to start playing it.

Instagram Reels Video Download

  • In the bottom right corner of the screen, you’ll see three dots. Tap on these dots.

Instagram Reels Video Download

  • A menu will appear. Tap “Save” to save the Reel to your device.

Instagram Reels Video Download

  • You can then find the saved Reel by going to your profile and tapping on the three horizontal lines in the top right corner of the screen.
  • From the menu that appears, select “Saved.”

Instagram Reels Video Download

  • All of your saved Instagram Reels will appear on this screen.
  • To watch a saved Reel, simply tap on it and it will start playing.

And that’s it! By following these simple steps, you can easily save Instagram Reels to your device and watch them later at your convenience.

Reels Downloader app from Ezapo Technologies is also a great app to download Instagram Reels on your Android smartphone. The app offers a simplistic UI and it directly saves all the Instagram Reels on your device. The best part about it is that it doesn’t bombard you will ads, which is a common problem with most of these applications.

Apart from downloading Reels, you can save high-quality photos and videos as well. One can also re-post, share, delete photos and videos right from the application. Here’s how to use this application:

Open the Instagram application on your Android smartphone and search for the favourite reel you want to download. Now click on the three-dot at the bottom and then tap on the copy link. Go to the Reels Downloader application and simply paste the link there. The Reel video will start downloading on your Android device.

FAQs

Q1. Can you download the Instagram Reels video from a private account?

Answer. Instagram Reels video download from the private account is only possible if it’s on your follower’s list. Otherwise, there is no provision to download Instagram Reels videos from a private account, at least for free. Ingramer asks for a subscription to save the video from the social networking site’s private account.

Q2. What are the rules for Insta reels?

Answer. You can share to Feed so only your followers can see your reel. People will not be able to use original audio from your reels, and people cannot share your reels with others who don’t follow you.

Q3. What is the video file format of Instagram Reels?

Answer. Instagram Reels video supports only two video file formats at the moment: MP4 and MOV.

Q4. How to record a Reel on Instagram?

Answer. To record a reel, follow the below-mentioned steps –

  • Tap on new Create on the left.
  • Tap on Post.
  • Tap on “Select from computer” and choose the content that you want to share from your device. Click media in the bottom right, then click add to add another file.
  • Tap on Next in the top right. From here, you can a) Use the slider on the right, below the Cover photo, to choose a cover photo from the clip or click Select from computer to choose one on your device. b) Use the slider on the right, below Trim, to trim the beginning or end of your clip.
  • Tap on Next in the top right. Here you can write a caption, add a location, tag people, add alternate text and adjust your post’s settings.
  • Tap on Share in the top right.

Note that you can record one or multiple clips that add up to 90 seconds. The progress bar at the top shows how long you’ve recorded. If you share your reel to Explore, it can also be seen in the Reels section of your profile.

Q5. What is the maximum video file size of Instagram Reels?

Answer. Instagram Reels video supports a maximum file size of 4GB. Anything north of that will end up making the video a little shabby on the social networking platform.

Q6. How to share Instagram Reels videos on Facebook?

Answer. Instagram allows you to share Reels videos to other apps like Facebook, without going through the trouble of downloading or saving them on your device. To share your Instagram Reels video on Facebook, follow the steps below –

  • Go to your Insta feed and open the Reels video
  • Now, click on the three-dot icon and tap ‘Post to other apps’
  • Toggle the button next to Facebook to share Instagram Reels videos on Facebook

If you’re looking to share an Instagram Reels video posted by others, go to the Reels section and look for three dots –> select ‘Share to’ from the screen that pops up, followed by a Facebook app. This way you’ll be able to post Instagram Reels videos on Facebook.

Q7. What are the Insta Reels dos and don’ts?

Answer. Reels is a unique opportunity as short videos can be an unparalleled branding opportunity. There are some important Do’s and Don’ts to follow when creating Reels.

The Do’s 

  • Do use all the tools. Take full advantage of the filters, GIFs, text tools, and available audio tracks. Your Reels will be more authentic when making total usage of the tools.
  • Do add hashtags. Consider not only which ones are relevant to your content and existing audience but also your target audience. Use hashtags that put your content in front of new people primed to discover your property.
  • Do share to your feed. At first, always cross-post Reels to the feed. It will make your content more accessible and visible to your followers and other users on the Explore Page. You can always remove the Reel from your grid later if it doesn’t fit in with your aesthetic. Or here’s a hack: include a one-second frame at the start of the Reel so that your grid’s flow is uninterrupted.
  • Do it for the right reasons. If you’re doing Reels because it’s the hot new thing, you’ll be less successful. Instead, create for the format! Observe what’s popular – and then see how to add your brand into the mix in an engaging and appropriate way.

The Don’ts

  • Don’t repost from TikTok. It’s tempting to save time and money by reposting a TikTok to IG (or a Reel to TikTok). That’s not a good idea! Videos with the TikTok logo are most likely dinged in Instagram’s algorithm, and this will defeat the purpose of reaching a wider audience. The same goes for posting a Reel to TikTok.
  • Don’t use big borders or too much text. The IG algorithm will also deprioritize Reels that are primarily text or that have chunky frames. That’s because it goes against the aesthetic and intention of the format. Since it’s not what people expect, your Reel won’t be recommended to others.
  • Don’t use outside music. You should also avoid using audio that’s not from the Instagram music library. If you do, at least make sure that you have full rights to it, which means that it’s original audio or you’ve purchased a license. Otherwise, you risk the video getting flagged and potentially removed.

Q8. How to add audio in Instagram Reels?

Answer. Mix your own audio with music or someone else’s original audio in your reel on Instagram

  • Tap Music and select a song.
  • Tap Voiceover to add a voiceover.
  • Tap Sound Effects and select the sound effect you want to add, then tap Done at the bottom.

Q9. Why don’t I have Reels on Instagram?

Answer. You won’t have Reels If you are using an outdated version of Instagram. So update it to the latest version.

Also Read: Instagram Will Allow Users To Put 5 “Links In Bio”, Confirms Mark Zuckerberg: Here’s How to do it

Also Read: How to Check If Someone Blocked You on Instagram?

Also Read: How to Restore Your Deleted Instagram Posts?

Google Pixel 7a to get Face Unlock feature, reveals new leak

0
Google Pixel 7a

HIGHLIGHTS

* As per a leak, the Google Pixel 7a will come with a face unlock feature out of the box.
* Pixel 7a expected to be available immediately after the announcement on May 10th.
* Pixel 7a is tipped to cost $499 (approx Rs 41,000).

Google is all set to launch its new Pixel A-series smartphone, the Pixel 7a, next month at the company’s Google I/O 2023 conference. While key details about the phone have leaked in the past, the company is likely to introduce incremental changes to the design of its entry-level Pixel phone, while upgrading the hardware and software.

Google Pixel 7a

One of the key areas where the Pixel 7a is expected to receive an upgrade over its predecessor, the Pixel 6a, is in terms of face unlock support. The Pixel 6a lacked an Al-based facial recognition system to unlock the phone, but with the Pixel 7a, Google is reportedly adding this feature for user convenience.

According to tipster Snoopy Tech, who shared some UI images of the phone, the Pixel 7a will have a flat display with a hole-punch cutout at the top centre and slightly thicker bezels.

Additionally, the phone will offer two types of biometric authentication methods, including the face unlock feature along with an in-display fingerprint sensor.

Google Pixel 7a Specifications (Expected)

Google Pixel 7a

The Google Pixel 7a is expected to come with a 6.1-inch OLED panel with a Full HD+ resolution and a 90Hz refresh rate. The handset will likely be powered by Google’s in-house Tensor G2 SoC and paired with up to 8GB LPDDR5 RAM and 128GB of UFS3.1 storage.

The handset is said to feature a dual camera setup on the back with a new 64MP primary camera along with a 13MP ultra-wide angle sensor. For selfies and video calls, the Pixel 7a will likely rely on an updated 12MP sensor. Other notable features on the handset include 5G, 4G, WiFi6, wireless charging, Android 13 out of the box with the promise of 3 future Android version updates, and a sizeable 4,500mAh battery with support for 18W charging.

5-90
4-107
2-123
5-90 4-107 2-123

GOOGLE PIXEL 7A KEY SPECIFICATIONS

General

Launch Date April 27, 2023 (Unofficial)
Operating System Android v12

Performance

Chipset Google Tensor G2
CPU Octa core (2.8 GHz, Dual core, Cortex X1 + 2.25 GHz, Dual core, Cortex A76 + 1.8 GHz, Quad core, Cortex A55)
Co-Processor Titan M2
Architecture 64 bit
Fabrication 5 nm
Graphics Mali-G78 MP20
RAM 8 GB

Display

Display Type OLED
Screen Size 6.1 inches (15.49 cm)
Resolution 1080 x 2400 pixels
Aspect Ratio 20:9
Pixel Density 431 ppi
Bezel-less display Yes with punch-hole display
Touch Screen Yes, Capacitive Touchscreen, Multi-touch
Refresh Rate 90 Hz
Screen to Body Ratio (claimed by the brand) 84.3 %

Design

Waterproof Yes, Water resistant, IP67
Ruggedness Dust proof

Camera

MAIN CAMERA
Camera Setup Dual
Resolution 12.2 MP f/1.7, Primary Camera
12 MP f/2.2, Ultra-Wide Angle Camera
Autofocus Yes
Flash Yes, LED Flash
Image Resolution 4000 x 3000 Pixels
Settings Exposure compensation
Shooting Modes Continuous Shooting
High Dynamic Range mode (HDR)
Camera Features Digital Zoom
Auto Flash
Face detection
Touch to focus
Video Recording 3840×2160 @ 30 fps
1920×1080 @ 30 fps
FRONT CAMERA
Camera Setup Single
Resolution 8 MP f/2, Primary Camera
Video Recording 1920×1080 @ 30 fps

Battery

Capacity 4410 mAh
Type Li-Polymer
Removable No
Wireless Charging Yes
Quick Charging Yes, Fast
USB Type-C Yes

Storage

Internal Memory 128 GB
Expandable Memory No

Network & Connectivity

SIM Slot(s) Dual SIM, GSM+GSM
SIM Size SIM1: Nano, SIM2: Nano
Network Support 5G Not Supported in India, 4G Supported in India, 3G, 2G
VoLTE Yes
SIM 1
4G Bands:
TD-LTE 2300(band 40)
FD-LTE 1800(band 3)
3G Bands:
UMTS 1900 / 2100 / 850 / 900 MHz
2G Bands:
GSM 1800 / 1900 / 850 / 900 MHz
GPRS:
Available
EDGE:
Available
SIM 2
4G Bands:
TD-LTE 2300(band 40)
FD-LTE 1800(band 3)
3G Bands:
UMTS 1900 / 2100 / 850 / 900 MHz
2G Bands:
GSM 1800 / 1900 / 850 / 900 MHz
GPRS:
Available
EDGE:
Available
Wi-Fi Yes, Wi-Fi 4 (802.11 b/g/n)
Wi-Fi Features Mobile Hotspot
Bluetooth Yes
GPS Yes with A-GPS, Glonass
NFC Yes
USB Connectivity Mass storage device, USB charging

Multimedia

Loudspeaker Yes
Audio Jack USB Type-C

Sensors

Fingerprint Sensor Yes
Fingerprint Sensor Position On-screen
Fingerprint Sensor Type Optical
Other Sensors Light sensor, Proximity sensor, Accelerometer, Compass, Gyroscope

Faqs on Google pixel 7a

1) Google Pixel 7a leak points to Face Unlock support ?

Ans) With the Google Pixel 7a moving ever closer to launch, the leak cycle for the mid-range phone has been ramping up. The latest leak seems to indicate that the Pixel 7a will be Google’s first affordable phone with Face Unlock.

Face Unlock for the Google Pixel series debuted on the Pixel 4 lineup, but the feature didn’t return the following year. And while there were quite a few signs that Google had every intention of bringing Face Unlock to the pixel 6 series ,didn’t see the convenient feature arrive again until the Pixel 7 and Pixel 7 Pro.

All the while, Google’s affordable A-Series Pixel phones have thus far only featured fingerprint sensors to supplement the usual Pattern/PIN unlock options. Last year’s Pixel 6a was a step up in technology (but maybe not in quality) from the Pixel 5a before it, as Google switched to using an under-display fingerprint sensor.

By all indications, the Pixel 7a should also feature an under-display sensor, but according to the latest leaked images, it may also have another way to unlock. New (blurry) alleged images of the Pixel 7a shared by leaker snoopy tech some of the phone’s menus, including options for “Face & Fingerprint Unlock.”

If these images are to be believed, this will mark the most affordable Pixel phone to feature Face Unlock. That said, we’ve been down this road before with the Pixel 6 series. It’s still entirely possible for Google to remove this feature from the Pixel 7a before launch.
Presumably, the Face Unlock would work on the same principle as it does on the Pixel 7 and 7 Pro. On those phones, the front-facing camera’s dual-pixel nature better ensures that what the phone sees is a 3D face and not something like a 2D picture of you.

2) What are the specifications of google pixel 7a?

Ans) As for the rest of the specifications, the Pixel 7a is expected to get a 6.1-inch FHD+ AMOLED panel with a 90Hz refresh rate, and be offered with a dual-camera setup, including a main wide lens and a secondary ultrawide unit.

Based on the leaked renders, the phone could also offer relatively symmetrical bezels, minimizing the chin—and increasing the overall screen-to-body ratio. As for the price, leaks have pointed towards a sticker price of $499, which would represent a $50 price hike, up from the $449 price of the Pixel 6a.

Also Read: Google Pixel 7a Full Images Revealed, Showcases Colour Options and Design via Renders Ahead of Launch

Also Read: Google Pixel 7a Tipped to Launch in Five Colour Options, 256GB Storage Option Ahead of I/O 2023 Event

Realme 11 Pro+ Confirmed to Sport dedicated Moon Mode Ahead of Launch: Teaser Suggests

0
REALME 10 PRO
REALME 10 PRO

HIGHLIGHTS

* Realme 11 Pro+ is expected to launch in China in May
* Leaked specifications have claimed it to feature a MediaTek Dimensity chip
* It is also tipped to come with a 200MP primary camera
* Realme 11 Pro+ is confirmed to come with a Moon mode for photography.
* It has been confirmed by a sample moon shot shared by Realme China Marketing Director, Jessie on Weibo.

Realme is expected to launch a new mid-premium range smartphone that will seek to rival Xiaomi’s Redmi Note 12 series. The smartphone has a potential launch date of May this year, and two devices are expected under the new series – Realme 11 Pro+ and 11 Pro.

Now, building up to the launch, a post on Chinese social media platform Weibo, by the company’s marketing director, has revealed that the smartphone will feature a dedicated ‘Moon Mode’ in its rear camera.

Realme 11 Pro+

Realme 11 Pro+ Moon mode has been confirmed by the brand’s Marketing Director, Jessie. The top executive posted a sample moon shot on China’s microblogging platform, Weibo. Notably, brands like Huawei and Samsung already offer dedicated moon mode on their flagship devices, and Samsung has even received flak for faking moon shots.

Realme itself has dabbled in astrophotography with its dedicated starry night mode, but this is the first time it will offer a dedicated moon mode to its users. Let’s take a look at what’s in store.

Realme 11 Pro+: What we know so far

Realme 11 Pro+

The ‘Moon Mode’ on Realme 11 Pro+ seems to be an interesting addition, since leaks so far had not pointed at the inclusion of a telephoto camera unit on the phone. Now, the smartphone looks set to get a zoom feature that could be akin to Samsung’s ‘Space Zoom’ feature that has been present in its flagship Galaxy S series since the launch of the Samsung Galaxy S21 Ultra.

It’s not clear how the feature will work. General industry trends suggest that Realme may include a telephoto camera unit in the Realme 11 Pro+, and augment this with software enhancements and Al algorithms that optimise the zoom performance specifically to take photographs of the moon.

Details on the matter, however, remain under wraps for now. In terms of leaked specifications, the Realme 11 Pro+ is tipped to feature a 6.7-inch full HD+ 120Hz display, which could feature AMOLED or OLED panel tech. It is tipped to feature an as-yet unannounced Media™ek Dimensity 7000 series chip, which could be clocked at 2.6GHz. This could be paired with up to 16GB RAM and 1TB internal storage on the Realme 11 Pro+.

Realme 11 Pro+

To the rear, the smartphone could feature a 200MP triple rear camera setup, and a 16MP front camera could handle selfie duties. The entire setup could be powered by a 5,000mAh battery, with up to 100W fast charging standards tipped as well. The phone is expected to run on Android 13.

Realme is expected to launch the Realme 11 Pro+ in India following its China launch, when it will replace the Realme 10 Pro+ that is already on sale here. The latter is priced onward of Rs 24,999 in India, so the Realme 11 Pro+ could retain a sub-Rs 30,000 price tag, once launched.

Realme 11 Pro+ Moon Mode Confirmed by Realme China Marketing Director

Realme 11 Pro+

Realme 11 Pro+ is confirmed to come with a dedicated Moon mode for clicking detailed, high-resolution pictures of the moon. As you can see in the picture shared by Jessie, the image of the moon appears quite detailed and sharp, with craters, etc., visible. The Weibo post doesn’t reveal anything else about the camera setup, but we can safely assume that the camera setup also features a telephoto lens.

Previous reports have confirmed that the Realme 11 Pro+ will have a 200MP primary camera. The same executive also shared a teaser of the upcoming smartphone, confirming that it will launch in China in May. The smartphone is also expected to launch in India alongside Realme 11 and Realme 11 Pro. Digital Chat Station has recently revealed some core specifications of the Realme 11 series smartphones.

Realme 11 Pro+

Realme 11 Pro+: Specifications and Everything We Know So Far According to the well-known Chinese tipster, the 11 Pro+ will be powered by the MediaTek Dimesnity 7000 series chipsets. Reportedly, Realme 11 Pro+ will not come with the existing Dimensity 7020 and Dimensity 7200 chipsets but a new Dimensity 7000 series SoC from MediaTek. Apart from this, Digital Chat Station has yet to reveal any further information.

The Realme 11 Pro+ has also cleared the TENAA Certifications and the listing has shed light on several smartphone specifications. According to the listing, the 11 Pro+ bears the RMX3740 model number. It will feature an FHD+, 120Hz curved AMOLED display with an in-display fingerprint scanner. The smartphone will flaunt a triple-rear camera setup, including a 200MP Samsung HPX primary shooter, an 8MP ultra-wide-angle lens, and a 2MP macro sensor. On the front, it will have a 16MP selfie camera.

The listing also confirmed that the smartphone would have a 4,680mAh dual-cell battery and 100W fast charging support. The handset will reportedly offer up to 16GB RAM and 1TB storage. It also runs Android 13-based Realme UI 4.0 out of the box.

REALME 11 PRO PLUS KEY SPECIFICATIONS

Key Specs

RAM 8 GB
Processor MediaTek Dimensity 1200 MT6893
Rear Camera 200 MP + 8 MP + 2 MP
Front Camera 32 MP
Battery 5000 mAh
Display 6.7 inches (17.02 cm)

General

Launch Date June 14, 2023 (Unofficial)
Operating System Android v13
Custom UI Realme UI

Performance

Chipset MediaTek Dimensity 1200 MT6893
CPU Octa core (3 GHz, Dual core, Cortex A78 + 2.6 GHz, Tri core, Cortex A78 + 2 GHz, Quad core, Cortex A55)
Architecture 64 bit
Fabrication 6 nm
Graphics Mali-G77 MC9
RAM 8 GB

Display

Display Type AMOLED
Screen Size 6.7 inches (17.02 cm)
Resolution 1080 x 2412 pixels
Pixel Density 394 ppi
Screen to Body Ratio (calculated) 90.75 %
Bezel-less display Yes with punch-hole display
Touch Screen Yes, Capacitive Touchscreen, Multi-touch
Refresh Rate 120 Hz

Design

Height 161.6 mm Compare Size 
Width 73.9 mm
Thickness 8.2 mm
Weight 185 grams

Camera

MAIN CAMERA
Camera Setup Triple
Resolution 200 MP, Primary Camera
8 MP, Ultra-Wide Angle Camera
2 MP, Macro Camera
Autofocus Yes
Flash Yes, LED Flash
Image Resolution 16300 x 12300 Pixels
Settings Exposure compensation, ISO control
Shooting Modes Continuous Shooting
High Dynamic Range mode (HDR)
Camera Features Digital Zoom
Auto Flash
Face detection
Touch to focus
FRONT CAMERA
Camera Setup Single
Resolution 32 MP, Primary Camera

Battery

Capacity 5000 mAh
Type Li-Polymer
Removable No
Quick Charging Yes, Fast
USB Type-C Yes

Storage

Internal Memory 128 GB
Expandable Memory No

Network & Connectivity

SIM Slot(s) Dual SIM, GSM+GSM
SIM Size SIM1: Nano, SIM2: Nano
Network Support 5G Not Supported in India, 4G Supported in India, 3G, 2G
VoLTE Yes
SIM 1
4G Bands:
TD-LTE 2300(band 40)
FD-LTE 1800(band 3)
3G Bands:
UMTS 1900 / 2100 / 850 / 900 MHz
2G Bands:
GSM 1800 / 1900 / 850 / 900 MHz
GPRS:
Available
EDGE:
Available
SIM 2
4G Bands:
TD-LTE 2300(band 40)
FD-LTE 1800(band 3)
3G Bands:
UMTS 1900 / 2100 / 850 / 900 MHz
2G Bands:
GSM 1800 / 1900 / 850 / 900 MHz
GPRS:
Available
EDGE:
Available
Wi-Fi Yes, Wi-Fi 6 (802.11 a/b/g/n/ac/ax) 5GHz
Wi-Fi Features Mobile Hotspot
Bluetooth Yes, v5.2
GPS Yes with A-GPS
USB Connectivity Mass storage device, USB charging

Multimedia

Loudspeaker Yes
Audio Jack 3.5 mm

Sensors

Fingerprint Sensor Yes
Fingerprint Sensor Position On-screen
Fingerprint Sensor Type Optical
Other Sensors Light sensor, Proximity sensor, Accelerometer, Compass, Gyroscope

Faqs on Realme 11 Pro

1) What are the specifications of Realme 11 Pro +?

Ans) According to the well-known Chinese tipster, the 11 Pro+ will be powered by the MediaTek Dimesnity 7000 series chipsets. Reportedly, Realme 11 Pro+ will not come with the existing Dimensity 7020 and Dimensity 7200 chipsets but a new Dimensity 7000 series SoC from MediaTek. Apart from this, Digital Chat Station has yet to reveal any further information.

The Realme 11 Pro+ has also cleared the TENAA certifications, and the listing has shed light on several smartphone specifications. According to the listing, the 11 Pro+ bears the RMX3740 model number. It will feature an FHD+, 120Hz curved AMOLED display with an in-display fingerprint scanner. The smartphone will flaunt a triple-rear camera setup, including a 200MP Samsung HPX primary shooter, an 8MP ultra-wide-angle lens, and a 2MP macro sensor. On the front, it will have a 16MP selfie camera.

The listing also confirmed that the smartphone would have a 4,680mAh dual-cell battery and 100W fast charging support. The handset will reportedly offer up to 16GB RAM and 1TB storage. It also runs Android 13-based Realme UI 4.0 out of the box.

2) What is Realme 11 Pro + Moon Mode ?

Ans) Realme 11 Pro+ is confirmed to come with a dedicated Moon mode for clicking detailed, high-resolution pictures of the moon. As you can see in the picture shared by Jessie, the image of the moon appears quite detailed and sharp, with craters, etc., visible. The Weibo post doesn’t reveal anything else about the camera setup, but we can safely assume that the camera setup also features a telephoto lens. Previous reports have confirmed that the Realme 11 Pro+ will have a 200MP primary camera.

Also Read: Realme 11 Pro series (Realme 11 Pro+ and Realme 11 Pro) tipped to feature a new MediaTek Dimensity 7000-series chipset

Also Read: Realme 11 series confirmed to launch in May; Realme 11 Pro+ expected to come with 200MP camera

Also Read: Realme 11 Pro+, Realme 11 5G and Realme 11 Pro 5G spotted on BIS , FCC Websites;India launch imminent

How will the to get /use ChatGPT on your iPhone or IPad through this Siri shortcut

0
S-GPT

HIGHLIGHTS

* ChatGPT is one technology that’s got everyone excited and wanting to try out.
* iOS users now have an easy to integrate a ChatGPT directly on their devices.
* Here’s a detailed look at how one can get this ChatGPT shortcut and start using it.

ChatGPT is the talk of the town among tech enthusiasts and even those who are the least bit interested in tech. It also has people excited and wanting to try it out, and you can do just that with this new ChatGPT shortcut that brings the Al chatbot to iOS.

Shortcuts-GPT or S-GPT is a ChatGPT shortcut developed by Federico Viticci who has also explained all the steps required to install it on your Apple device. S-GPT basically gives you access to ChatGPT on iOS, iPadOS, macOS, and watchOS. The shortcut is free to use but it does require you to pay a subscription amount since it is powered by OpenAl. You do get $5 worth of free tokens that can be used up to three months.

For those interested, the pricing is actually not that bad and you end up paying less than $1 dollar for 1,000 tokens.

three different ChatGPT Siri shortcuts — SiriGPT, ChatGPT Siri, and Siri Pro. All of them worked similarly to bring the power of ChatGPT to an iPhone and iPad.

After the shortcut is set up, you’re able to trigger it a few different ways. You can open the Shortcuts app and tap the icon for the shortcut. You can add the shortcut to your Home screen where it’s more easily available. Plus, you can run the shortcut by telling Siri to activate it.

1. Get API keys

The menu displays the option for View API keys

Your first step is to get the necessary API keys from Open AI. These keys are used by a ChatGPT shortcut to send your requests to the ChatGPT service and receive the responses. The process for obtaining the keys is the same no matter which ChatGPT shortcut you use.

On your iPhone or iPad, open Safari and head to Open AI Platform Page .If you don’t already have an account with OpenAI, tap the button for Sign up. Otherwise, tap the button for Log in and sign in with your account. Tap the three line hamburger icon in the upper right, scroll to the bottom of the Settings menu, and select your profile. From the profile menu, tap View API keys.

2. Create new secret key

The API key copied and pasted.

At the API keys screen, tap the button for Create new secret key. Press down on the key to select the entire string and then tap Copy. Open a note and paste the key. If you plan to try more than one ChatGPT shortcut, return to the Open AI platform page, tap OK, and then tap Create new secret key to generate another key. Repeat the copy and paste.

Now, let’s check out each of the three ChatGPT shortcuts.

How to use SiriGPT

1. Get the shortcut

SiriGPT shortcut being added

Open the SiriGPT shortcut page on your device and tap the button for Get Shortcut.
At the shortcuts screen, tap the button for Add Shortcut. The shortcut appears in the Shortcuts app.

2. Add the API key

The API key being pasted

Return to the note in which you pasted one or more of the API keys. Select and copy one set of keys. Back in the Shortcuts app, tap the three-dot icon for the SiriGPT shortcut. In the text field, remove the phrase ADD API KEY HERE and then paste the API key you just copied. Tap Done.

3. Run SiriGPT

The shortcut being run

Tap the SiriGPT shortcut to run it. The first time you do this, you’ll be asked to allow it access to Speech Recognition. Tap Allow.

4. Ask a question 

The response is displayed and spoken

Type or speak your request. Tap Allow when asked to connect to api.openai.com. SiriGPT then displays and speaks the response. Tap Done at any point. Tap Done to stop the chat. Tap Ask Again to ask another question.

How to use ChatGPT Siri

1. Get the shortcut

The shortcut being added

Open the ChatGPT Siri shortcut page in Safari and tap the button for Get Shortcut.
At the shortcuts screen, tap the button for Add Shortcut. The shortcut then pops up in the Shortcuts app.

2. Add the API key

The API key is pasted

Tap the three-dot icon for the shortcut. In the text field, delete the phrase “Replace this with your own API key!” and paste one of the API keys you copied from Open AI. Tap Done.

3. Ask a question 

The response is displayed

Tap the ChatGPT shortcut. Type your request in the text field or speak it by tapping the keyboard’s microphone icon. Allow ChatGPT to connect to api.openai.com. The response then appears on the screen.

How to use Siri Pro

1. Get the shortcut

The shortcut is added

Open the Siri Pro shortcut page in the browser and tap the button for Get Shortcut. At the shortcuts screen, tap the button for Add Shortcut. The shortcut pops up in the Shortcuts app.

2. Add the API key

The API key is pasted

Tap the shortcut’s three-dot icon. In the text field, delete the phrase “GENERATE & ADD YOUR API KEY HERE” and paste an API key that you copied from Open AI. Tap Done.

3. Ask a question 

The response is spoken

Tap the Siri Pro shortcut. Type your request in the text field or speak it by tapping keyboard’s microphone icon. Allow Siri Pro to connect to api.openai.com. By default, the shortcut only speaks the response and doesn’t display it. But if you’re skilled enough with Siri shortcuts, you may be able to tweak this one to display a response on the screen as well.

How to trigger a shortcut from the Home screen

Instead of launching a shortcut through the Shortcuts app, you can more easily trigger it from the Home screen.

1. Add to Home screen

The shortcut is added to the Home screen

To set this up, press down on the icon for one of the ChatGPT shortcuts and select Share. From the Share menu, tap the option for Add to Home Screen. Preview the name and icon for the shortcut and then tap Add.

2. Ask a question

The shortcut run from the Home screen

Tap the icon on the Home screen and then speak or type your request to receive a response.

How to trigger a shortcut through Siri

Siri runs the shortcut

An even quicker way is to run a shortcut through Siri. Simply say: “Hey Siri [name of shortcut].” If Siri doesn’t understand that you want it to run a shortcut due to confusion with the name, then your best bet it to rename the shortcut.

To do this, press down on it in the Shortcuts app and select Rename from the menu. Choose a name that won’t conflict with an existing command. Try calling on Siri again. Speak or type your request and wait for the response.

How to use S-GPT?

S-GPT

First thing that you need to do is create an OpenAI account and set up a pay-as-you-go billing method. Once you’ve done that you will need to create a new secret key for your account from the API Keys page. Then copy the API key and paste it when S-GPT asks you to. There are several ways you can use S-GPT on your iPhone and these include launching it from the Shortcuts app, as an icon on the Home Screen, a widget, or even using it as a shortcut inside Siri.

What does S-GPT do?

S-GPT

Just like ChatGPT, you can ask S-GPT questions directly on your iPhone. A small S-GPT question box will be available where you can type out questions with no word limit. You can ask S-GPT very specific questions and on just about anything. Some of the examples the developer has shared include asking S-GPT to make a list of emo songs released after 2000, and even group them by year, and song title. You can also ask S-GPT to make a travel itinerary for you based on what you like and what you want to do in that city or country.

It takes a few seconds for S-GPT to come back with a detailed response. S-GPT can also hold back-to-back conversations so you can actually have a proper talk asking the chatbot multiple questions at the same time but without leaving the chat. You can also integrate S-GPT with Siri but this isn’t recommended as it would be too data-heavy for the virtual assistant leading to more wait time for responses.

If you own an Apple device and you’re interested in using ChatGPT or want to use it extensively, you can head over to this site and get started. Viticci has asserted how simple the UI and layout of S-GPT is so it shouldn’t be any trouble using the AI chatbot.

S-GPT S-GPT

Faqs on Chatgpt iPhone/ IPad

1) How to sign up for ChatGPT on iPhone?

Ans) Since we did mention OpenAl being at capacity, we have to explain that all ChatGPT users need personal accounts. If you’ve already accessed the chatbot on an internet browser, you have an account ready. That means a username (email address) and a password.

But you can always create an account on your iPhone. Just load up Safari or your iOS browser app of choice and head to chat.openai.com. This is where you’ll be able to sign up for ChatGPT unless the system tells you they’re too busy.

You’ll need an email address to use ChatGPT on your iPhone and anywhere else. And you’ll want to set a strong password. The system will also verify your phone number before it lets you in.
Once that’s done, you can access ChatGPT on your iPhone straight from the browser. The following clip should help guide you through the sign-up process:

2) What about a ChatGPT app for iPhone?

Ans) Unfortunately, there’s no ChatGPT app for iPhone right now. Maybe OpenAI will develop one in the future. Until then, you can just bookmark the link in your browser or enter it manually every time you want to interact with the chatbot.

Remember, however, that the answers ChatGPT will provide might not always be correct. It’s not as accurate as the regular version of Search, so you might want to double-check some of the facts the chatbot provides.

3) How to use a shortcut for ChatGPT on iPhone

Ans) While there’s no ChatGPT app for iPhone, the good news is that you can create a shortcut for it relatively quickly. Fabian Heuwieser made an easy-to-follow tutorial, posting it on Medium a few weeks ago.

You can either replicate the steps as shown in the shortcut or just download the shortcut yourself.

You’ll still need a ChatGPT account to create the iPhone shortcut. That’s because you’ll need your API key from OpenAl, and that’s only available via an account.
Generating the API key is incredibly easy.

All you have to do is log into your ChatGPT account and create an API key for the iPhone. This is where you can create the API key.

Once you retrieve that key, open the Shortcuts app and create the shortcuts just as shown in the screenshots that Heuwieser provides. An alternative is downloading the shortcut at this link. In case you download it, you’ll need your API key handy.

As soon as the shortcut is ready, you’ll be able to interact with ChatGPT on your iPhone without needing the browser. The shortcut will also work on Apple Watch, if you feel like you need access to the chatbot on your wrist.

4) How to use S-GPT on iPhone

Ans) There’s another potentially game-changing ChatGPT shortcut for iPhone and iPad called S-GPT. It works with both ChatGPT-3.5 and ChatGPT-4, so you can load your API regardless of whether you’re on a free OpenAI account or the Plus subscription. Still, those OpenAI requests will require a pay-as-you-go billing plan.

Created by MacStories’ Federico Viticci, S-GPT integrates ChatGPT into native iPhone and iPad features. Once you set it up, you can use S-GPT inside Safari to summarize pages or process text in the clipboard. It also works with the Reminders and Calendars apps and can help you manage your Apple Music.

5) How to integrate ChatGPT into Siri on your iPhone?

Ans) With the emergence of ChatGPT, the expectation is that Apple’s own Siri will evolve similar capabilities in the future. And a version of Siri with features identical to ChatGPT would certainly improve how we use iPhone, iPad, and Mac.

Thankfully, we don’t have to wait for Apple to unveil its own generative AI features built into Siri. Developer Mate Marschalko found a way to incorporate ChatGPT into Siri via a different shortcut. That means you have another option of using ChatGPT on the iPhone in addition to the ones above.

But the Siri trick is limited to performing specific actions via ChatGPT, like controlling a smart home. The Siri-ChatGPT will also answer questions that are related to the home, in addition to controlling your connected devices.

The developer explained his Siri-ChatGPT hack in a blog post on Medium. You’ll be able to follow the instructions along to create a similarly powerful Siri-ChatGPT tool on your iPhone or iPad.

Like Heuwieser’s shortcut above, Marschalko’s instructions are easy to follow. You’ll be able to set up your Siri-ChatGPT shortcuts in no time, although, again, the functionality might be very specific. However, the Siri-ChatGPT solution might be more useful than using Siri alone to manage your smart home.

You can’t talk to Siri-ChatGPT and give it all sorts of questions or commands on the iPhone like on the web. But Marschalko’s work might inspire additional iPhone shortcuts that harvest the powers of ChatGPT via Siri.

6) How to replace Siri with ChatGPT on iPhone?

Ans) The shortcuts above let you either access ChatGPT from your iPhone or Apple Watch or use ChatGPT to manage your smart home.

But there’s another handy shortcut that lets you “replace” Siri with ChatGPT. That way, you can turn to the OpenAI chatbot for information rather than Siri. ChatGPT might not always be reliable, but neither is Siri. And ChatGPT can offer you a better way of interacting with the chatbot on iPhone.

You won’t actually uninstall Siri on your device or replace it. You cannot do that on iPhone, iPad, and Mac. But developer Yue Yang posted on GitHub instructions on how to create a voice shortcut that uses Siri to trigger ChatGPT.

Like the previous steps, you’ll need your OpenAI API key for the shortcut. Once you generate a ChatGPT key for this shortcut, you can download the shortcut directly from GitHub and then customize it.

That’s all it takes to have a fully functional ChatGPT AI bot on iPhone, iPad, and Mac, right alongside Siri.

7) Perplexity AI brings ChatGPT search to iPhone?

Ans) If you only want to use ChatGPT for online searches, install Perplexity AI immediately. The new app offers a clean ChatGPT user interface that lets you ask questions and follow-ups. It provides clear answers complete with links to sources. Perplexity also keeps track of threads, but you can delete the chats at any point.

Even better, Perplexity doesn’t collect any user data from your iPhone. It won’t bother you with ads, and you don’t have to pay an access fee. This sounds too good to be true, and maybe Perplexity will one day monetize its ChatGPT client. And perhaps they should. What’s clear is that the app is a must-have generate iOS tool right now.

8) Petey for iPhone, another great ChatGPT client

Ans) In addition to Perplexity AI, there’s also Petey for iPhone that you should take into account if you want simple ChatGPT action on your handset. Unlike Perplexity, Petey is an app that will cost you a flat fee or a subscription. The app gives you access to ChatGPT’s GPT-3.5 engine, with an upgrade to the GPT-4 model to follow.

Petey for iPhone started on the Apple Watch, but the iPhone is a much better home giving the app better features. Like support for Live Activities. With the help of the Shortcuts app, you can use voice and use Petey as a Siri replacement. The default voice assistant can’t be replaced on iPhone, however.

9) Requirements to Get ChatGPT to Work with Siri?

Ans) 1. Siri ChatGPT Shortcut

The integration of ChatGPT into Siri works through a handy shortcut that will run on your iPhone. As such, it is necessary to download the Siri shortcut. Called Siri Pro, the shortcut is courtesy of YouTuber Tim Harris. While the shortcut is named Siri Pro, you can always rename it to whatever you want. To begin, download the Siri Pro (Get) shortcut but don’t run it yet. Once downloaded, keep reading.

2. ChatGPT API Key

To successfully use ChatGPT’s services with Siri on your iPhone, you need to use its API. ChatGPT’s API key is something you can access through your OpenAI account. To get that, head to the OpenAI API keys page and log in to your account. Here, you will see the option to “Create new secret key.” Click on it to generate an API key to use with Siri Pro.
Once done, copy the OpenAI API key. Do remember that once you copy the key and close the pop-up box, you cannot copy the same API key again. So keep it somewhere safe.
You can also open this website on your iPhone to generate and copy the API key to your clipboard. If you do not have an OpenAI account, you can create one .

10) I followed all the above steps but the shortcut gives no response. What do I do?

Ans) As mentioned above, the ability for ChatGPT Siri to run on your iPhone is dependent on the current server load on the AI chatbot itself. If ChatGPT itself is overloaded, there’s a high chance of the shortcut not giving a response. Wait an hour or two and run the shortcut again.

11) Is this method available for Android?

Ans) As of now, ChatGPT for Siri is only available on iOS. Since this relies on iPhone’s shortcut app, we are yet to discover a similar method for Android fanboys out there. However, rest assured, we will keep you updated if we run into anything.

12) The Shortcut Keeps Telling Me to Add in Your API Key First. What Do I Do?

Ans) As the error, that means you haven’t properly added your ChatGPT API Key yet. Without this, the shortcut cannot communicate with the server.

Also Read: Snapchat’s ChatGPT-like My AI chatbot now available to all global users for free to take on ChatGPT, Google Bard and Bing AI: says the Al will later ‘Snap’ you back

Also Read: How to Earn Money with ChatGPT?

Also Read: How to Use ChatGPT for Tech Related Queries?

Alleged Pixel Fold live video, pricing, sale offers leak ahead of May 10th launch

0
Google Pixel Fold

HIGHLIGHTS

* Google Pixel Fold is expected to be released at the upcoming Google I/O on May 10th
* An alleged live video has surfaced of the Google Pixel Fold, showcasing the inner and outer displays
* A separate leak has uncovered the Google Pixel Fold price, colour variants and sale offers
Google is expected to formally announce its first-ever foldable phone, the Google Pixel Fold, at the Google I/O event in Mountain View, California, on May 10th. Ahead of that, two separate leaks by reliable tipsters Kuba Wojciechowski and Jon Prosser (Front Page Tech) have pretty much revealed everything about the phone, including its design, pricing details and key specs.

Google Pixel Fold live video

Google Pixel Fold

Kuba (who’s been leaking a lot of information related to the Pixel Fold in the past) has uploaded a six-second clip of a foldable on Twitter, which he claims is the first live look of Google’s first foldable.

We’d earlier seen the Pixel Fold leak in renders , and apparently in the hands of a communter on the New York Subway, but this could be our best look yet. While there is no logo or the classic Google camera module to distinguish that this indeed is the Pixel Fold, what we do see is the selfie camera, thick internal bezels and rounded edges. The video on the internal screen is blurred, but we do get an idea of the form factor.

As per previous leaks, the Pixel Fold is expected to weigh around or 283gms, which is about 20gms heavier than its closest competitor, the Samsung Galaxy Z Fold4. The Pixel Fold dimensions when folded are expected to be 5.5 height x 3.1 width x 0.5 depth (inches). We don’t know the exact dimensions unfolded yet.

Pixel Fold Price, Colours (Leaked)

Google Pixel Fold

As per Jon Prosser the Pixel Fold price will be $1,799 (over Rs 1.47 lakh)  for the 12GB/256GB model in Chalk and Obsidian colours. The Google Pixel Fold 12GB/512GB is expected to be available for $1,919 (over Rs 1.57 lakh) in Obsidian only. As per Prosser, there is a free Pixel Watch for all those who pre-order the Fold.

The Pixel Fold pre-orders will start from May 10th from the Google Store, while the phone is expected to ship starting June 27th, as per the leaked info.

Google Pixel Fold Specifications

Google Pixel Fold

Prosser has further dwelled on what we can expect from the Pixel Fold spec sheet as follows:

* Display: The outer display will be 5.8 inch-FHD+ OLED with a resolution of 2092×1080 OLED at 408ppi and a 17.4:9 aspect ratio. The inner display is 7.6 inches, 2208×1840 OLED with a 6:5 aspect ratio at 380ppi. The inner display has ultra-thin glass protected by plastic. Both displays have 120hz refresh rates.

* Chipset: As per previous leaks, the Pixel Fold will use Google’s in-house Tensor 2 chipset  along with a Titan M2 security chip. The chipset could be the same as that of the Pixel 7.

* Cameras: The Pixel Fold will have a triple camera setup. According to Prosser, there will be a 1/2 inch, 48MP main sensor with 0.8 μm pixel width and f/1.7 aperture. There’s a 1/3.1-inch 10.8MP sensor telephoto lens with 1.22 pm pixel width, f/3.05 aperture, with 5x optical zoom capable up to 20x digitally. The ultrawide camera will have a 1/3-inch, 10.8MP sensor with 1.25 um pixel width, f/2.2 aperture and 121.1-degree field of view.

The outer selfie camera is 9.5MP, while the inner front camera is 8MP.

* RAM and storage: Two storage variants are expected – 256GB and 512GB with 12GB of LPDDR5 RAM. The storage is UFS 3.1.

* Battery: The Pixel Fold is expected to pack a 4,700mAh battery. The fast charging details are unknown at the moment.

* OS: It is expected to run Android 13 OS out of the box.

Google Pixel Fold
IMG_0695
IMG_0687
IMG_0696
IMG_0694
IMG_0688
IMG_0695
IMG_0694
IMG_0699
Google Pixel Fold IMG_0695 IMG_0687 IMG_0696 IMG_0694 IMG_0688 IMG_0695 IMG_0694 IMG_0699

GOOGLE PIXEL FOLD KEY SPECIFICATIONS

Key Specs

RAM 8 GB
Processor Google Tensor G2
Rear Camera 64 MP + 12 MP + 10 MP
Front Camera 10 MP
Battery 4500 mAh
Display 7.6 inches (19.3 cm)

General

Launch Date May 10, 2023 (Unofficial)
Operating System Android v12

Performance

Chipset Google Tensor G2
CPU Octa core (2.85 GHz, Dual core, Cortex X1 + 2.35 GHz, Dual core, Cortex A78 + 1.8 GHz, Quad core, Cortex A55)
Architecture 64 bit
Fabrication 4 nm
Graphics Mali-G710 MC10
RAM 8 GB

Display

Display Type OLED
Screen Size 7.6 inches (19.3 cm)
Resolution 1840 x 2208 pixels
Pixel Density 378 ppi
Bezel-less display Yes with punch-hole display
Touch Screen Yes, Capacitive Touchscreen, Multi-touch
Brightness 1200 nits
Refresh Rate 120 Hz

Camera

MAIN CAMERA
Camera Setup Triple
Resolution 64 MP, Primary Camera
12 MP, Ultra-Wide Angle Camera
10 MP , Telephoto Camera
Sensor Exmor-RS CMOS Sensor
Autofocus Yes
Flash Yes, LED Flash
Image Resolution 9000 x 7000 Pixels
Settings Exposure compensation, ISO control
Shooting Modes Continuous Shooting
Camera Features Digital Zoom
Auto Flash
Face detection
Touch to focus
FRONT CAMERA
Camera Setup Single
Resolution 10 MP, Primary Camera

Battery

Capacity 4500 mAh
Type Li-Polymer
Removable No
Wireless Charging Yes
Quick Charging Yes, Fast
USB Type-C Yes

Storage

Internal Memory 128 GB
Expandable Memory No

Network & Connectivity

SIM Slot(s) Dual SIM, GSM+GSM
SIM Size SIM1: Nano, SIM2: eSIM
Network Support 5G Not Supported in India, 4G Supported in India, 3G, 2G
VoLTE Yes
SIM 1
4G Bands:
TD-LTE 2300(band 40)
FD-LTE 1800(band 3)
3G Bands:
UMTS 1900 / 2100 / 850 / 900 MHz
2G Bands:
GSM 1800 / 1900 / 850 / 900 MHz
GPRS:
Available
EDGE:
Available
SIM 2
4G Bands:
TD-LTE 2300(band 40)
FD-LTE 1800(band 3)
3G Bands:
UMTS 1900 / 2100 / 850 / 900 MHz
2G Bands:
GSM 1800 / 1900 / 850 / 900 MHz
GPRS:
Available
EDGE:
Available
Wi-Fi Yes, Wi-Fi 4 (802.11 b/g/n)
Wi-Fi Features Mobile Hotspot
Bluetooth Yes, v5.2
GPS Yes with A-GPS, Glonass
NFC Yes
USB Connectivity Mass storage device, USB charging

Multimedia

FM Radio No
Loudspeaker Yes
Audio Jack USB Type-C

Sensors

Fingerprint Sensor Yes
Fingerprint Sensor Position Side
Other Sensors Light sensor, Proximity sensor, Accelerometer, Compass, Gyroscope

Faqs on Google pixel fold

1) How will the camera be of google pixel fold ?

Ans) The Pixel Fold will have a triple camera setup. According to Prosser, there will be a 1/2 inch, 48MP main sensor with 0.8 μm pixel width and f/1.7 aperture. There’s a 1/3.1-inch 10.8MP sensor telephoto lens with 1.22 pm pixel width, f/3.05 aperture, with 5x optical zoom capable up to 20x digitally. The ultrawide camera will have a 1/3-inch, 10.8MP sensor with 1.25 um pixel width, f/2.2 aperture and 121.1-degree field of view.
The outer selfie camera is 9.5MP, while the inner front camera is 8MP.

2) What is the price & colour options of the upcoming Google pixel fold ?

Ans) As per Jon Prosser the Pixel Fold price will be $1,799 (over Rs 1.47 lakh)  for the 12GB/256GB model in Chalk and Obsidian colours. The Google Pixel Fold 12GB/512GB is expected to be available for $1,919 (over Rs 1.57 lakh) in Obsidian only.

3) What is the special offer for the ones who preorder the google pixel fold ?

Ans) As per Prosser, there is a free Pixel Watch for all those who pre-order the Fold.

Also Read: Google Pixel 7a, Google Pixel Fold Pricing, Release And Availability Details Leaked Ahead of May 10 Launch

Also Read: Google Pixel Fold, Google Pixel 7a launch timeline, Price Leaked; Storage, Colour Options expected to launch in May at the Google I/O event

Also Read: Google Pixel Fold allegedly spotted in public ahead of the Official Launch, See Images as First Leak