As per reports, users have been vocal about the devices’ tendency to overheat, a problem initially so severe it drew comparisons to handling a freshly microwaved Hot Pocket.
This issue was particularly pronounced when running certain applications, such as Instagramand Uber, leading to an uncomfortable user experience and accelerated battery depletion.
Thankfully, the deployment of iOS 17.0.3 in early October addressed the primary bug causing this overheating, providing much-needed relief to users.
Ming-Chi Kuo, usually the top dog when it comes to Apple news, has suggested that the choice of titanium for the handset’s casing could be exacerbating the issue, given the material’s inferior heat conductivity compared to steel.
In contrast, Samsung has proactively addressed similar concerns with its Galaxy S24 Ultra by significantly enlarging the vapour chamber (VC) by 92% compared to its predecessor, the Galaxy S23 Ultra.
iPhone 15 Pro series faces overheating issues
The S24 Ultra also uses Titanium for its frame but the enhanced VC has offset most of the heating issues.
Looking at these issues, Apple’s response to ongoing thermal management challenges are likely evolve, with rumours suggesting that the company is finally incorporating a vapour chamber in future iPhone models.
Graphene Vapour Chamber on iPhone 16 Series?
iPhone 16 Series May Tackle Overheating with Graphene Vapour Chamber
Apple has reportedly been exploring the idea of VCs on iPhones since 2021.
For the uninitiated, a VC operates by absorbing internal heat and converting a contained liquid into gas, which then cools and recondenses, cycling back to cool the device’s processor effectively.
Graphene is renowned for its exceptional thermal conductivity and could represent a significant advance over the graphite pads currently employed, promising enhanced heat dissipation and potentially mitigating the overheating issues that have plagued earlier models.
Apple has reportedly been exploring the idea of VCs on iPhones since 2021
Apart from, among the anticipated innovations, there are also reports emerging of a metal shell for the battery, which could offer improved thermal properties and a graphene layer attached to the processor.
The transition to materials like graphene could mark a significant step forward in addressing these challenges, ensuring that future iPhones can deliver the high-performance, user-friendly experience that customers expect.
Rumours suggest a graphene vapour chamber could cool future iPhone models
Apple iPhone 16 Specs
GENERAL
Sim Type
Dual Sim, GSM+GSM
Dual Sim
Yes
Sim Size
Nano + eSIM
Device Type
Smartphone
Release Date
September 07, 2024 (Expected)
DISPLAY
Type
Color OLED Screen (1B Colors)
Touch
Yes
Size
6.12 inches, 1200 x 2600 pixels, 120 Hz
Aspect Ratio
20:9
PPI
~ 447 PPI
Features
Super Retina XDR Display, HDR Display, True Tone, Wide Color (P3), Haptic Touch, 1200 Nits Max Brightness (HDR), Support for Display of Multiple Languages and Characters Simultaneously
AAC‑LC, HE‑AAC, HE‑AAC v2, Protected AAC, MP3, Linear PCM, Apple Lossless, FLAC, Dolby Digital (AC‑3), Dolby Digital Plus (E‑AC‑3), Dolby Atmos and Audible (formats 2, 3, 4, Audible Enhanced Audio, AAX and AAX+)
Video
HEVC, H.264, MPEG‑4 Part 2 and Motion JPEG, HDR with Dolby Vision, HDR10 and HLG
FM Radio
No
Document Reader
Yes
BATTERY
Type
Non-Removable Battery
Size
3500 mAh, Li-ion Battery
Fast Charging
Yes
Wireless Charging
Yes, 25W MagSafe
Music Playback Time
100 hours
FAQs
What overheating issues have iPhone 15 Pro series users reported?
Users have experienced significant overheating, particularly noticeable when using certain apps and during charging, reminiscent of handling an overly hot object.
How has Apple addressed the iPhone 15 Pro series’ overheating issues?
iOS 17.0.3 update resolved the primary bug causing overheating, improving the situation significantly for users experiencing discomfort and rapid battery drain.
Why might the titanium casing in iPhone 15 Pro models contribute to overheating?
Titanium’s inferior heat conductivity compared to steel may hinder effective heat dissipation, as suggested by analyst Ming-Chi Kuo.
What solution is Apple rumoured to be considering for future iPhone models to manage heat?
Apple is rumoured to be incorporating a vapour chamber in future models, potentially using graphene for its exceptional thermal conductivity to mitigate overheating issues effectively.
How does a vapour chamber work in smartphones?
A vapour chamber operates by absorbing internal heat, converting liquid to gas to cool down, and then recondensing, effectively pulling heat away from critical components like the processor.
What was Apple’s immediate response to the iPhone 15 overheating issue?
Apple quickly released a software update, iOS 17.0.3, to address the overheating issues reported in the iPhone 15 series. This update focused on fixing software bugs and optimizing app functionalities to reduce heat generation.
How is Apple planning to prevent overheating in the iPhone 16?
For the iPhone 16, Apple is reportedly developing a new graphene-based thermal management system. This system is expected to be more efficient in heat dissipation compared to the copper heat sink used in the iPhone 15.
What additional hardware change is expected in the iPhone 16 for better cooling?
Alongside the new thermal system, the iPhone 16 is rumoured to include a metal bracket around the battery. This design is anticipated to aid in more effective heat dissipation, particularly for the device’s chip and battery.
What happened to the iPhone 15 Pro Max in the recent overheating incident?
A Reddit user reported that their iPhone 15 Pro Max overheated while charging overnight, resulting in a melted charging cable, burn marks on the device, and a burn injury to the user’s finger.
The phone’s USB-C port also got fused with the metal part of the charging cable.
Is it safe to use non-certified charging cables with the iPhone 15 Pro Max?
The incident underscores the risks associated with using non-certified charging cables.
Apple recommends using either its own cables or MFi-certified cables to ensure safety and prevent damage, as cheaper, uncertified cables can lead to hazards like overheating.
Can the iPhone 15 Pro Max still be used after such an overheating incident?
While the device might still function and could potentially be charged using a MagSafe wireless charger, the safety of the iPhone 15 Pro Max is questionable after such severe overheating.
Professional assessment and repair at an Apple-certified center are strongly advised.
What should owners of the iPhone 15 Pro Max do if they encounter similar issues?
In case of overheating or any damage caused by charging, iPhone 15 Pro Max owners should immediately visit an Apple Store or a certified repair center.
Attempting to remove a fused charging cable or self-repair can be dangerous and might cause further damage.
Why is the iPhone 15 series overheating?
Apple has identified that the new devices run hotter during the initial setup process and pointed out specific third-party apps like Asphalt 9, Uber, and Instagram as contributors to the issue.
What is causing the faster-than-expected battery drain on iPhone 15 and 15 Pro?
High battery usage can occur when restoring the device from a backup, downloading large media libraries, and using apps with high background activity.
How to Alleviate Overheating Issues?
Limit your use of Uber and Asphalt 9 until updates are made available that address the issue.
Ensure Instagram is updated to its latest version, which was released on September 26 and reportedly fixes the problem.
If you encounter overheating while using other apps, consider halting their use or updating them to the latest versions.
Apple has signaled that a forthcoming iOS release, possibly version 17.0.3 (release date unconfirmed), will offer a comprehensive solution to the overheating issue.
The rumoured Xperia F, with its “F” denoting foldable, does imply Sony’s ambitious leap into a market segment currently dominated by the likes of Samsung and Motorola.
As we approach the Mobile World Congress (MWC) in Barcelona, the anticipation for Sony’s possible offering is palpable, potentially marking a pivotal moment in the foldable smartphone landscape.
The Speculative Xperia F: Possible Features
The Speculative Xperia F: Possible Features
The Xperia F is rumoured to boast a 7-inch 4K resolution display, setting it apart with a 21:9 aspect ratio that promises a more expansive viewing experience compared to the 22:9 screens of its rivals, the Galaxy Z Flip 5 and the Razr+.
This design choice suggests Sony’s intent to merge cinematic viewing with the practicality of foldable technology, offering users a device that doesn’t compromise on screen real estate or portability.
Market Dynamics and Consumer Trends
Market Dynamics and Consumer Trends
However, recent discussions, fuelled by insights from a purported Sony insider on Reddit, hint atSony’s cautious stance towards fully committing to foldable smartphones.
The study claims 70% of current foldable device users reportedly considering a switch back to traditional smartphones for their next purchase.
However, it’s essential to approach these insights with caution, as they remain unverified and speculative.
The true measure of foldable smartphones’ success and their place in consumers’ future preferences will unfold over time, influenced by advancements in technology, design innovations, and shifts in user experience expectations.
A Glimpse into the Future
A Glimpse into the Future
Beyond the speculative features and potential market implications, the introduction of gaming capabilities to the Xperia Fcould represent a move by Sony to differentiate its foldable device in an increasingly crowded market.
As the countdown to MWC continues, with Sony’s plans for the foldable smartphone marketare closely watched by industry insiders and consumers alike.
Whether the Xperia F will materialize remains to be seen, but Sony’s exploratory steps towards foldable technology signal a willingness to innovate and adapt to the evolving mobile landscape.
FAQs
What is the Sony Xperia F?
The Sony Xperia F is a rumoured foldable smartphone by Sony, speculated to have a clamshell design and a 7-inch 4K resolution display, potentially making its debut at the Mobile World Congress (MWC).
Why is there uncertainty around the release of the Xperia F?
Reports suggest Sony is evaluating consumer trends and the long-term viability of foldable smartphones, with concerns that many users may revert to traditional devices.
How does the Xperia F compare to other foldable phones?
The Xperia F is rumoured to boast a wider 21:9 aspect ratio for its display, differing from competitors like the Galaxy Z Flip 5 and Razr+, and may also integrate gaming features unique to Sony.
When could the Xperia F be announced?
While speculative, there is anticipation that Sony could reveal the Xperia F at the upcoming MWC event, with no confirmed leaks or renders yet available.
What makes the Xperia F stand out in the foldable market?
Apart from its rumoured display and aspect ratio, the addition of gaming capabilities could distinguish the Xperia F in a competitive foldable smartphone market.
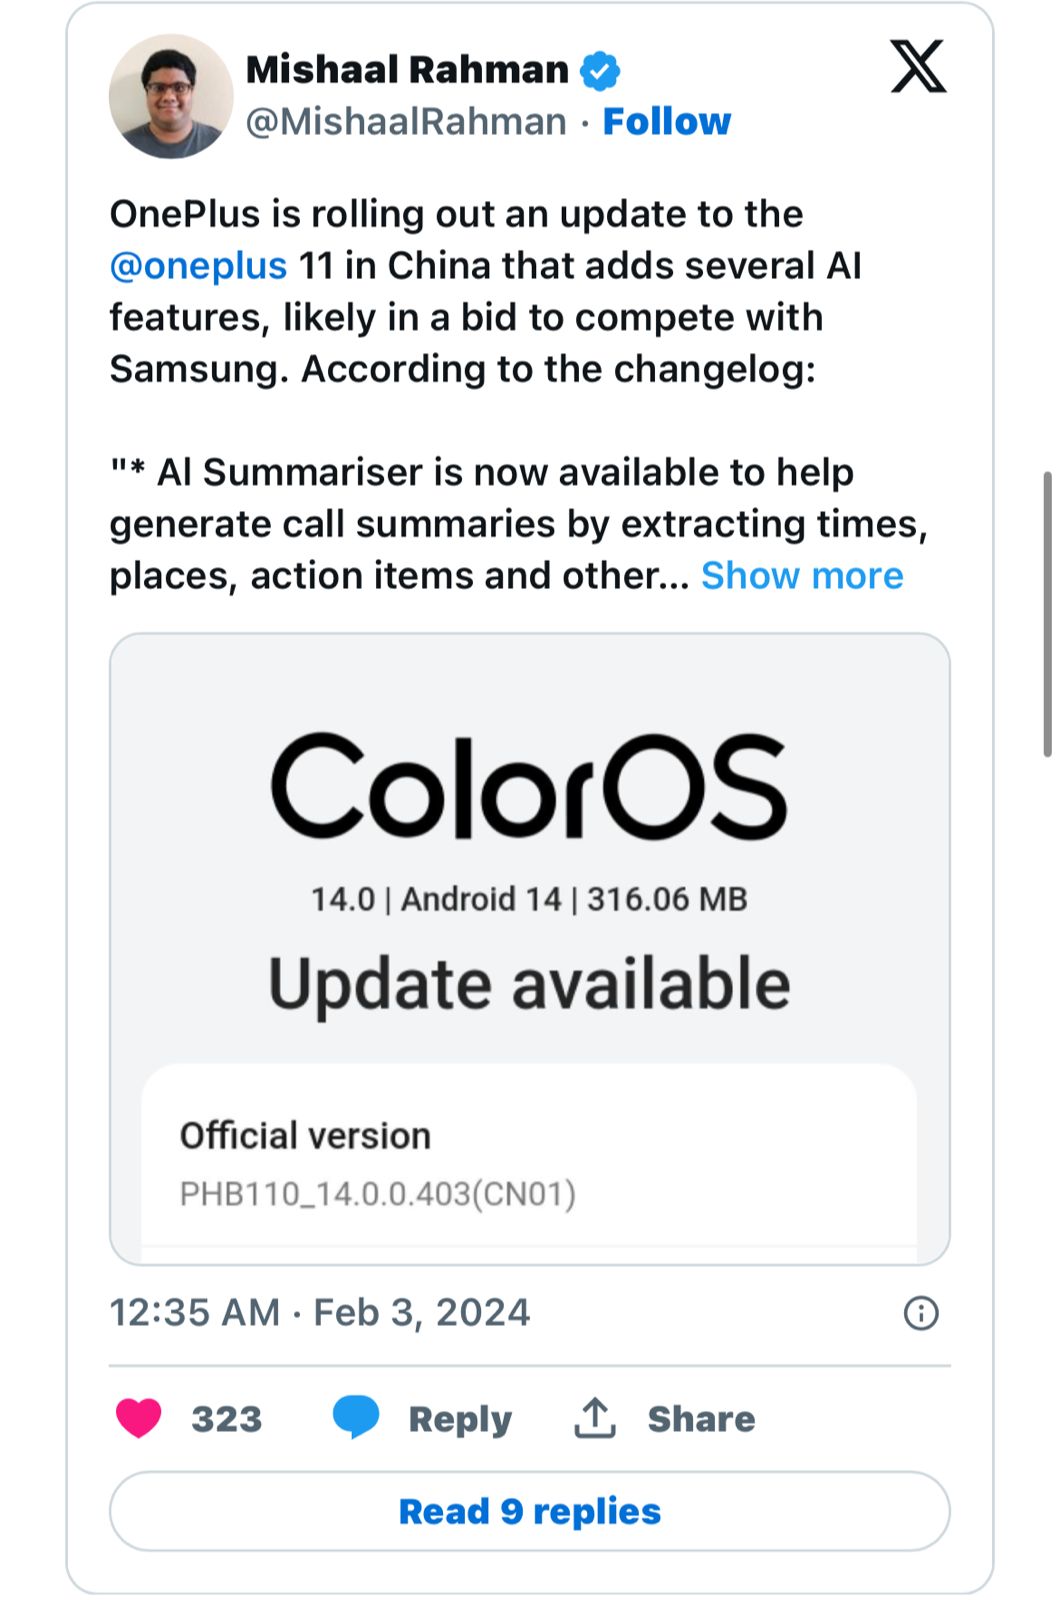
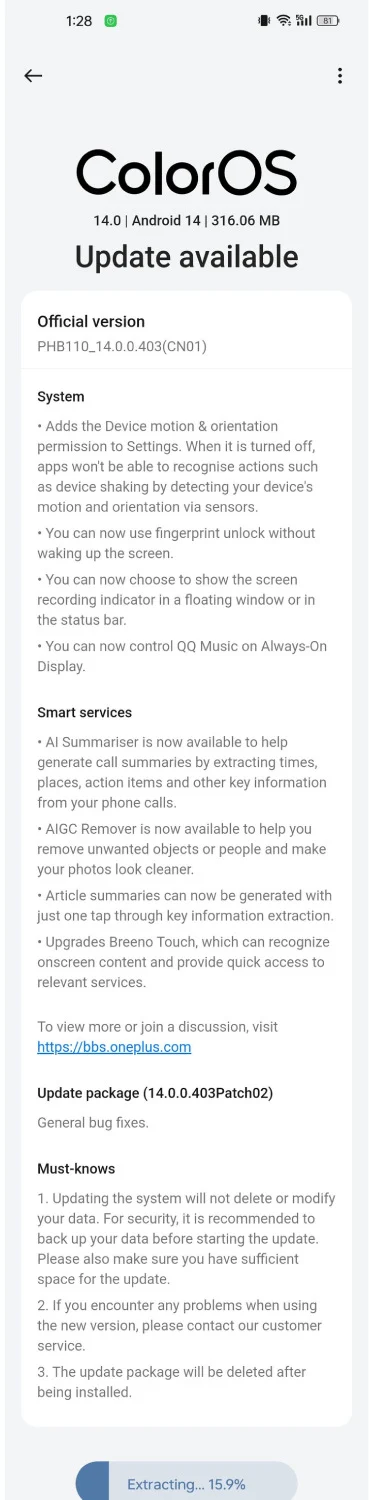
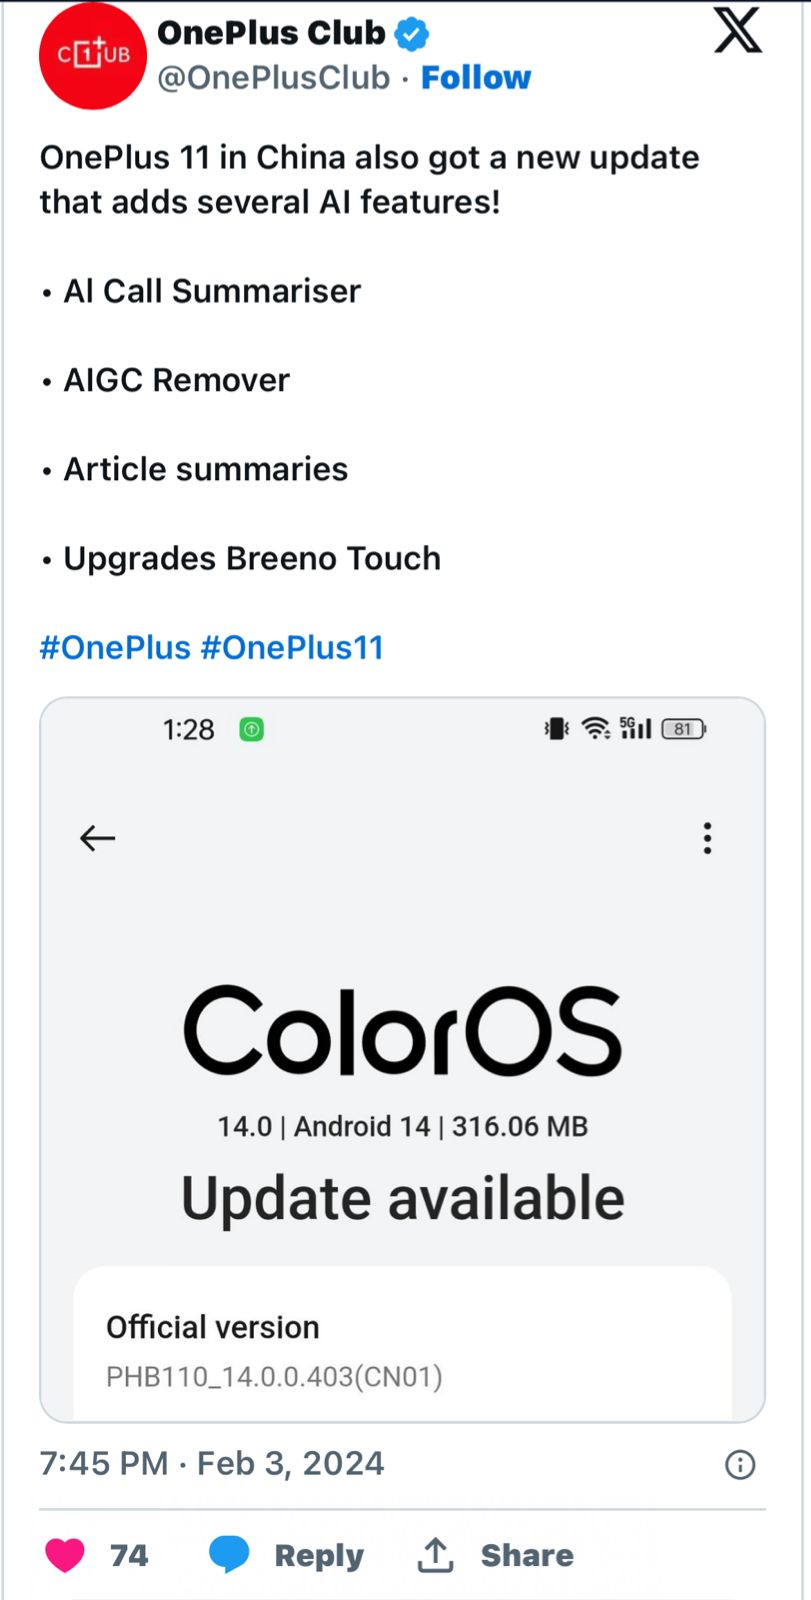
This update is said to be introducing a suite of AI-powered features designed to streamline user interaction and enrich the overall device experience.
However, as of now, there is no news on when these features could possibly make it to more global markets.
ColorOS: New AI Features Explained
ColorOS: New AI Features Explained
This update equips both devices with functionalities such as AI Summariser, AIGC Remover, and Article Summaries, positioning OnePlus alongside giants like Samsung and Google in the AI domain.
The AI Summariser is particularly innovative, offering users concise summaries of phone calls, capturing essential details like time and location.
The AIGC Remover feature is going to be a boon for photography enthusiasts, allowing the seamless removal of undesired elements from photos, a capability reminiscent of the sophisticated editing tools found in Samsung and Google Pixel devices.
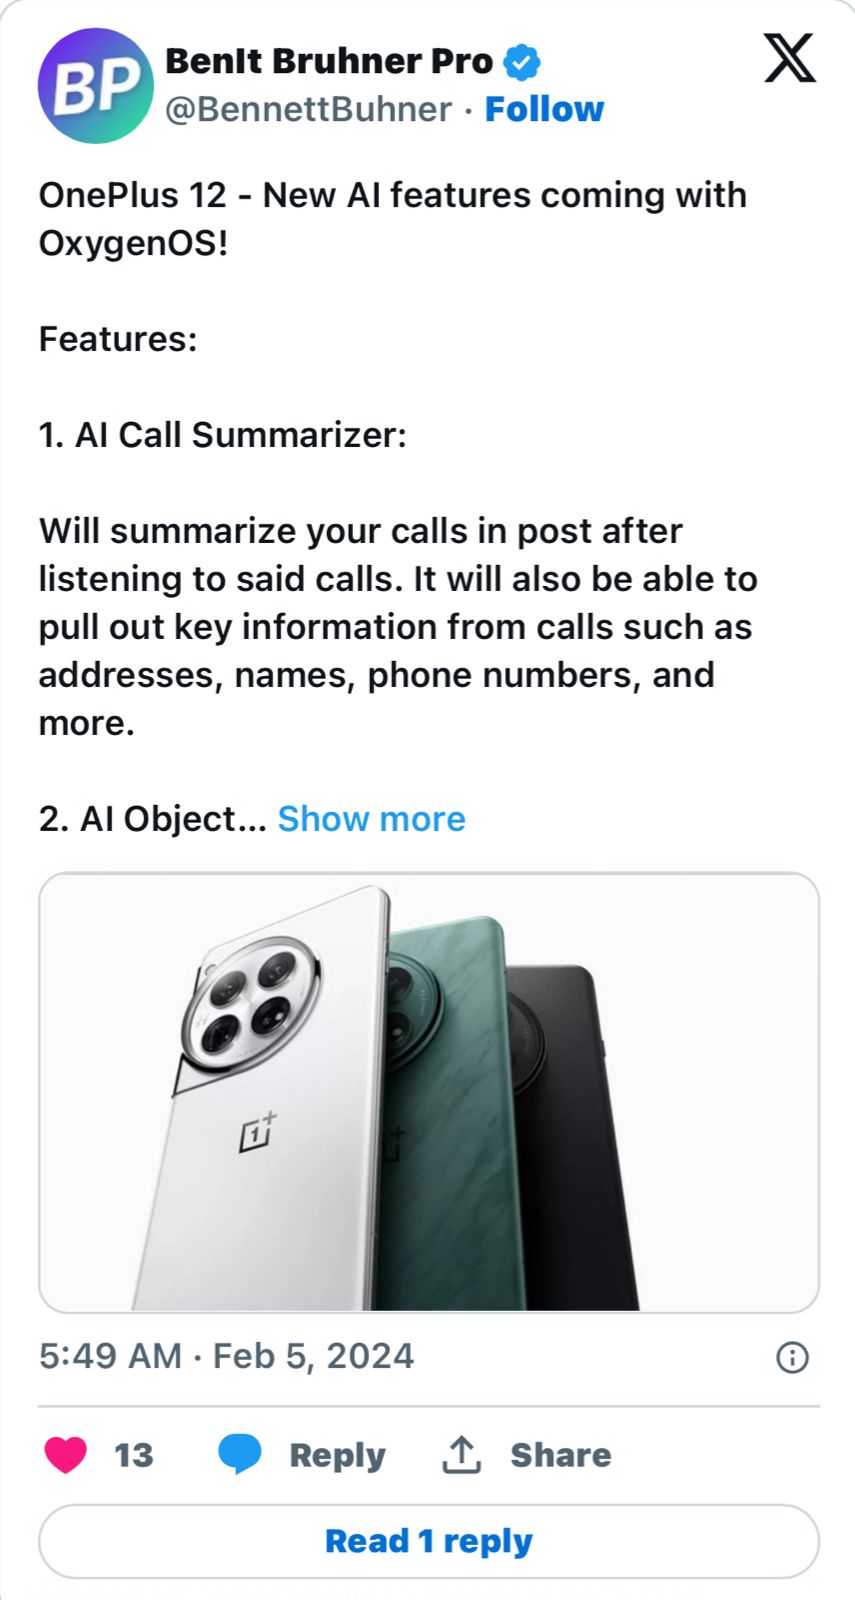
The recent update noted by Mishaal Rahman unveils a notable advancement for the OnePlus 11 and OnePlus 12 smartphones
Additionally, the Article Summarizer simplifies content consumption by providing succinct overviews of articles with a mere tap.
Beyond AI, the update enhances device usability with practical improvements such as unlocking the phone via the fingerprint scanner without needing to wake the screen first.
It also introduces more granular control over media and notifications, such as managing QQ Music directly from the Always-On Display and options for displaying screen recording indicators.
OxyegnOS Availability?
OxyegnOS Availability?
The firmware versions for the OnePlus 11 and OnePlus 12 are PHB110_14.0.0.403(CN01) and PJD110_14.0.0.405(CN01), respectively.
Each version is tailored to boost not only the AI capabilities but also the core functionalities of the devices, including Bluetooth, NFC, and WLAN network stability, especially in challenging environments akin to subway conditions.
Welcome introduction to AI for OnePlus 11 and 12 users.
Given the shared foundation between ColorOS and OxygenOS, there’s a tangible hope that these AI enhancements will soon be available to a wider audience, further solidifying OnePlus’s commitment to innovation and user-centric design.
A standout feature in this update is the AI Summarizer, an intelligent tool that automatically generates summaries of phone calls.
What is the AI Summariser feature in the latest OnePlus update?
The AI Summariser in the latest OnePlus update provides brief summaries of phone calls, highlighting key information such as time and location, enhancing user convenience and efficiency.
How does the AIGC Remover enhance the photography experience on OnePlus devices?
The AIGC Remover allows users to easily delete unwanted elements from their photographs, akin to editing tools on Samsung and Google Pixel, elevating the photo editing capabilities on OnePlus devices.
Can I summarize articles with the new OnePlus update?
Yes, the Article Summarizer feature offers quick, tap-to-generate summaries of articles, simplifying content consumption for OnePlus users.
Will the new AI features of OnePlus be available globally?
Currently, these AI features are exclusive to ColorOS in China, but there’s hope for a global rollout to OxygenOS versions, given the shared foundation between the two operating systems.
What usability enhancements come with the OnePlus AI update?
The update brings practical improvements like unlocking the phone with the fingerprint scanner without waking the screen, controlling QQ Music on the Always-On Display, and options for screen recording indicators.
How does the OnePlus 12’s performance compare to the OnePlus 11?
The OnePlus 12 is expected to house the Snapdragon 8 Gen 3 chipset, offering a 30% increase in CPU and 25% in GPU performance over the OnePlus 11’s Snapdragon 8 Gen 2.
This significant leap suggests the OnePlus 12 will outperform its predecessor in speed and efficiency.
What are the key design differences between the OnePlus 12 and OnePlus 11?
The OnePlus 12 is rumoured to feature a higher maximum brightness of 2,600 nits and 2,160Hz PWM dimming on its 6.7-inch OLED display. It also sports a textured back and repositioned Alert Slider, distinguishing it from the OnePlus 11’s design.
What camera improvements are expected in the OnePlus 12?
The OnePlus 12 is anticipated to improve on the OnePlus 11’s camera setup with a 64MP telephoto lens offering 3x optical zoom.
Additionally, the ongoing partnership with Hasselblad suggests further enhancements in camera performance and tuning.
What upgrades in battery life and charging does the OnePlus 12 have over the OnePlus 11?
The OnePlus 12 might feature a 5,400 mAh battery, larger than the OnePlus 11’s 5,000 mAh, and could introduce wireless charging.
Combined with the more efficient Snapdragon 8 Gen 3, this suggests an improvement in overall battery life.
Would these features launch for global variants with Oxygen OS?
It isn’t clear if OnePlus will limit these features to its models in China or bring them to global markets as well, where it ships its devices with Oxygen OS instead of ColorOS, such as the US and India.
However, this is a step in the right direction considering how Samsung, being one of the biggest competitors, already has most of these features. These features would certainly help it better compete in China, and globally when/if these features roll out.
What are AI features unveiled during the OnePlus update in China ?
With the latest ColorOS update, OnePlus has integrated three generative AI features into its smartphones. These features aim to enhance user experience and productivity:
AI Summarizer: OnePlus users can now benefit from an AI-powered summarization tool for phone calls. This feature automatically generates summaries by extracting relevant data such as locations, timestamps, action items, and other key information from phone conversations. This tool is designed to help users quickly review and recall important details from their calls.
AIGC Remover: The update also includes an image editing tool known as AIGC Remover. This tool allows users to remove objects and people from their photos, providing greater control over their images. While similar to features found in other flagship phones like the Pixel 8 and Galaxy S24 series, OnePlus focuses solely on photo editing capabilities without extending to video editing.
Article Summaries: OnePlus users can now create article summaries with a single tap, thanks to the new generative AI feature. By extracting key information from articles, this tool simplifies content consumption, making it easier for users to grasp the essence of lengthy texts.
These AI features, although not as advanced as those offered by competitors like Google and Samsung, represent a positive step for OnePlus users who have been anticipating AI-driven functionalities on their devices.
What are the Additional enhancements of OnePlus 11 & OnePlus 12 AI Powered ColorOS Update in China?
Fingerprint Scanner Access: Users can now access the fingerprint scanner without waking the phone, offering a more convenient and seamless unlocking experience.
Device Motion & Orientation Permission: A new permission setting, known as “Device motion & orientation,” has been introduced in the Settings menu. This feature restricts other apps from accessing the phone’s sensors for actions, gestures, and display orientation, enhancing user privacy and security.
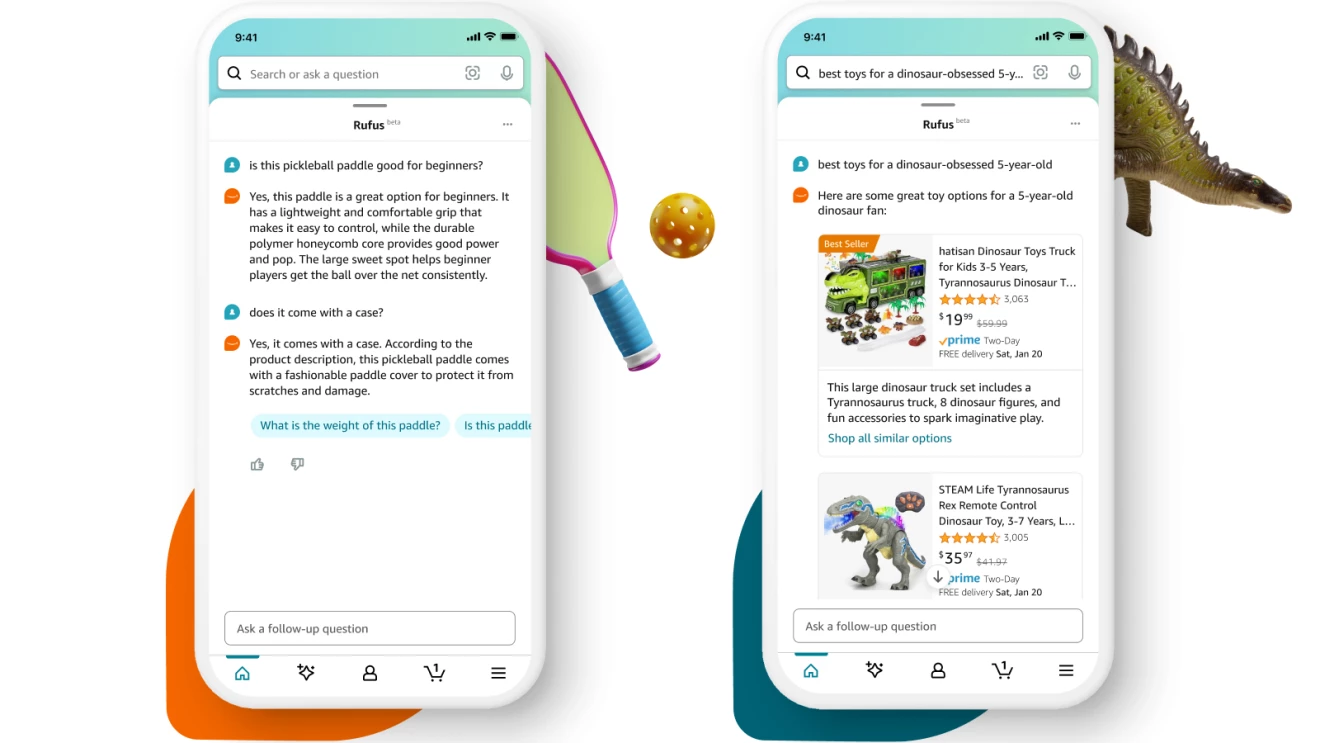
Rufus offers personalized shopping guidance and product comparisons.
The assistant provides specific recommendations for user queries.
Available initially to select U.S. customers in the Amazon mobile app.
Users can provide feedback to improve Rufus’s functionality over time.
Amazon has launched Rufus, a generative AI-powered shopping assistant designed to enhance the online shopping experience.
Developed from Amazon’s extensive product catalog and web information, Rufus aims to answer customer queries, offer product comparisons, and provide recommendations within Amazon’s mobile app.
This beta release starts with a limited number of U.S. customers, with plans for a broader rollout in the coming weeks.
Amazon Rufus: Key Features and Capabilities
Amazon Rufus: Key Features and Capabilities
Enhanced Shopping Guidance
Rufus assists customers in navigating product categories, helping them understand what to consider when making purchases.
For instance, customers can inquire about essential factors for buying headphones or starting indoor gardens.
Occasion or Purpose-Based Shopping
The assistant can suggest products based on specific activities, events, or needs. Whether customers are preparing for cold weather golf or initiating an indoor garden, Rufus recommends relevant product categories and items.
Product Comparison
Rufus aids in comparing different product categories, such as lip gloss versus lip oil or drip versus pour-over coffee makers, helping customers determine the best fit for their needs.
Personalized Recommendations: Rufus can generate tailored suggestions for specific queries, like gift ideas for Valentine’s Day or the best dinosaur toys for children, streamlining the search process.
Product Detail Queries: While viewing a product’s detail page, customers can use Rufus to quickly find answers to specific questions about the item, leveraging information from listing details, customer reviews, and community Q&As.
Rufus Generate Answers using Relevant Information from across Amazon
Users can engage with Rufus by entering questions into the search bar, triggering a chat dialog box for interactive assistance.
Rufus provides answers and follow-up questions in the chat, with an option for users to return to traditional search results at any time.
Feedback and Continuous Improvement
Acknowledging the early stage of generative AI, Amazon emphasizes continuous improvement for Rufus based on customer feedback.
Users can rate their experience and provide suggestions to help refine and enhance Rufus’s effectiveness over time.
FAQs
What is Rufus, and how does it assist Amazon customers?
Rufus is an AI-powered shopping assistant developed by Amazon to provide users with product guidance, comparisons, and personalized recommendations directly within the Amazon mobile app.
How can customers access Rufus?
Rufus is currently available to a limited number of U.S. customers who update their Amazon Shopping app. It can be accessed by entering questions into the app’s search bar.
What types of queries can Rufus handle?
Rufus can assist with a wide range of shopping-related queries, from broad category guidance to specific product comparisons and recommendations.
Can users provide feedback on Rufus’s recommendations?
Yes, customers can rate Rufus’s responses with a thumbs up or down and offer freeform feedback to help Amazon refine and improve the assistant’s accuracy and helpfulness.
Watch the 66th Annual Grammy Awards live on CBS and Paramount+.
Siri supports music streaming from Apple Music, Pandora, and more.
Ask Siri to play Grammy nominees and personalized music selections.
Create shortcuts for instant Taylor Swift music playback on Apple Music or Spotify.
As the Grammy Awards approach, Siri is set to enhance your music experience, offering seamless integration with Apple Music and other leading music streaming platforms.
Whether you’re a “Swiftie” looking forward to Taylor Swift’s latest hits or eager to explore this year’s Grammy nominees, Siri has got you covered.
Watching the Grammy Awards
Watching the Grammy Awards
The 66th Annual Grammy Awards, hosted byTrevor Noah, will be broadcast live on CBS and Paramount+ on Sunday, February 4, starting at 5 p.m. PT/8 p.m. ET.
Siri effortlessly interacts with multiple music streaming services on your iPhone, including Apple Music and alternatives like Pandora.
This flexibility allows you to enjoy your preferred tunes and playlists across various platforms with simple voice commands.
Celebrating the Grammys with Siri
Celebrating the Grammys with Siri
Gear up for music’s biggest night by asking Siri to play a collection of this year’s Grammy-nominated tracks or dive into personalized selections based on your musical taste.
Here are a few prompts to kickstart your Grammy-themed music session with Siri:
“Siri, play this year’s Grammy nominees.”
“Siri, play music I’d like.”
“Siri, play today’s hits.”
“Siri, play the latest song from Taylor Swift.”
“Siri, create a radio station based on Usher.”
Taylor Swift at Your Fingertips
Here’s How You Can Enhance Your Grammy Awards Experience with Siri Shortcuts
Create a shortcut for instant access toTaylor Swift songs, whether you prefer to shuffle on Spotify or enjoy an uninterrupted stream on Apple Music.
FAQs
How can I use Siri to enhance my Grammy Awards experience?
Utilize Siri to play this year’s Grammy-nominated tracks, your favorite hits, or specific artists like Taylor Swift, enhancing your music listening experience leading up to the Grammy Awards.
When and where can I watch the Grammy Awards?
The 66th Annual Grammy Awards will be broadcast live on CBS and Paramount+ on Sunday, February 4, starting at 5 p.m. PT/8 p.m. ET, with Trevor Noah hosting.
Can Siri play music from services other than Apple Music?
Yes, Siri can control playback on various music streaming services installed on your iPhone, including Pandora, allowing you to enjoy a wide range of music with simple voice commands.
How do I create a shortcut for Taylor Swift music?
Use Apple’s Shortcuts app or Spotify to create a dedicated button for playing Taylor Swift’s music instantly, tailoring the playback experience to your preference.
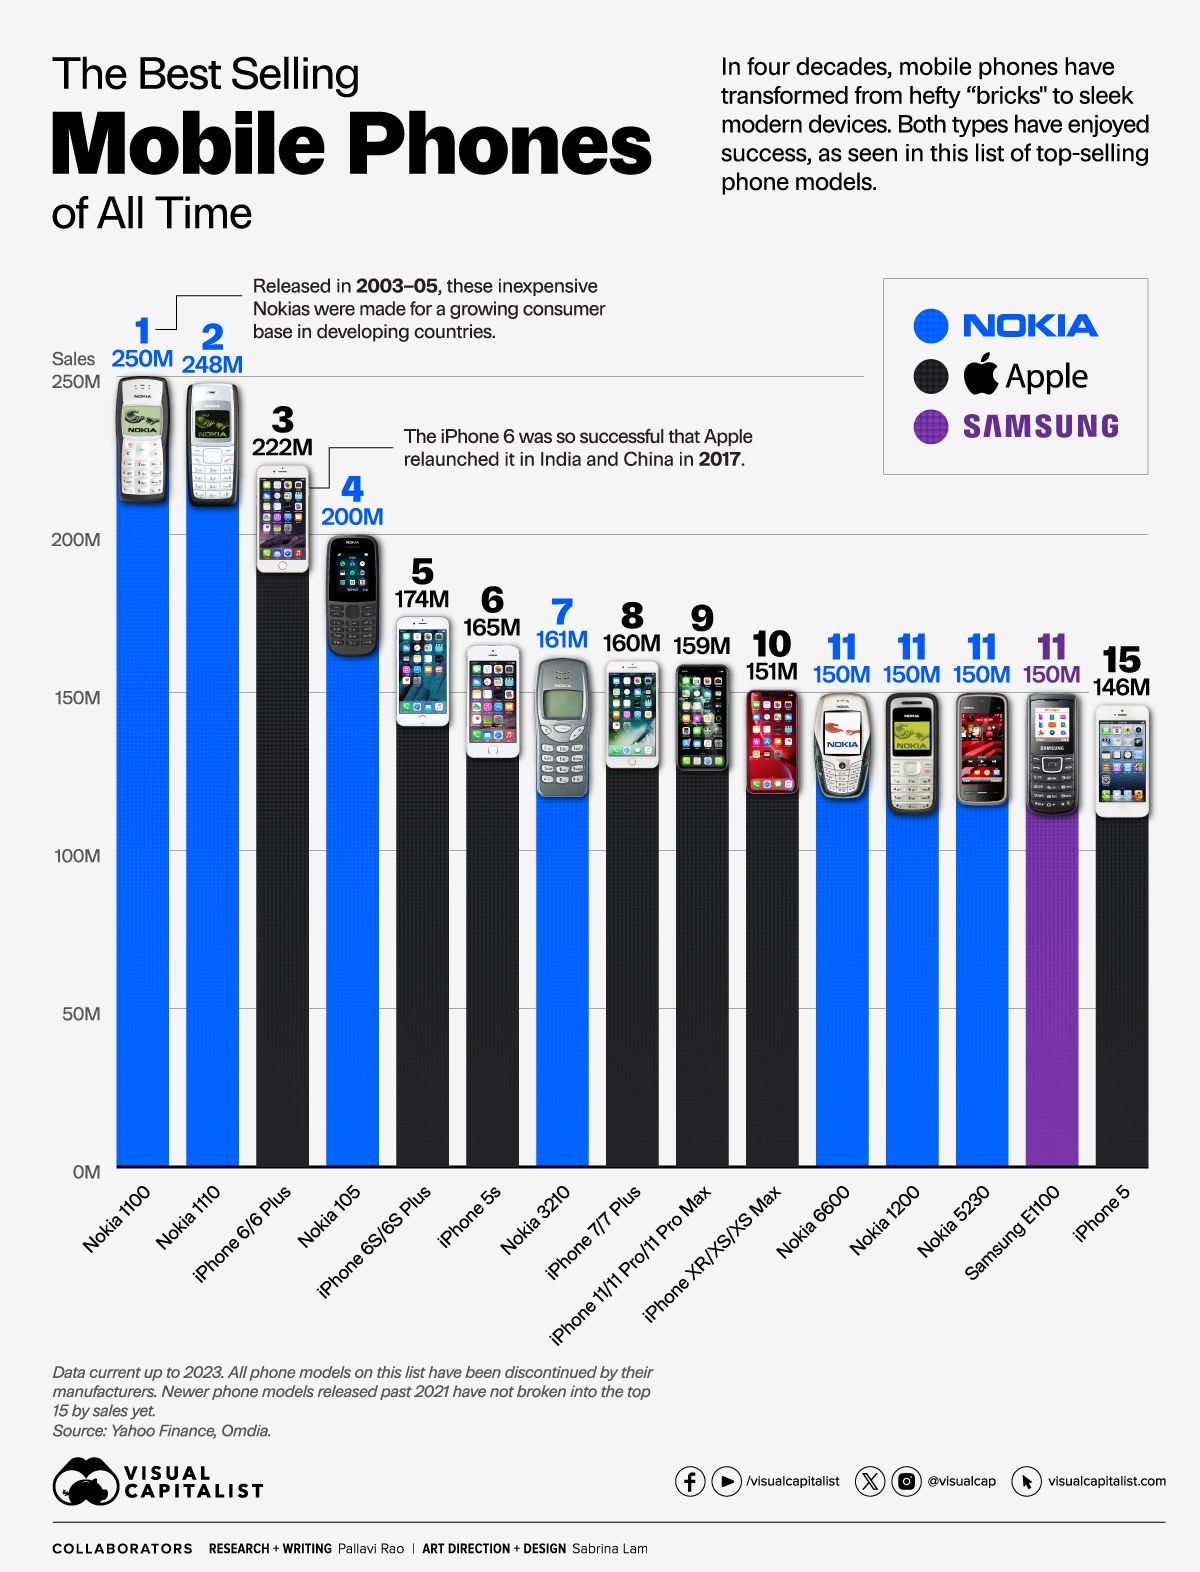
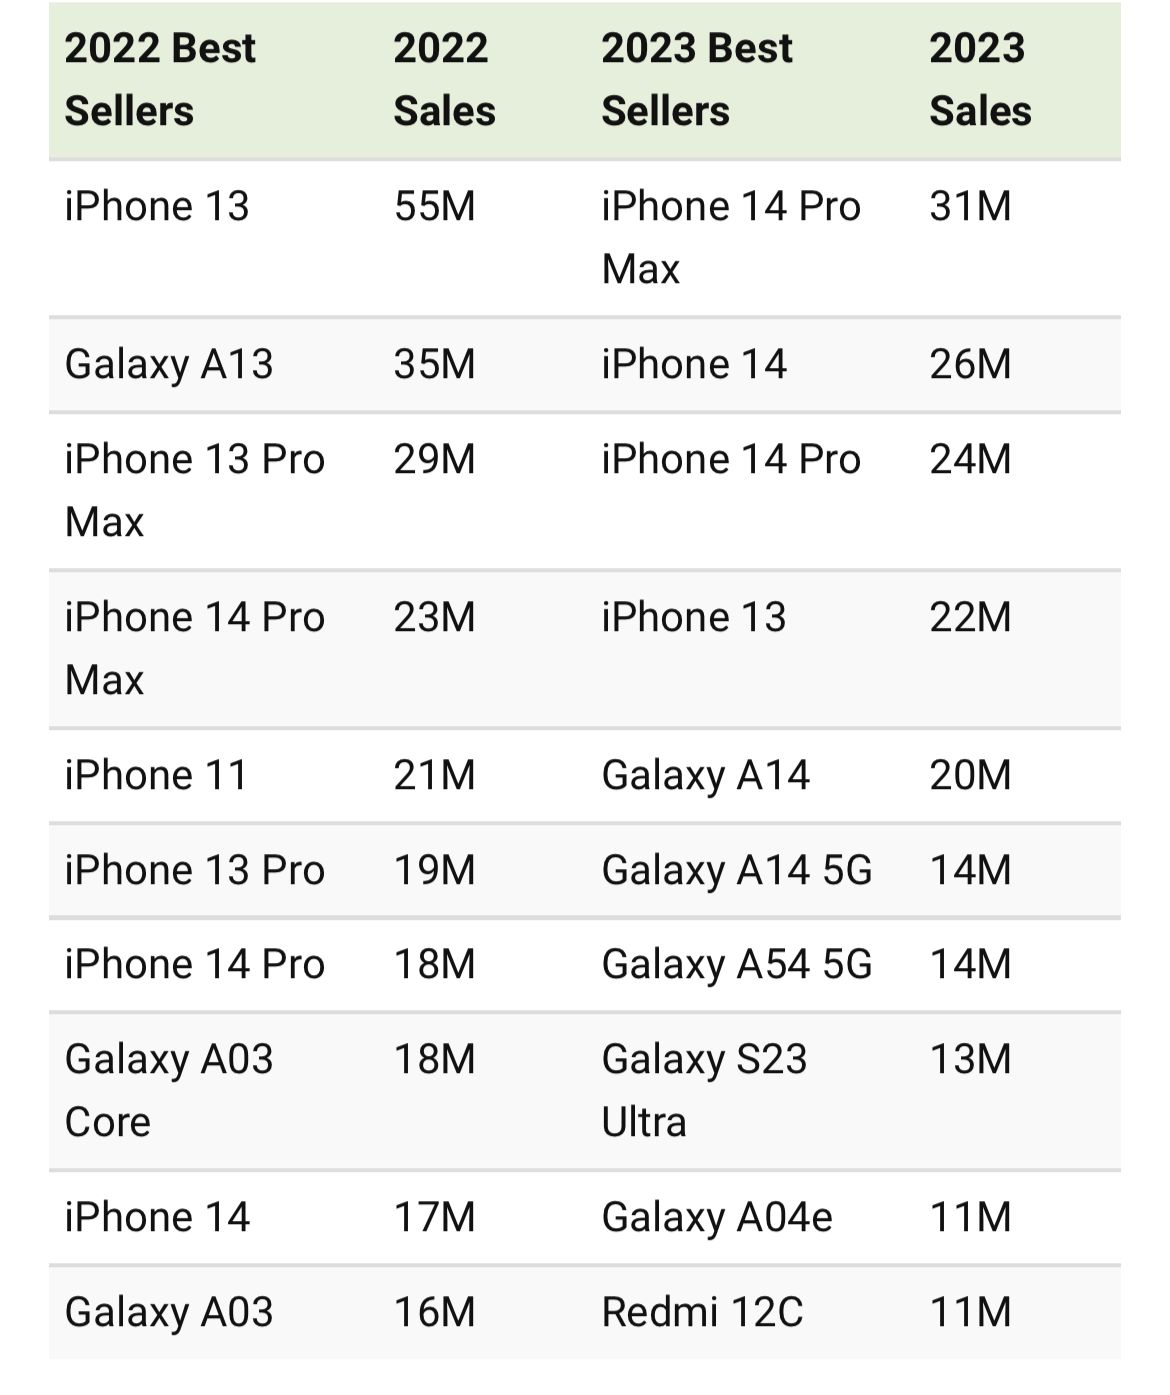
Nokia 1100 leads with over 250 million units sold.
iPhone 6 series marked Apple’s significant shift in smartphone design.
Nokia’s dominance in the early mobile phone era is unmistakable.
Iconic Nokia 3310 celebrated for its durability and Snake II game.
The mobile phone industry has seen exponential growth since its inception, evolving from basic communication devices to today’s multifunctional smartphones.
Throughout this journey, certain models have left an indelible mark on the market, achieving record-breaking sales.
You wil notice one company’s name standing out quite prominently though.
Top 10 Best-Selling Mobile Phones
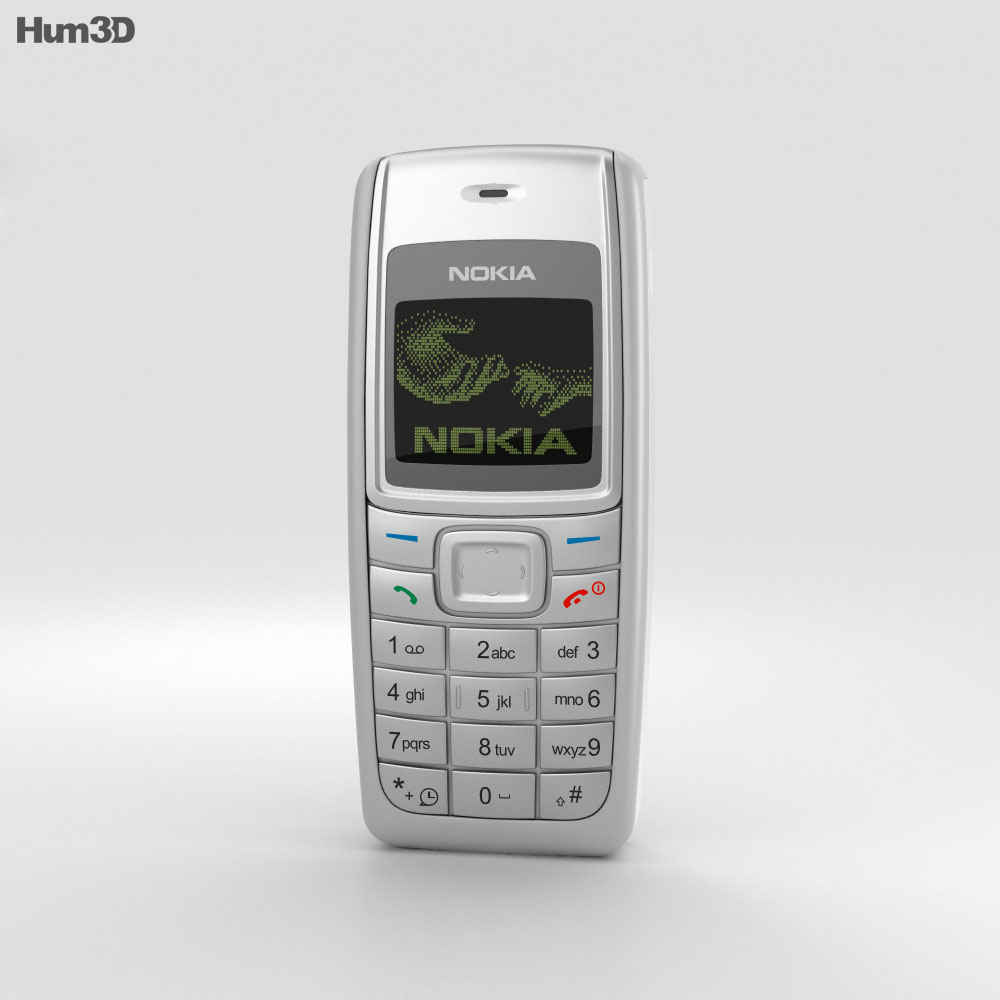
Nokia 1100
Nokia 1100
Units Sold: Over 250 million
Launched in 2003, the Nokia 1100 was designed with simplicity and durability in mind, primarily targeting developing countries.
Its robust build, long battery life, and user-friendly interface made it a popular choice for a vast audience, securing its position as the best-selling mobile phone of all time.
Nokia 1110
Nokia 1110
Units Sold: Over 250 million
Following closely behind its predecessor, the Nokia 1110, introduced in 2005, was renowned for its ease of use, featuring a large, readable font and intuitive navigation.
Its appeal in emerging markets contributed significantly to its astronomical sales figures.
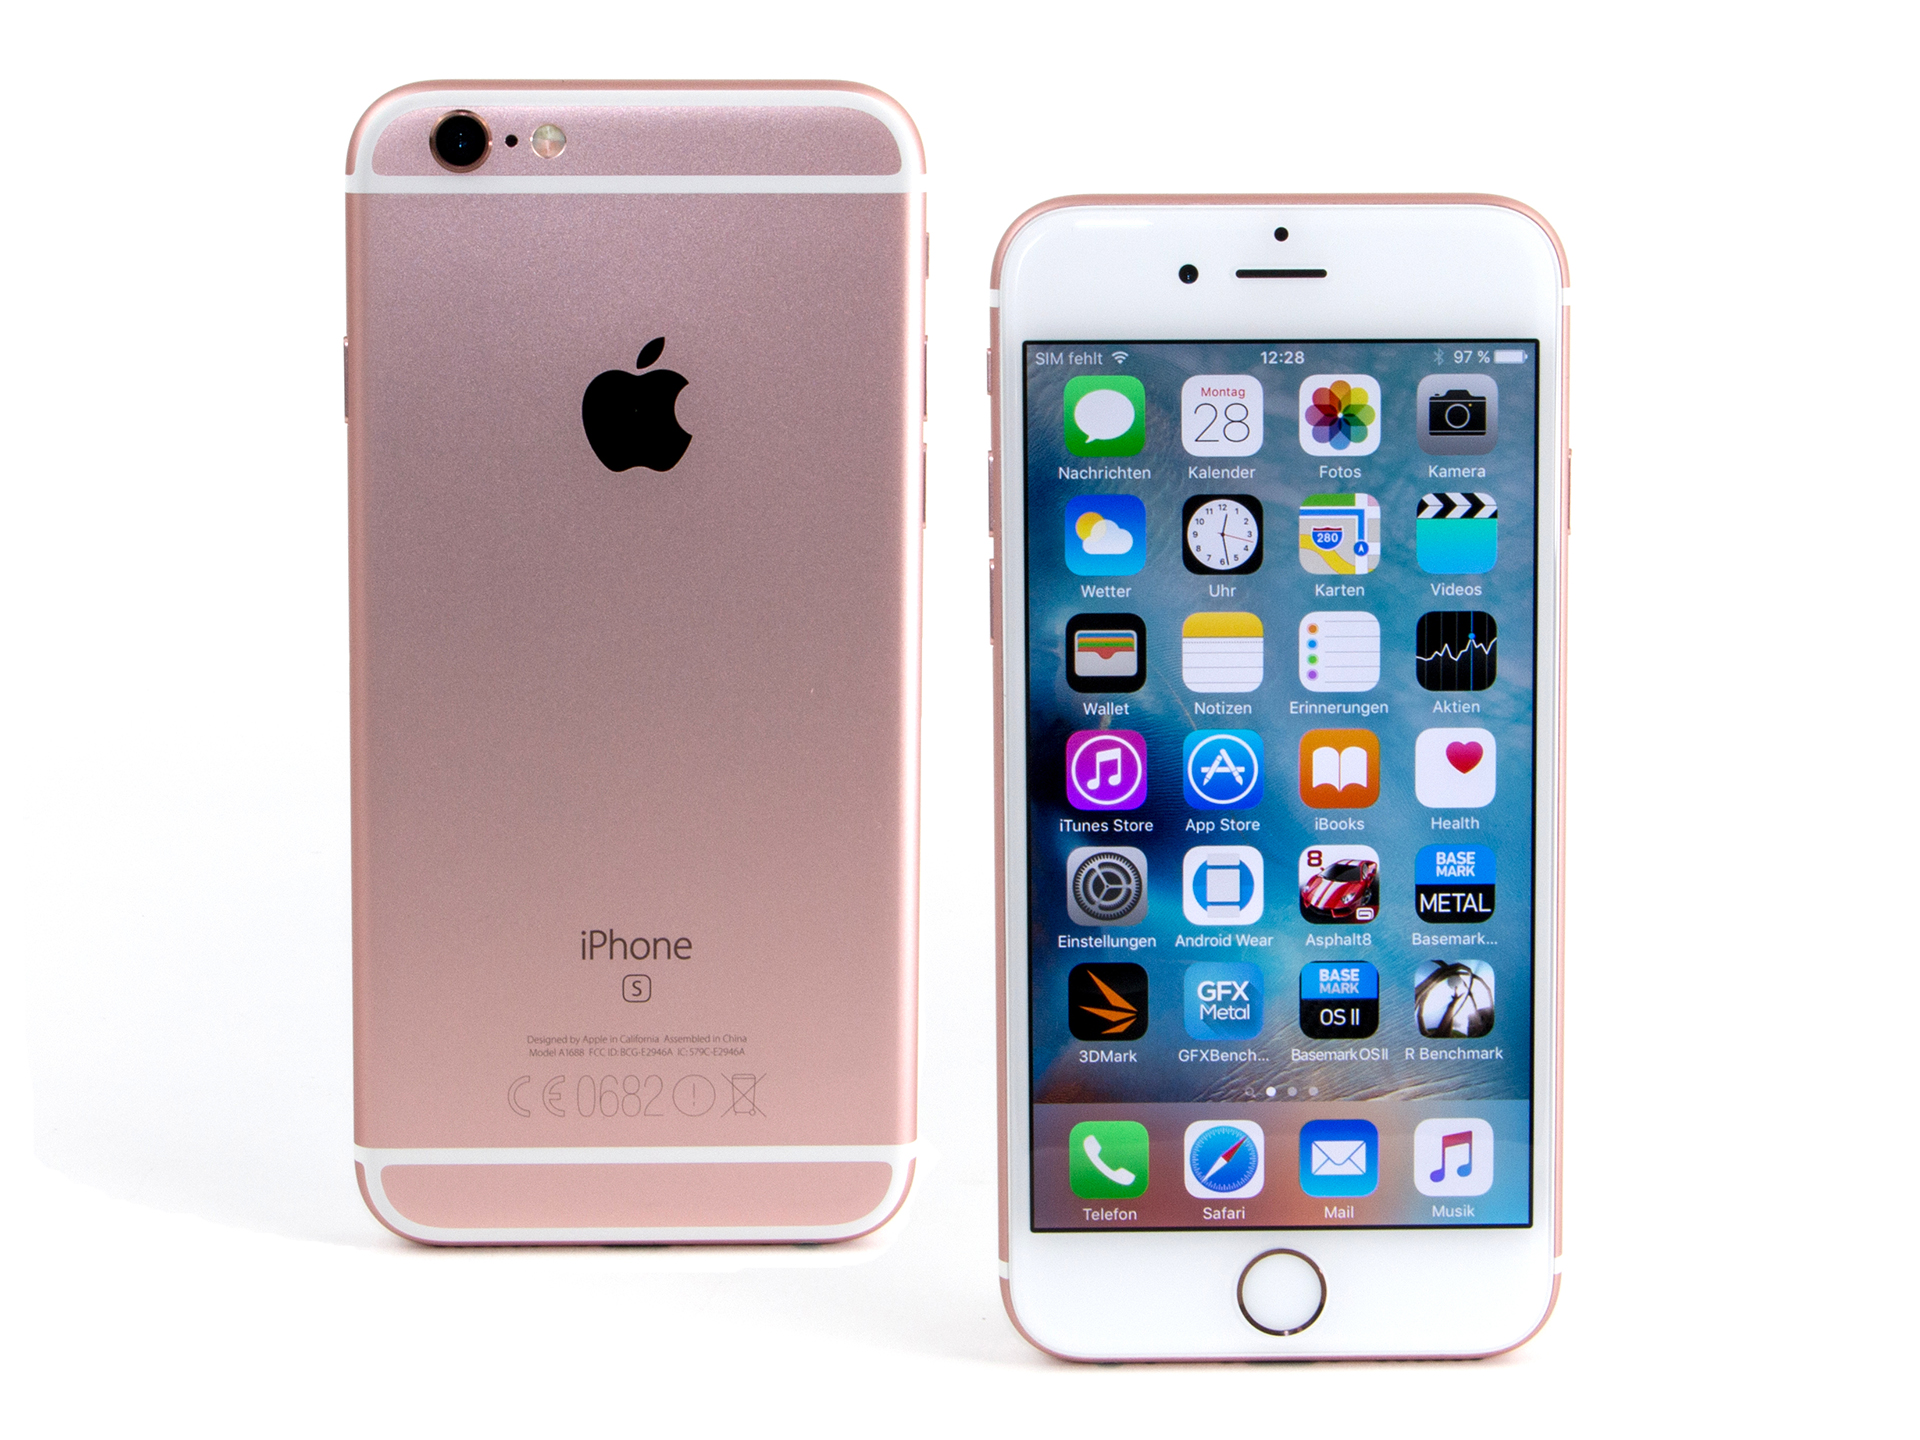
iPhone 6 and 6 Plus
iPhone 6 and 6 Plus
Units Sold: Approximately 220 million
Marking a significant shift in design and technology, the iPhone 6 and 6 Plus were released in 2014.
These models boasted larger screens, improved cameras, and faster processors, catering to the growing demand for high-performance smartphones.
Source: Data shared by Omdia. Note: 2023 numbers are current up to Q3, 2023.
Nokia 3210
Nokia 3210
Units Sold: 160 million
The Nokia 3210, released in 1999, was a game-changer with its internal antenna – a first for mobile phones.
It also introduced preloaded games like Snake, customizable ringtones, and predictive text input, making it a cultural icon of its time.
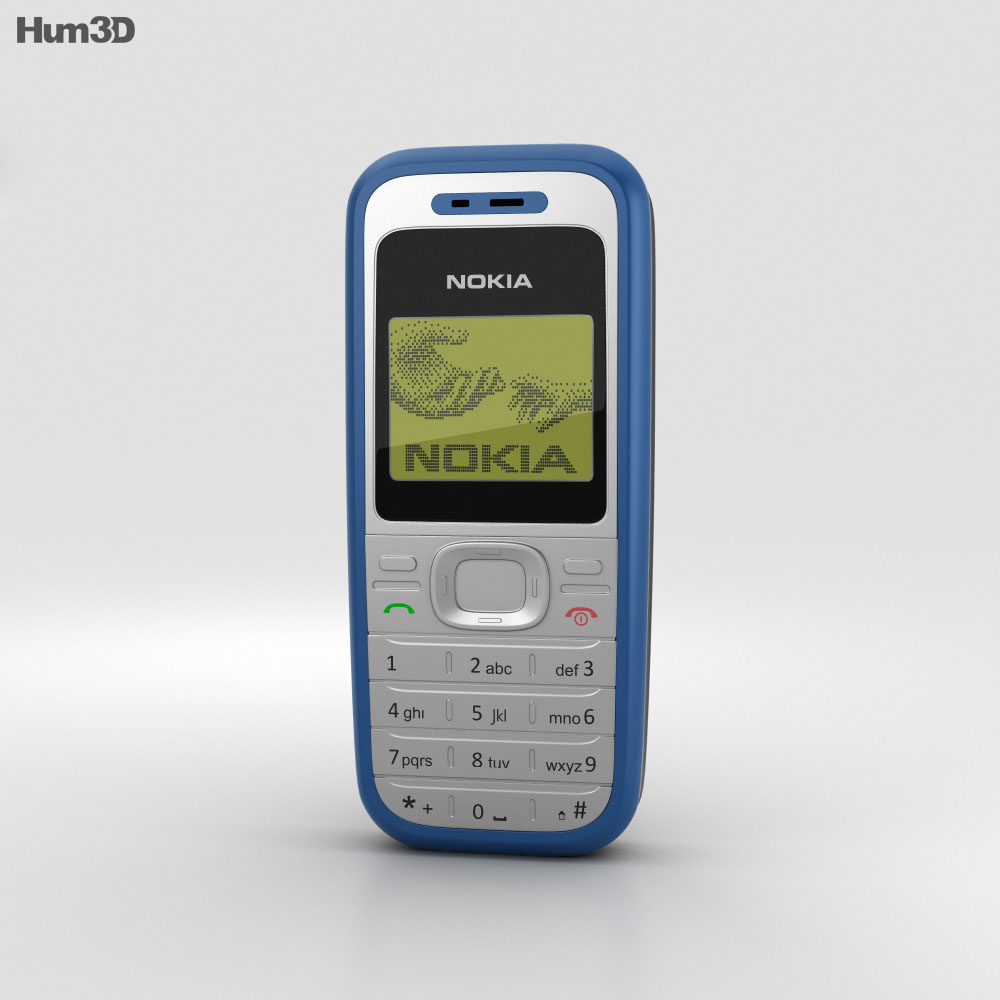
Nokia 1200
Nokia 1200
Units Sold: 155 million
Introduced in 2007, the Nokia 1200 was celebrated for its practical features, including extended battery life, flashlight functionality, and dust-resistant keys.
It was designed to be affordable, durable, and reliable, catering to a broad demographic.
Nokia 6600
Nokia 6600
Units Sold: 150 million
Launched in 2003, the Nokia 6600 was one of the first smartphones to gain widespread popularity.
It featured advanced functionalities for its time, such as a camera, Bluetooth connectivity, and expandable memory, appealing to tech enthusiasts worldwide.
Nokia 5230
Nokia 5230
Units Sold: 150 million
The Nokia 5230, released in 2009, was a touchscreen smartphone that offered many features of higher-end devices at a more affordable price point.
It was known for its music playback capabilities, GPS navigation, and access to the Ovi Store for apps.
Nokia 2600
Nokia 2600
Units Sold: 135 million
Known for its compact design and simple features, the Nokia 2600, introduced in 2004, catered to users looking for a basic, reliable phone.
Its colorful covers, long battery life, and affordability contributed to its popularity.
Nokia 1600
Nokia 1600
Units Sold: 130 million
Released in 2006, the Nokia 1600 featured a color screen, polyphonic ringtones, and a speaking clock, setting it apart from other entry-level models.
Face detection, Smile detection, Geo tagging, Panorama, Touch to focus
Video Recording
1080p @ 60 fps FHD
Flash
Yes, Dual LED
Front Camera
1.2 MP
TECHNICAL
OS
iOS v8, upgradable to v12
Chipset
Apple
CPU
1.4 GHz, Dual Core Processor
GPU
PowerVR GX6450 (quad-core graphics)
Java
No
Browser
Yes, supports HTML5 (Safari)
MULTIMEDIA
Supports
MMS, iMessage, Voice Commands
Email
Yes, with Push Email
Music
MP3, WAV, AAX+, AIFF
Video
MP4, H.264
FM Radio
No
Document Reader
Yes
BATTERY
Type
Non-Removable Battery
Size
1810 mAh, Li-Po Battery
Music Playback Time
50 hours
FAQs
Which mobile phone holds the record for the highest sales?
The Nokia 1100 holds the record as the best-selling mobile phone of all time, with over 250 million units sold, praised for its simplicity and durability.
What made the iPhone 6 series stand out in sales?
Released in 2014, the iPhone 6 and 6 Plus saw approximately 220 million units sold, thanks to their larger screens, enhanced cameras, and faster processors, meeting the demand for high-performance smartphones.
How did Nokia achieve such dominance in the mobile phone market?
Nokia’s dominance was built on the back of durable, user-friendly phones like the Nokia 1110 and 3210, which were designed for ease of use and featured innovations like the internal antenna and preloaded games.
What features did the Nokia 5230 offer to achieve high sales?
The Nokia 5230, a touchscreen smartphone released in 2009, offered features typically found in higher-end devices at an affordable price, including music playback, GPS navigation, and app store access.
Among the standout updates are the revamped Saved Messages 2.0, the introduction of one-time voice and video messages, and advanced read receipts. Here’s what you need to know
Availability and Future Directions
Availability and Future Directions
Available now on Android and iOS, this update marks another step forward in Telegram’s journey to provide a comprehensive, secure, and user-centric communication platform.
With version 10.6.3 or later, Telegram continues to innovate, ensuring that its users enjoy a seamless and enriched messaging experience.
Revolutionising Note-Taking and Storage with Saved Messages 2.0
Telegram’s Saved Messages featurehas received a substantial upgrade, transforming it into a powerful tool for storing links, media, and bookmarks.
This enhanced version allows users to organize their saved content by chat, apply tags for better categorization, and access it all through a newly introduced ‘Saved’ tab within the Shared Media section.
View Saved Messages by Chat and Enhanced Tagging
Adding to the utility of Saved Messages 2.0, Telegram has implemented a ‘View as Chats’ mode.
This feature enables users to view a list of private chats, groups, and channels from which messages have been saved, with the option to pin preferred chats for quick access.
Furthermore, premium users benefit from the ability to add multiple tags based on emojis to their saved messages.
One-Time Voice and Video Messages for Enhanced Privacy
In a move to bolster privacy and control over shared content, Telegram now offers a View-Once setting for voice and video messages.
This feature ensures that such messages can only be played a single time before they are automatically deleted.
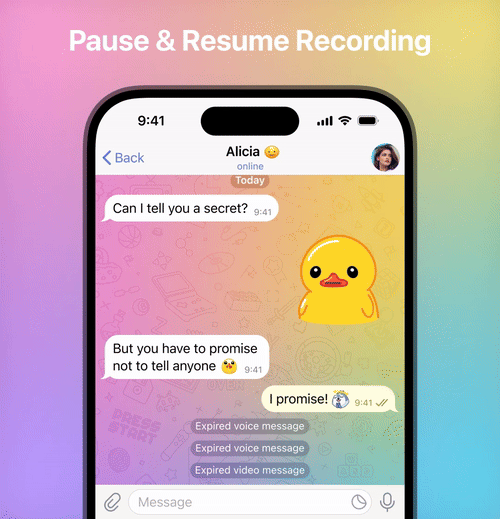
Pause and Resume Recording Plus Read Time in Private Chats
Pause and Resume Recording
Improvements to voice and video messaging continue with the ability to pause and resume recording, eliminating the inconvenience of sending multiple messages.
Additionally, Telegram has introduced read time information for private chats, allowing users to see the exact time their messages were read, with privacy settings aligned with the Last Seen status.
Search functionality in all chats has been improved, making it easier to navigate search results and view them as a compact list.
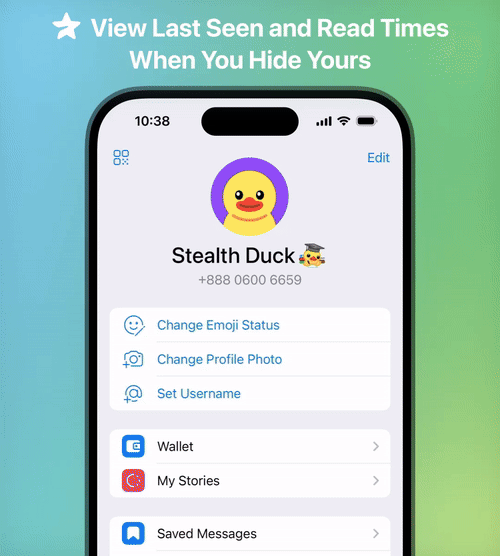
One-Way Last Seen and Read Times
One-Way Last Seen and Read Times
Telegram Premium users can hide their last seen and read times while still viewing those of others.
This feature is customizable and allows for greater privacy control.
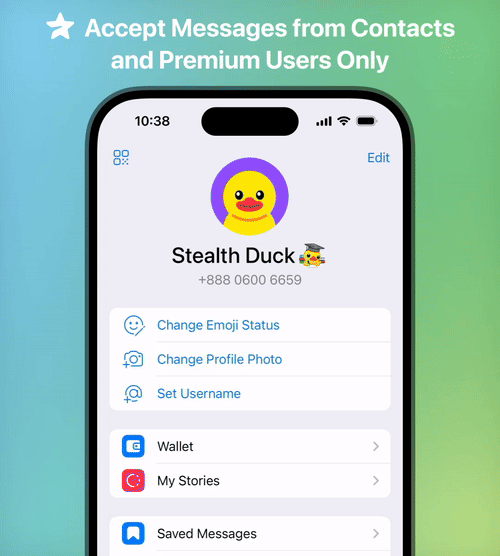
Private Message Permissions
Private Message Permissions
Premium users can choose who can send them messages, selecting from ‘Everyone’ or ‘My Contacts and Premium Users.’
Faster Loading Time and High-Quality Stories
Faster Loading Time and High-Quality Stories
Video stories now load four times faster, and Premium users can view them in higher quality. All users can control playback speed in video stories.
New Design for Shared Contacts
New Design for Shared Contacts
Messages with shared contacts now display better, reflecting the chosen color and emoji icons in Appearance Settings.
Improved Video Messages on iOS
Improved Video Messages on iOS
Video message recording on iOS has been enhanced for clearer quality, quicker camera switching, and reduced camera shake.
FAQs
What is Saved Messages 2.0 on Telegram?
Saved Messages 2.0 is an upgraded feature that allows Telegram users to efficiently store links, media, and bookmarks, organize them by chat or tags, and easily access them through a new ‘Saved’ tab.
How do one-time voice and video messages work?
Telegram’s one-time voice and video messages can be played only once before they are automatically deleted, providing an added layer of privacy for sensitive communications.
Can I see when my message was read in Telegram?
Yes, Telegram has introduced detailed read receipts in private chats, enabling users to see the exact time their messages were read, with privacy tailored based on Last Seen status.
What new features are available for Telegram Premium users?
Telegram Premium users now enjoy features like hiding last seen and read times, selecting who can send them messages, faster video story loading, and enhanced video message quality.
How has Telegram improved search functionality?
The update has improved search functionality across all chats, offering a more streamlined experience when navigating search results and viewing them in a compact list.
Future strategies focus on technological advancements and market trends.
In an insightful interview with Gaurav Pahwa, Director of Lotus Electronics Supermarket, we delve into the remarkable journey of Lotus Electronics since its inception in 2000.
Pahwa shares key milestones in the company’s growth, the evolution of its product range, strategies for market expansion, and how it has navigated the shift towards online retail.
Strategic product range expansion meets changing consumer demands.
He also highlights the top-performing products of 2023, Lotus Electronics’ competitive differentiation in the consumer electronics sector, and future challenges and opportunities.
This conversation sheds light on Lotus Electronics’ strategic approach to maintaining its prominence in the dynamic consumer electronics market.
Can you describe the journey of Lotus Electronics since its inception in 2000, and what were the key milestones in its growth?
Lotus Electronics marks significant growth with 20 stores in 3 states
Since inception in 2000, Lotus Electronics has grown from a modest start-up to a prominent player in the electronics retail industry.
The company’s key milestones include the establishment of multiple retail outlets (20 stores in 3 states), diversification of product range, and strong partnerships with leading brands.
Through a customer-centric approach, innovative marketing, and embracing e-commerce, Lotus Electronics has successfully positioned itself as a trusted name in the sector.
How has the product range of Lotus Electronics evolved over the years, and what influenced these changes?
Lotus Electronics evolved over the years
Initially starting with a limited selection, the company expanded its offerings to encompass a diverse range of electronics and appliances.
This evolution was influenced by several factors, including consumer demand, technological advancements, and market trends.
Lotus Electronics strategically adapted to changing customer preferences, incorporating the latest innovations in electronics and regularly updating its inventory to stay competitive.
The company’s commitment to providing a comprehensive and up-to-date product portfolio has played a crucial role in catering to a broader customer base and maintaining its relevance in the dynamic consumer electronics market.
Lotus Electronics has expanded its presence significantly. Could you elaborate on the company’s approach to market expansion and the selection of new store locations?
Lotus Electronics has expanded its presence significantly
Lotus Electronics has implemented a strategic and calculated approach to its market expansion, contributing to its significant presence in the industry.
The company carefully selects new store locations based on a combination of demographic analysis, market research, and potential customer demand.
The decision to open stores in specific areas is often influenced by factors such as population density, economic development, etc.
What were the top-performing products for Lotus Electronics in 2023, and what trends do you see emerging in consumer electronics?
top-performing products for Lotus Electronics in 2023
Emerging Segments: Mobile, Laptop, Television, Air Conditioners, Refrigerators, Home Appliances
With the increasing shift towards online retail, how has Lotus Electronics adapted its online strategy to meet consumer needs?
Lotus Electronics adapted its online strategy to meet consumer needs
Lotus Electronics has likely adapted to the increasing shift towards online retail by investing in a user-friendly e-commerce platform, ensuring efficient order fulfillment, and offering exclusive online deals.
The company may also leverage digital marketing channels and emerging technologies to enhance the online shopping experience and stay competitive in the evolving online retail landscape
How does Lotus Electronics differentiate itself from other players in the consumer electronics sector?
Lotus Electronics differentiate itself from other players in the consumer electronics sector
Lotus Electronics distinguishes itself in the consumer electronics sector through a commitment to customer service, a diverse product range, competitive pricing, strong brand partnerships, and adaptability to technological trends.
The strategic expansion of retail locations and an evolving online strategy further contribute to its unique positioning in the market.
The company demonstrates each and every one living by the philosophy based on 6Cs which is totally customer-centric and related to Comfort, Convenience, Choice, Competitive rates, Care and Commitment – making the total shopping experience a memorable one. Just like its showrooms the online portal also commits the same shopping experience.
What strategies has Lotus Electronics employed to maintain a competitive edge in the highly dynamic consumer electronics market?
Lotus Electronics employed to maintain a competitive edge in the highly dynamic consumer electronics market
Lotus Electronics maintains a competitive edge through customer-centric approaches, strategic brand partnerships, a diverse product range, and an embrace of technological trends.
Effective marketing, strategic retail expansion, and an evolving online strategy contribute to its adaptability in the dynamic consumer electronics market.
Regular assessments of consumer preferences and a commitment to value further solidify the company’s competitive position.
Looking forward, what are the key challenges and opportunities that Lotus Electronics anticipates, and how is the company planning to address them?
Lotus Electronics focus on innovation, supply chain optimization, strategic partnerships, e-commerce optimization, and overall adaptability to market dynamics
Basically, challenges for us include staying current with technological advancements, managing supply chain disruptions, facing intense competition, and adapting to the growth of e-commerce.
Opportunities lie in the demand for smart technologies, sustainability practices, market expansion, and improving customer experience.
To address these challenges, we often focus on innovation, supply chain optimization, strategic partnerships, e-commerce optimization, and overall adaptability to market dynamics.
FAQs
What has been key to Lotus Electronics’ success since its inception?
Lotus Electronics attributes its success to strategic market expansion, a diverse product range, and a strong focus on customer-centric approaches, as detailed by Director Gaurav Pahwa.
How does Lotus Electronics stay ahead in the competitive consumer electronics market?
By prioritizing customer service, embracing technological trends, and maintaining strategic brand partnerships, Lotus Electronics ensures its competitive edge, as shared by Gaurav Pahwa.
What are the top-performing products for Lotus Electronics, and what trends are emerging?
Mobiles, laptops, televisions, and home appliances are among the top performers, with smart technologies and sustainability emerging as key trends.
How has Lotus Electronics adapted to the growing trend of online shopping?
Lotus Electronics has developed a comprehensive online strategy, focusing on a user-friendly e-commerce platform and leveraging digital marketing to enhance the online shopping experience.
What future challenges does Lotus Electronics anticipate, and how does it plan to address them?
Anticipated challenges include technological advancements and e-commerce growth. Lotus Electronics plans to focus on innovation, supply chain optimization, and market adaptability to address these challenges.
Also Read: Best Phones to Buy in Different Price Segments – under 10K, under 20, under 30K, under 40K, and above 50K
Starting in March 2024 with the iOS 17.4 update, this legislative requirement will allow sideloading and alternative digital storefronts alongside the existing App Store in EU member states.
While this opens up new avenues for developers, it also presents significant risks to end users.
Potential Risk to Apple Users
Potential Risk to Apple Users
The “walled garden” approach of Apple has traditionally safeguarded users against malicious software, with the App Store’s rigorous review process rejecting nearly 1.7 million app submissions in 2022 alone, due to privacy, security, and content standard failures.
The introduction of third-party storefronts, however, introduces a potential pathway for harmful apps to be installed on iPhones, circumventing the stringent security measures Apple has in place.
In response to these regulatory changes, Apple has been proactive in implementing security mechanisms to mitigate risks, including the notarization of all apps, which ensures they are secure and non-malicious before installation, regardless of the originating app store.
Phil Schiller Not Sure of Third Party Apps
Phil Schiller Not Sure of Third Party Apps
Schiller highlighted Apple’s efforts in engineering over 600 new APIs to support developers in creating secure marketplaces and installing apps, emphasizing user control throughout the process.
Additionally, an information sheet will be provided to users prior to app installation, offering basic details about the app and enhancing marketplace selection control.
Despite these measures, Schiller acknowledges that Apple’s ability to protect usersis not absolute, especially concerning the content of apps from alternative storefronts. Notarization focuses on security rather than content, leaving the door open for apps that Apple would typically restrict due to objectionable content. The onus will be on these third-party marketplaces to establish their own rules and limitations, which may not necessarily align with Apple’s established standards aimed at protecting users and families from inappropriate content.
In an interview with Fast Company’s Michael Grothaus published today, Apple’s former marketing chief and current App Store head Phil Schiller said there are privacy and security risks associated with these alternative app marketplaces:
“These new regulations, while they bring new options for developers, also bring new risks.
There’s no getting around that. So we’re doing everything we can to minimize those risks for everyone,”Schiller told me in a recent discussion about the privacy and security impact of the European Commission’s Digital Markets Act.
Another risk is that the App Store’s strict rules surrounding objectionable content might not extend to alternative app marketplaces, according to Schiller:
“We have dealt with a lot of input from families, from governments, on things that we need to do to try to either not allow certain kinds of objectionable content on our App Store, or give users control over that experience to decide what’s best for themselves—and we have rules around that,” Schiller says. “Those rules will not apply in another marketplace unless they choose to make rules of their own, [with] whatever criteria they come up with. Does that increase the risk of users, and families, running into objectionable content or other experiences? Yes, it does.”
Schiller’s comments reiterate many of the risks that Apple outlined on its website:
Apple’s Phil Schiller Warns of Privacy Risks with Third-Party App Marketplaces in EU
If not properly managed, alternative distribution poses increased privacy, safety, and security risks for users and developers.
This includes risks from installing software from unknown developers that are not subject to the Apple Developer Program requirements, installing software that compromises system integrity with malware or other malicious code, the distribution of pirated software, exposure to illicit, objectionable, and harmful content due to lower content and moderation standards, and increased risks of scams, fraud, and abuse.
Apple has less ability to address these risks, and to support and refund customers regarding these issues. Even with safeguards, many of these risks remain.
FAQs
What changes are coming to the iPhone app ecosystem in the EU?
Due to the EU Digital Markets Act, Apple will allow sideloading and third-party digital storefronts alongside the existing App Store in EU member states, starting with the iOS 17.4 update in March 2024.
How has Apple traditionally protected its users against malicious apps?
Apple’s “walled garden” approach, including a rigorous review process, has protected users by rejecting nearly 1.7 million app submissions in 2022 for failing to meet privacy, security, and content standards.
What is app notarization, and how does it help with third-party app installations?
App notarization is a security measure implemented by Apple to ensure all apps, regardless of their source, are secure and non-malicious before being installed on an iPhone, as part of Apple’s effort to mitigate risks from third-party app marketplaces.
Can Apple control the content of apps from alternative storefronts?
While Apple can secure apps through notarization, it does not control the content of apps from third-party storefronts. This means apps that Apple would typically restrict could be available through alternative marketplaces.
What changes is Apple making in response to the EU’s DMA legislation?
Apple is complying with the European Union’s Digital Markets Act by allowing third-party app downloads and offering developer consultations to navigate these changes effectively, ensuring a smooth transition for app distribution and payments in the EU.
How can developers learn about the new guidelines affecting the App Store in the EU?
Developers can request 30-minute online or in-person consultations with Apple’s team to discuss changes impacting iOS, Safari, and the App Store in the EU, including alternative distribution and payment methods.
What was Apple’s revenue in Fiscal Q1 2024, and how did it compare to expectations?
Apple reported a revenue of $119.58 billion in Fiscal Q1 2024, surpassing analyst expectations and indicating strong sales across iPhone, Services, and other product lines, despite slight shortfalls in Mac and iPad revenues.
How significant is the EU market to Apple’s App Store business?
The EU accounts for approximately 7% of Apple’s global App Store revenue. Despite the small percentage, the recent regulatory changes pose new challenges and opportunities for Apple in the European market.
Will Apple’s compliance with the DMA affect its financial performance?
While Apple CEO Tim Cook acknowledges the challenges posed by the DMA compliance, the company remains focused on preserving its ecosystem’s privacy, security, and usability. The full impact on financial performance remains to be seen in future quarters.
What is Apple’s new policy regarding third-party app stores?
Apple announced plans to allow third-party app stores in Europe, including a “Core Technology Fee” for apps sold outside its App Store and a €1,000,000 letter of credit requirement for opening an app store.
Why is Apple’s new policy being criticized?
Critics, including Spotify’s CEO, argue that Apple’s new policy imposes high financial burdens on developers, especially smaller ones, potentially stifling innovation and diversity in the app market.
What did Spotify’s CEO say about Apple’s new app store policy?
Spotify CEO Daniel Ek criticized Apple’s policy in a blog post, calling it “extortion” due to the combination of the per-install fee and restrictions on in-app payments.
How does Apple’s policy affect smaller app developers?
The requirement of a €1M letter of credit and per-install fees pose significant financial challenges for smaller developers, potentially excluding them from establishing their own app stores.
Are there potential legal implications for Apple’s policy?
Apple’s approach to DMA compliance is expected to lead to legal challenges, with accusations that the company is making it difficult and costly to leave its App Store.
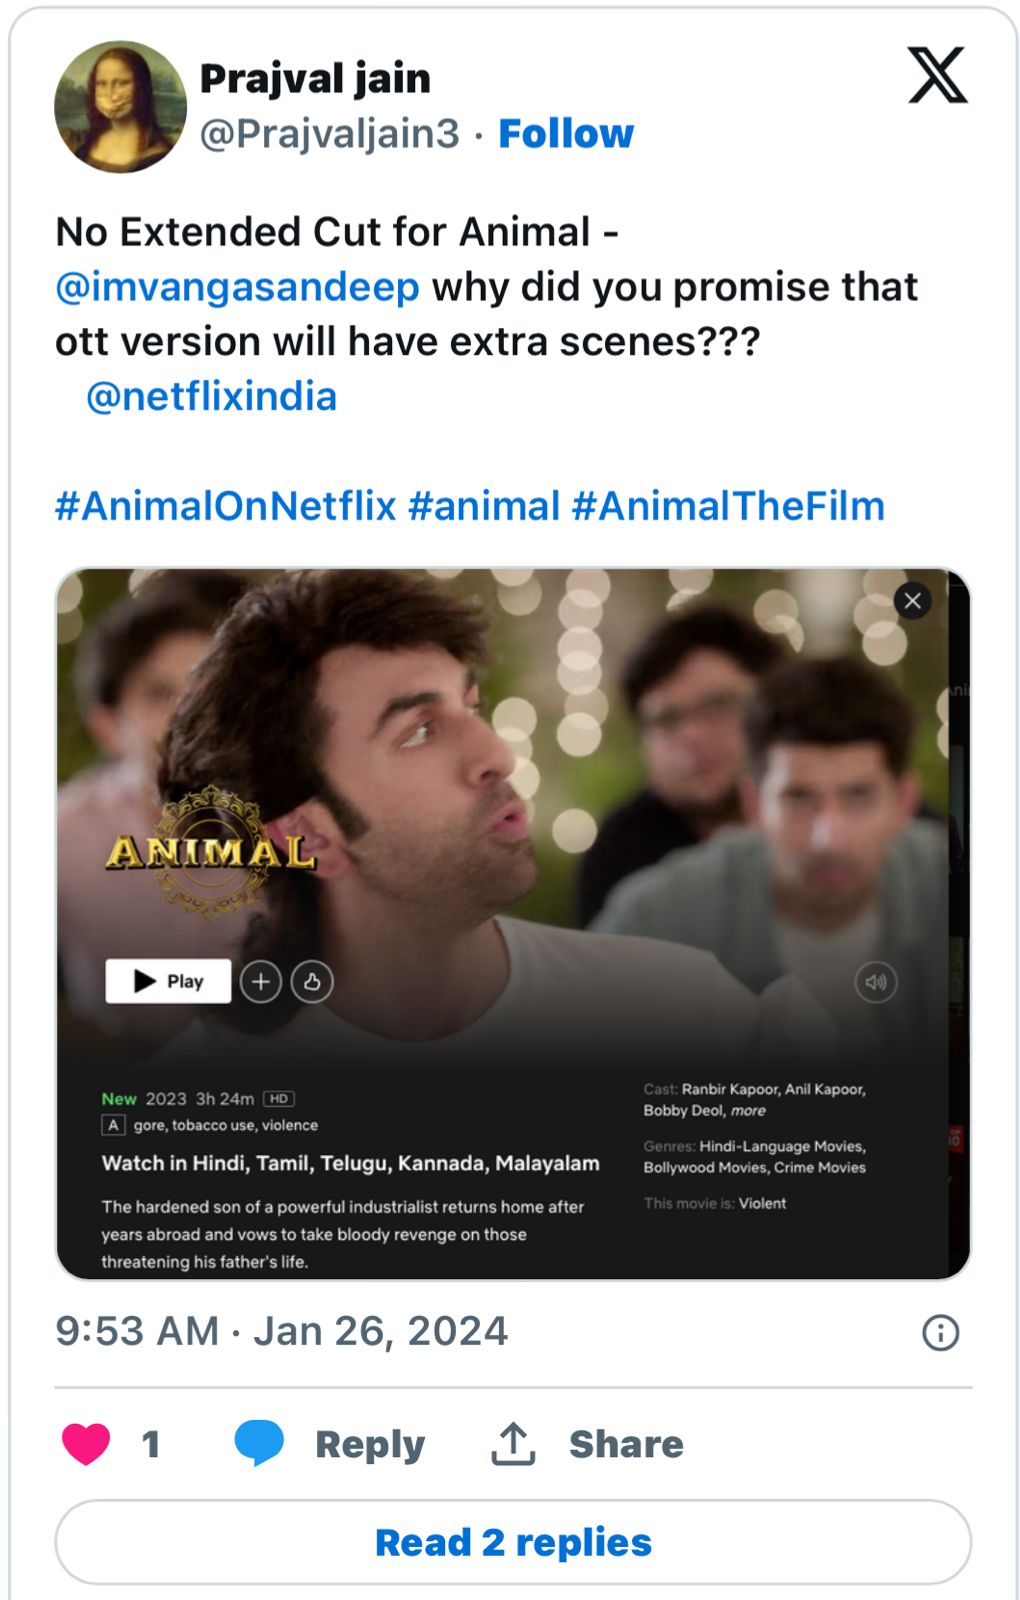
Sandeep Reddy Vanga’s 2023 superhit family crime drama Animal was released on Netflix on January 26.
Animal has Ranbir Kapoor and Rashmika Mandanna in lead roles.
Fans expressed disappointment with the makers for not releasing an Extended Cut.
Last year was one of the most exciting years for Indian Film fans.
While multiple box office records were created and shattered, there were quite a few films that became the talk of the town.
One of the most controversial movies of 2023, Sandeep Reddy Vanga’s Animal has now been released on OTT and reactions are buzzing from all corners.
Here’s all you need to know about this latest Netflix release.
Announcing the OTT release, the official handle of Netflix on X (formerly Twitter) wrote, “The air is dense and the temperature is rising. Witness his wild rage in Animal, streaming from 26 January on Netflix in Hindi, Tamil, Telugu, Malayalam and Kannada.”
“We are absolutely overjoyed by the response ‘Animal’ received in theatres and now I am glad that audiences worldwide will get a chance to watch it in the comfort of their homes. The opportunity to showcase our work globally is truly special,” the actor said in a statement.
Fans Disappointed with ‘Animal’ OTT Release Version
Fans Disappointed with ‘Animal’ OTT Release Version
Within a few hours of the official announcement, several excited fans of the movie started commenting on it with the hashtag #AnimalOnNetflix.
However, many viewers were soon left disappointed after the OTT release.
Director Sandeep Reddy Vanga, actor Bobby Deol and many sources online had hinted that the extended cut would likely be streamed. To the fan’s disappointment, that didn’t happen.
X users were quick to express their disappointment on the app with many tagging the director asking ‘where’s the extended cut.
As fans played the movie on Netflix, they noticed that the run-time was 3 hours 24 minutes, which was more than 3 hours 21 minutes – the version released in theatres.
They thought the OTT version had Animal’s deleted scenes, but once they played the film, it turned out to be 3 hours and 21 minutes long only.
Sandeep Reddy Vanga hinted that there will be some more seens added in the movie on OTT
No Kiss Between Ranbir Kapoor and Bobby Deol?
No Kiss Between Ranbir Kapoor and Bobby Deol?
Since Animal exploded at the Box Office, rumours and speculations about characters have made rounds on Twitter, Reddit and other social media discourse groups.
One such speculation was a supposed kiss between Ranbir Kapoor and Bobby Deol in the climax showdown scene.
Soon the “kiss between Ranbir and Bobby” rumours did not remain rumours as the director Sandeep Reddy Vanga confirmed the scene in an interview. Sandeep had said, “Yes, actually there was a kiss. Bobby will kiss Ranbir, a kiss on the cheek, and say, ‘Bhai, I didn’t even spend one day with my father’, and he’ll go back and open his zip. It was superb when we were shooting, but I felt like the kiss was diluting the zip. Why I removed it was because Bobby sir gave this expression with a smirk, and a tear falls down his cheek. I felt that was a bigger cinematic high than coming and kissing.”
Vanga then went on to promise that the kiss would make it to the extended cut on Netflix India.
However, fans online were disappointed to find out that no such scene was included in the Netflix version of the film.
Animal starring Ranbir Kapoor, Rashmika Mandanna, Bobby Deol and Anil Kapoor in lead roles did great business at the box office.
Director Sandeep Reddy Vanga is known for delving into controversial territories with the various themes in his movies and reactions to his latest family crime drama “Animal” were no different.
“Animal” has been heavily criticised by a large section of the audience for its regressive narrative along with its cruel glorification of misogyny and patriarchy.
The plot of the film revolves around a complex relationship between a father and a son.
The film follows Ranvijay (Ranbir), the son of Balbir (Anil), a business magnate in Delhi, who moved to the United States, and returns after an assassination attempt was held on his father, following which Ranvijay plans to take revenge for his father.
Animal had a worldwide theatrical release on December 1, 2023. It received an exceptional response from the viewers and was a smash hit at the box office.
Ranbir Kapoor, Anil Kapoor, Bobby Deol, Rashmika Mandanna, Tripti Dimri
OTT Platform
Netflix
Streaming Date
26 January 2024
Budget
100 Crores
Hit or Flop
Blockbuster
Animal” has been heavily criticised by a large section of the audience
‘Animal’ OTT Release Date
‘Animal’ OTT Release Date
‘Animal’ will be released on Netflix on Friday, January 26 in Hindi, Tamil, Telugu, Malayalam and Kannada.
ANIMAL Box-office Collection: Breaks All Records
ANIMAL Box-office Collection: Breaks All Records
ANIMAL has now surpassed Jawan, Gadar 2, and Pathaan with ₹512 Crores box-office collection (day 17), and is still running in theatres.
Thus, it is the Best/Highest Indian Grossing Movie of 2023. Even Karan Johar recently watched ANIMAL and gave it the tag of ‘Best Film of 2023’.
After Salman Khan’s Tiger 3 setback, Shahrukh Khan & Raju Hirani’s Dunki is expected to join ANIMAL or even set new records given the director’s legendary movies like 3 Idiots, PK, and Munnabhai MBBS! Prabhas & Prashanth Neel’s SALAAR can also be a dark horse!
ANIMAL has now surpassed other Boxoffcice hit
Songs of the ‘Animal’
Songs of the ‘Animal’
The music direction of the film is given by Harshavardhan Rameshwar, who has previously worked with the director of Arjun Reddy (2017) and Kabir Singh (2019).
The songs featured in the film are composed by Vishal Mishra, Jaani, Manan Bhardwaj, Shreyas Puranik, Pritam, JAM8, Ashim Kemson, Harshwardhan Rameshwar and Gurinder Seagal. Siddharth-Garima, Jaani, Manan Bhardwaj, Gurinder Seagal, Manoj Muntashir, Raj Shekhar, Ashim Kemson and Bhupinder Babbal have given the song’s lyrics.
‘Hua Main’, the first single was released on 11 October 2023 and became a huge hit amongst the fans.
The second song, ‘Satranga’ was released on 27 October 2023, and the third song, ‘Papa Meri Jaan’ was showcased on 14 November 2023. ‘Arjan Vailly’, the fourth single was showcased on 18 November 2023.
Will there be any additional scenes In Animal OTT?
Will there be any additional scenes In Animal OTT?
The duration of the Animal movie was 3 hours and 21 minutes.
However, the director of the movie, Sandeep Reddy Vanga, hinted that there will be some more scenes added to the movie released on OTT.
In one of his interviews, the director said, “One thing I felt was I should have left the 3 hours 30 minutes instead of 3 hours 21 minutes. I don’t know why I edited those 8-9 minutes. Now, I will be using those 5-6 minutes extra.”
Courtroom drama over OTT release
Courtroom drama over OTT release
Cine1 Studios Private Limited, which co-produced the movie, sued another producer T-series over non-payment compliance with contractual obligations.
Cine1 asked the court to stop the release of Animal on OTT on January 26, 2024, until it paid its dues and rendered a collection of the movie.
T-Series lawyer advocate Amit Sibal stated that Cine1 had renounced its rights for 2.2 crore. He also mentioned that the company concealed the document from the court and thus was not entitled to relief.
Cine1 Studios Private Limited Sued another producer of T-series over non-payment compliance
Reactions to the missing ‘extended cut’
Reactions to the missing ‘extended cut’
Expressing disappointment at the missing extended cut, X (formerly Twitter) users shared their discontent. One post read, “Animal extended cut is a scam lol. Original runtime 3H23M. Netflix runtime is 3H24M (eyeroll emojis).”
Another comment questioned, “Where is the extended cut version of Animal on Netflix? It was supposed to be a 3h and 44m run time right?”
FAQs
Q1. Is Animal a hit?
Answer. On the box office front, the film was a huge commercial success and went on to gross over Rs 800 crore globally, making it one of the most successful Hindi films ever.
Q2. Why Animal movie is controversial?
Answer. After the theatrical release of the 2023 superfit film Animal, a segment of the audience found the movie objectionable. Criticisms included its portrayal of toxic masculinity, misogyny, a chauvinistic approach, unnecessary violence, and poor treatment of women, creating an online uproar.
Q3. How long is Ranbir Kapoor’s Animal?
Answer. “Animal” is definitely one of the Hindi film industry’s longest-running films of recent times. The Ranbir Kapoor starrer ‘Animal’ has a runtime of 3 hours 21 minutes.
Q4. What is the budget of Animal?
Answer. Sandeep Reddy Vanga invested significantly in “Animal,” with a reported budget of around Rs. 100 crores.