Highlights
- VLC media player is one of the most popular video streaming software amongst Windows users.
- VLC is a free and open-source, portable, cross-platform media player software.
- It supports a wide range of video and audio formats.
- VLC software has a common issue of lagging during video streaming.
- There are ways the video lagging issue can be fixed which include checking the file format, disabling hardware acceleration, changing the power plan to high performance, disabling the in-loop deblocking filter, changing the cache value, resetting preferences, updating or reinstalling the software.
Introduction
If you are facing video lag issues with the VLC media player on your Windows system, in this article we are sharing multiples ways to fix it.
VLC media player is one of the most widely used free and open-source, portable, cross-platform media player software. It supports a range of file formats and can work as a one-for-all player for Windows. VLC’s popularity is often credited to the software’s versatility and user-friendly setup. If you are a windows user, you are most probably already using VLC for streaming different types of media.
However, VLC media player users often complain of lagging issues during running certain media files. The software sometimes doesn’t play the videos smoothly and users experience constant lags.
If you too are facing similar issues with the VLC software in your windows system, we are here with some easy fixes.
But before we get to the easy fixes on how to fix video lag in VLC media player on windows, let’s learn more about the software itself.
What is VLC Media Player?
VLC media player is one of the most widely used free and open-source, portable, cross-platform media player software.
It supports a wide range of input formats including MPEG (ES, PS, TS, PVA, MP3), AVI, ASF / WMV / WMA, MP4 / MOV / 3GP, OGG / OGM / Annodex, Matroska (MKV), Real, WAV (including DTS) and various types of Raw Audio files.
All formats supported by VLC Meda Player –
Video – MPEG-1/2, DivX® (1/2/3/4/5/6), MPEG-4 ASP, XviD, 3ivX D4, H.261, H.263 / H.263i, H.264 / MPEG-4 AVC, Cinepak, Theora, Dirac / VC-2, MJPEG (A/B), WMV 1/2, WMV 3 / WMV-9 / VC-1, Sorenson 1/3, DV, On2 VP3/VP5/VP6, Indeo Video v3 (IV32), Real Video (1/2/3/4).
Music – MPEG Layer 1/2, MP3 – MPEG Layer 3, AAC – MPEG-4 part3, Vorbis, AC3 – A/52, E-AC-3, MLP / TrueHD>3, DTS, WMA 1/2, WMA 3, FLAC, ALAC, Speex, Musepack / MPC, ATRAC 3, Wavpack, Mod, TrueAudio, APE, Real Audio, Alaw/µlaw, AMR (3GPP), MIDI, LPCM, ADPCM, QCELP, DV Audio, QDM2/QDMC, MACE.
Others – DVD, Text files (MicroDVD, SubRIP, SubViewer, SSA1-5, SAMI, VPlayer), Closed captions, Vobsub, Universal Subtitle Format (USF), SVCD / CVD, DVB, OGM, CMML, Kate.
ID3 tags, APEv2, Vorbis comment.
VLC Media Player – System Requirements
- Windows – VLC runs on all versions of Windows, from Windows XP SP3 to the last version of Windows 10
- Mac OS X – VLC media player requires Mac OS X 10.7 or later
- Ubuntu – Ubuntu 13.10 “Saucy Salamander”, Ubuntu 13.04 “Raring Ringtail”, Ubuntu 12.10 “Quantal Quetzal”, Ubuntu 12.04 LTS “Precise Pangolin”
- Android
- iOS
How to Fix Video Lag in VLC Media Player on Windows?

Check the File Format
If you are facing any issue with any media player, the first thing to check is the file format.
And even though the VLC Media Player supports most types of file formats, there could be a rare chance that you are trying to play an unsupported media file. In such cases, you may experience lags.
If case the file format is unsupported, you can convert the file format into a supported format to be able to play it using the VLC media player.
Change Cache Value
When VLC is used to stream internet videos, the software caches some of the content in order to facilitate faster playback. If the VLC media player in your system is creating video lag issues when you are streaming, try to increase the network and file cache sizes. In ideal circumstances, this should fix the video lagging. Follow the below-mentioned steps –
- Launch the VLC media player on your laptop or PC.
- Click the Tools menu at the top and select Preferences from the list.
- Select the All option under the Show settings section.
- Select Input / Codecs from the left pane column.
- Under the Advanced section, increase the value in the File caching (ms) field.
- Similarly, increase the value for the Network caching (ms) as well.
- Click the Save button.

Reset the VLC Preferences
There are a lot of settings and options or preferences in the VLC software that can change the way it functions. Even a minor problem in one of the settings and options can cause issues with the media player. Sometimes it is not possible to check all the settings to find out where is problem and in such cases resetting the VLC preferences can actually be a lifesaver. It is easier and you can restart your software without any further issues.
Follow the below-mentioned step to reset the VLC preferences –
- Launch the VLC media player on your PC.
- Click the Tools menu at the top and select Preferences from the list.
- In the Interface tab, click the Reset Preferences button at the bottom.

- Click OK when the Are you sure you want to reset your VLC media player preferences dialog appears.
- Restart the VLC media player.
Disable In-Loop Deblocking
If you are constantly facing video lagging in VLC, disabling the in-loop deblocking filter on the software can also solve this nagging issue. Below are the steps to follow –
- Open the VLC app and click on the Tools menu at the top.
- Select Preferences. (Alternatively, Press Ctrl + P as a short cut to launch the VLC Preferences window.)
- Switch to the Input / Codes tab.
- Click the drop-down menu next to Skip H.264 in-loop deblocking filter and select All.
Try High-Performance Power Setting on Windows
Windows’ strict power profile settings sometimes create many apps and software to run smoothly. The VLC media player too can sometimes face issues due to this power setting. You can try changing the power setting to high performance on windows to avoid this problem when playing certain files on VLC.
Follow the below steps to change the power setting of your Windows laptop or computer
- Press Win + R to launch the Run dialog box on your Windows system
- Type control in the Open field and press Enter. This will open the Control Panel window.
- Click the drop-down menu in the top right corner to change the view type to Small icons or Large icons.
- Click on Power Options to open that applet.
- Select High performance.
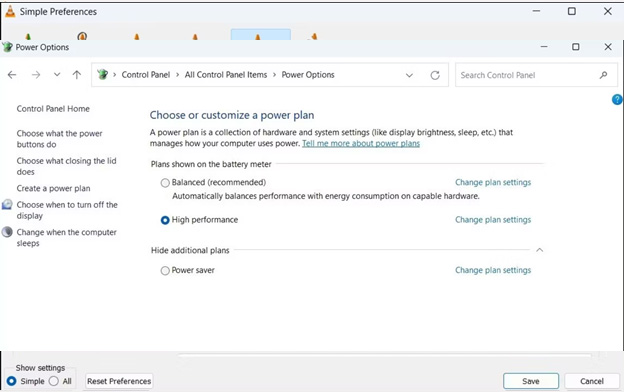
This will change the system power setting to High Performance, which will solve any video player lagging issues.
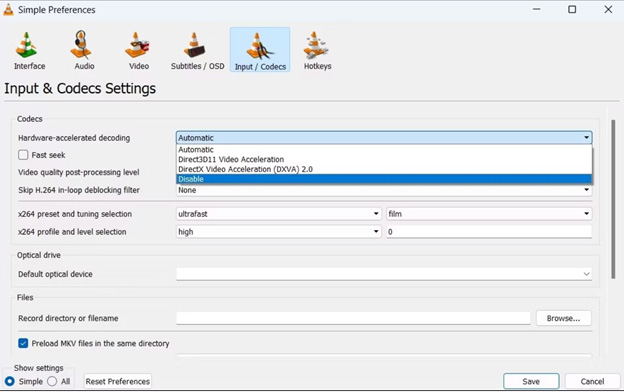
Disable Hardware Acceleration
VLC Media player uses the hardware acceleration feature to accelerate decoding for smooth video playback. Whenever there is a problem with this feature, the player shuts the video file without any prompt. In case you are facing a similar issue with the media player, you can try disabling the hardware acceleration feature. If that is causing the issue, disabling the feature should certainly solve the problem.
Here’s how you can disable the hardware acceleration feature
- Open VLC media player.
- Click on Tools and select Preferences from the resulting menu.
- Select the Input / Codes tab at the top.
- Use the drop-down menu next to Hardware-accelerated decoding to select Disable.
- Click on Save.
- Restart the VLC app
This should play the video smoothly.
Update/Reinstall VLC Media Player
If above mentioned all tricks don’t solve the video lagging issue on your VLC media player, then maybe it’s time to go for updating or reinstalling the software. Every software needs timely updates and there are times when the problem simply lies in the version of software you are using.
First of all check for updates and if available, download them to keep the software up-to-date. Here’s how you can check available software updates –
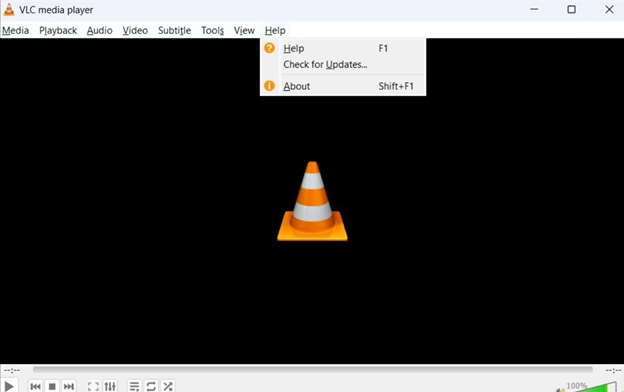
- Open the VLC media player on Windows.
- Click the Help menu at the top and select Check for Updates
If updates are available, simply follow the on-screen instruction to download and install them.
In case even updating the software doesn’t solve the issue, then it is time to get to the uninstall and reinstall process as the last resort. Follow the below-mentioned steps to uninstall and reinstall the VLC media player on your laptop or PC –
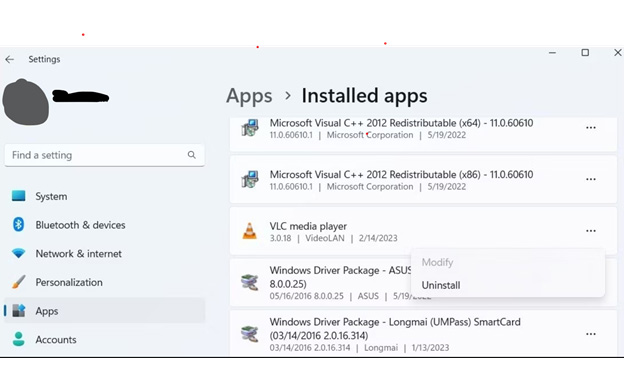
- Open the Start menu and click the gear-shaped icon to launch the Settings app.
- Navigate to the Apps tab using the left sidebar.
- Click on Installed apps.
- Scroll through the list or use the search bar at the top to quickly locate the VLC media player on the list. Click the three-dot menu icon next to it and select Uninstall.

- Select Uninstall once again to confirm.
- Once removed, open Microsoft Store on your PC and search for the VLC app.
- Then, click the Install button to download the app.
All these above-mentioned ways should solve any video lagging issues in the VLC Media Player software on your laptop or PC. In case the issue still persists, it could be a system hardware issue that an expert should take a look at. Please get your system hardware checked only through an authorised system expert.
FAQs VLC Media Player on Windows
Q1. Can VLC play more than one video at a time?
Answer. Any media player usually can play only one media file at a time. In case you wish to play multiple videos in the VLC media player, you can use the playlist feature. You can load the items into a playlist so that they stream sequentially in the media player.
Q2. Does VLC work without an Internet connection?
Answer. No, an internet connection is not required. The VLC media player plays video or audio files stored locally on your hard drive, and will also play streaming audio and video from a local network or the internet. To play files saved on the hard drive, the VLC media player can work without an internet connection.
Q3. Why VLC media player is not playing some videos on my computer?
Answer. Sometimes VLC does have issues in playing certain files. Some of the major reasons the VLC media player may not be playing certain videos are errors in the media files. Sometimes the media file could be corrupted or damaged. There can be issues with the VLC media player or its coding as well. Otherwise, the video file could be missing its header or any other metal component. Double-check the media file for errors and try reinstalling the software to solve the issue.
Q4. Why there is no sound in the VLC player?
Answer. If there is no sound in the VLC player, try turning on Audio/Unmute Audio on VLC settings. Follow the below steps –
- Open VLC Media Player and go to the Audio section.
- Go to the “Mute” option and click on it.
- Go to the Tools tab, and then go to “Preferences.”
- Go to Audio and check the Enable Audio box.
Q5. Why does the VLC media player keep buffering?
Answer. The VLC Player sometimes can run into spikes in the stream buffer. This could be due to certain hardware or network issues. It could also be because of the 0.3-second default buffer cache. If it is not a network issue, try changing the cache value or reinstalling the software to fix the persistent issue.
Also Read – https://www.mymobileindia.com/vlc-media-player-ban-lifts-in-india-meity-removes-9-month-ban/
Also Read – https://www.mymobileindia.com/microsoft-strongly-urges-users-to-upgrade-from-windows-10-to-windows-11/