Highlights
- The process of transferring photos from phone to laptop wirelessly may seem cumbersome but in reality, it is quick and easy.
- One of the easiest ways is to use Cloud storage services like Google Photos, Dropbox, and iCloud. These apps allow you to back up and access photos from anywhere with an internet connection.
- There is also built-in software on both Android and iOS devices, like AirDrop and Phone Link App that lets you transfer photos without cables or additional software.
- Alternatively, Third-party apps like Shareit and Xender offer a comprehensive wireless transfer solution with additional features.
- In this blog, we are sharing a complete guide with various methods to transfer your photos from your phone to your laptop wirelessly. The key is to find a solution that works best for your needs.
In today’s digital age, we take more photos on our phones than ever before. However, when it comes to transferring those photos from our phones to our laptops, it can often be a cumbersome and time-consuming task. Fortunately, there are several ways to transfer photos wirelessly, making the process quick and easy.
One of the easiest ways to transfer photos wirelessly is to use cloud storage services like Google Photos, Dropbox, or iCloud. These services allow you to automatically back up your photos to the cloud, and you can access them from anywhere with an internet connection. To transfer your photos from your phone to your laptop, all you need to do is sign in to your cloud storage account on your laptop and download the photos you want.
Another way to transfer photos wirelessly is to use the built-in software on your phone and laptop. Both Android and iOS devices come with a built-in feature called “AirDrop” or “Phone Link App,“ respectively. With these features, you can easily transfer photos between your phone and laptop without the need for any cables or additional software. Simply enable the feature on both devices and select the photos you want to transfer.
If you prefer a more comprehensive wireless transfer solution, you can also consider using third-party apps. These apps allow you to transfer files wirelessly between your phone and laptop, and they often have additional features like group sharing, file compression, and more.
All in all, transferring photos from your phone to your laptop wirelessly is a simple process that can save you time and effort. Whether you choose to use cloud storage services, built-in software, or third-party apps, the key is to find a solution that works best for you and your needs. In this blog, we are sharing a complete guide on how you can transfer photos from your phone to your laptop wirelessly.
How to Transfer Photos from Android Phone to Windows Laptop via Phone Link App?
If you have an Android Phone, you can use the Windows Phone app for your desktop to transfer photos wirelessly to your Windows laptop. Below are the steps to follow –
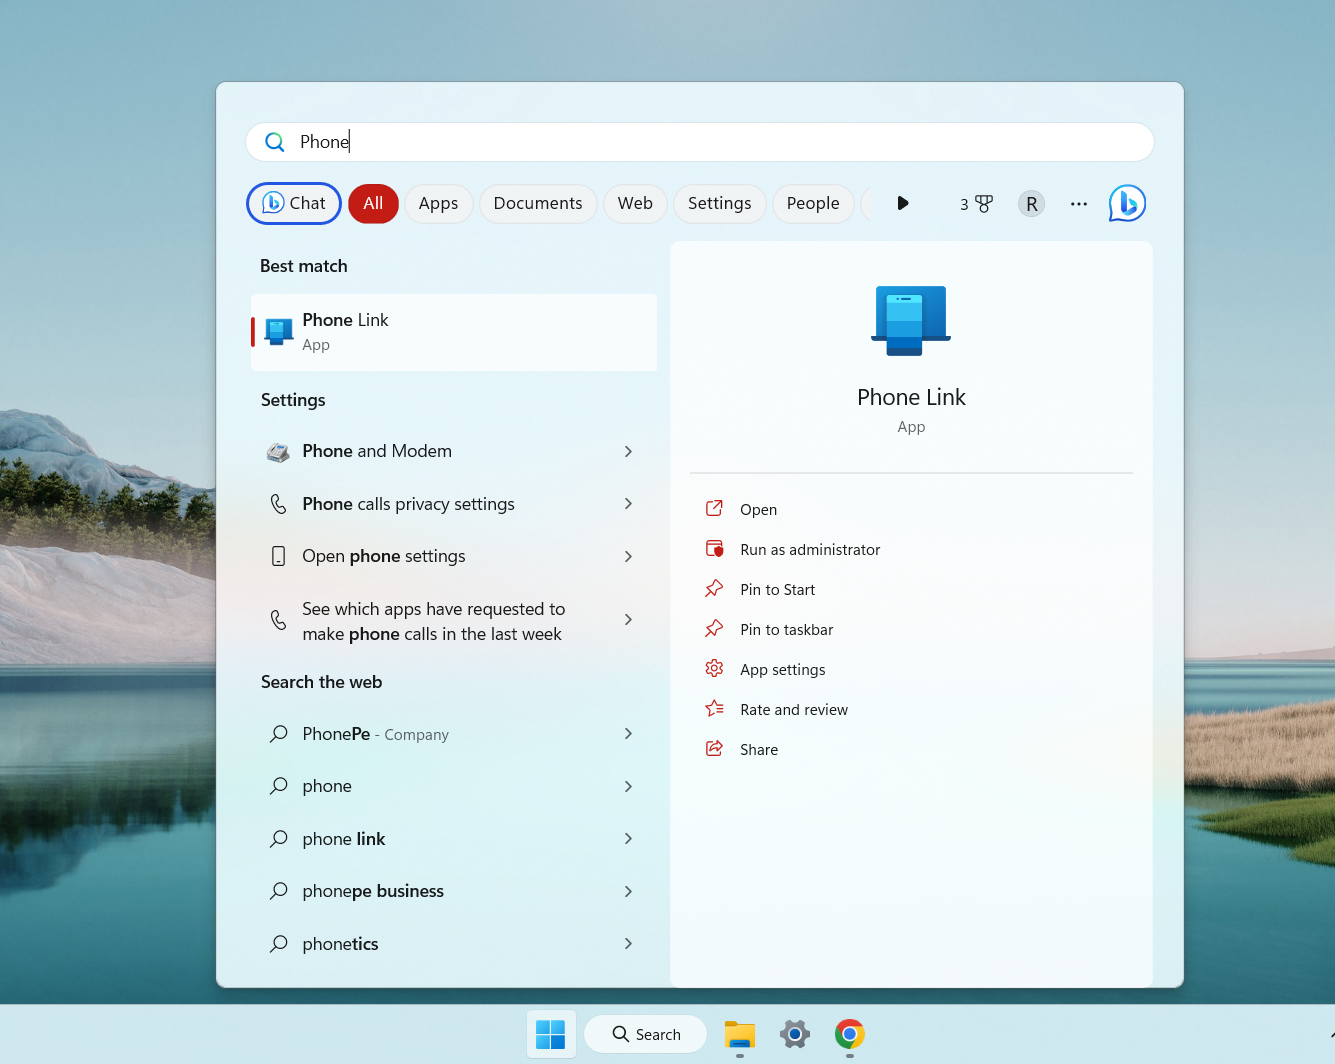
- To get started with your Android Phone, Go to the Start button of your Windows laptop (Windows 10 and above) and search for “Phone” and click on the Phone Link App that appears.
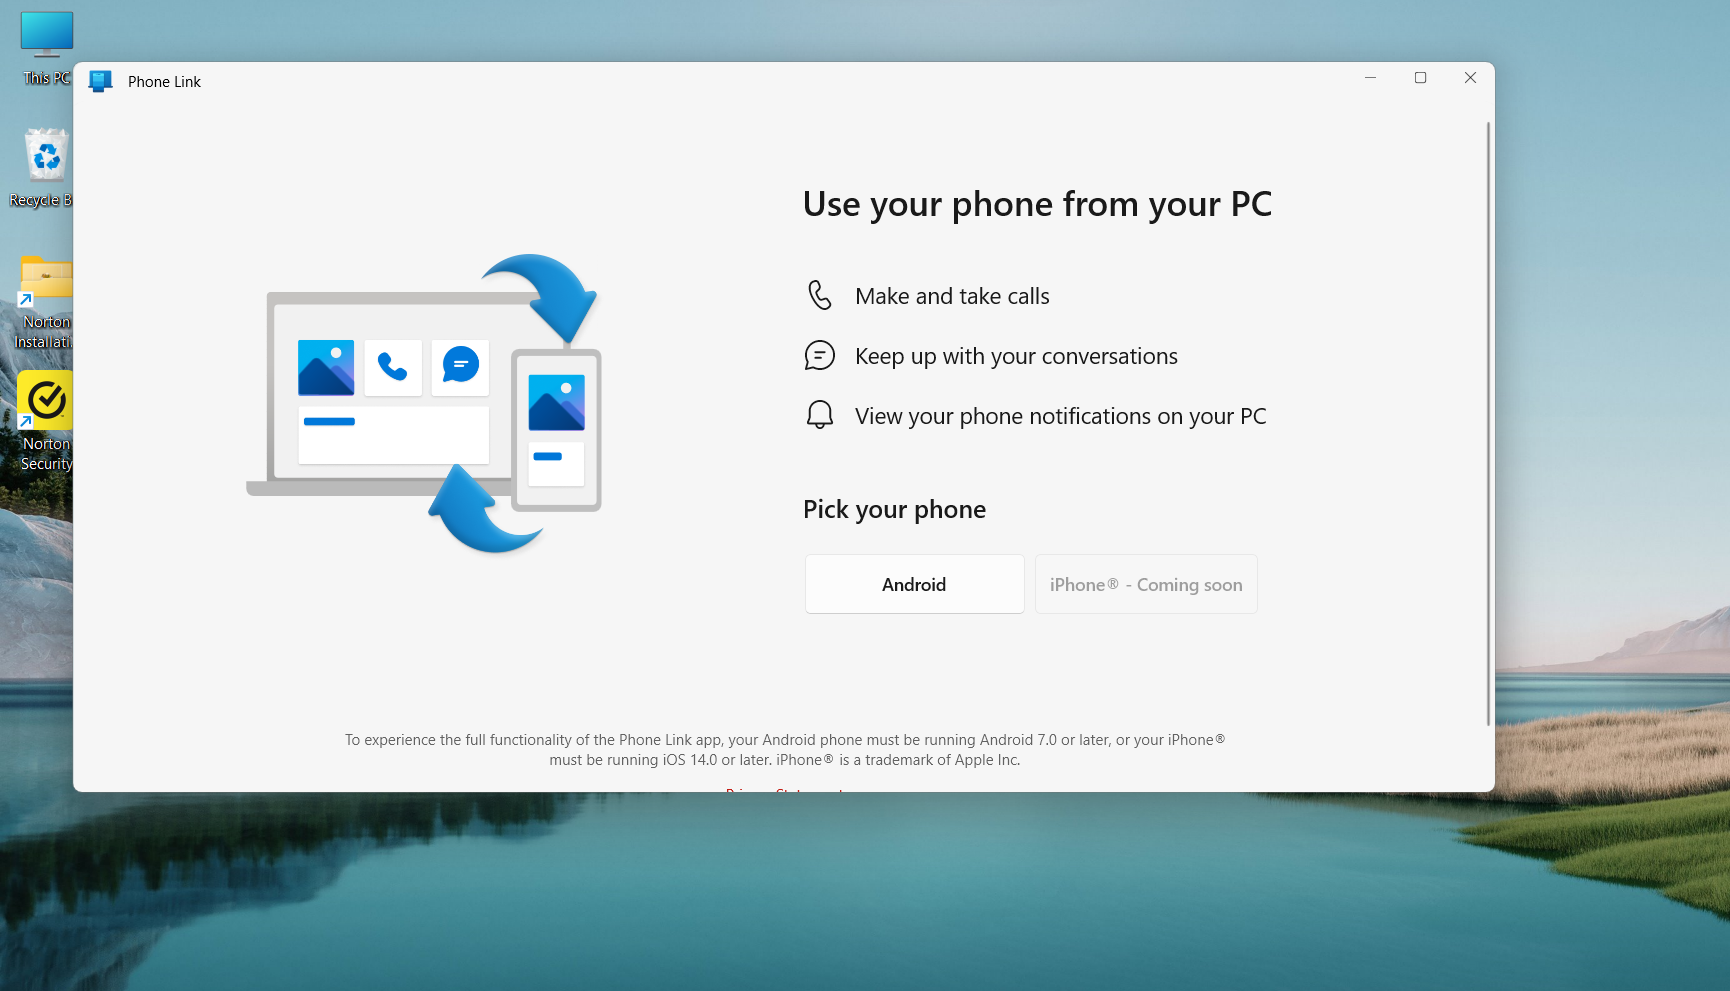
- Once the Phone Link App opens, select Android.
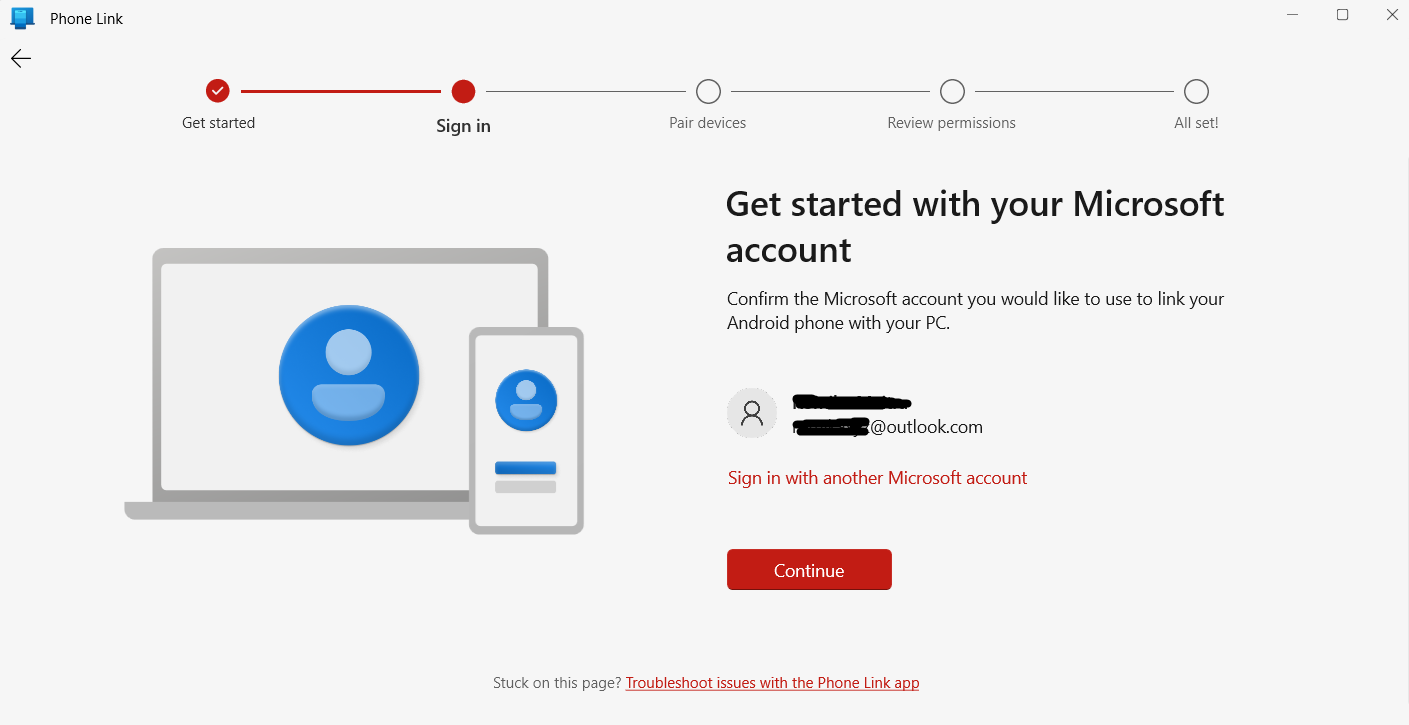
- Next, the Phone Link App will ask you to confirm your Microsoft Account. If you are not already signed in, log in to your Microsoft Account and click Continue.
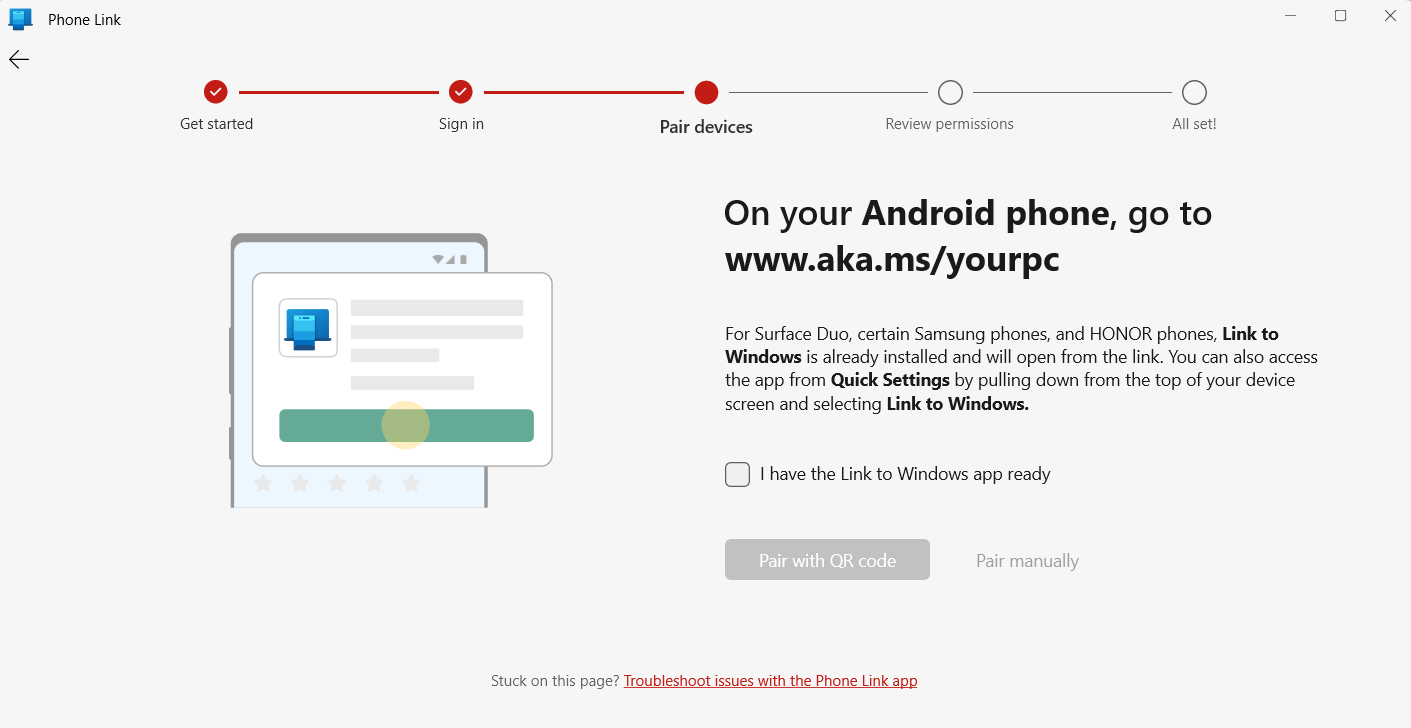
- Follow the on-screen instruction and go to aka.ms/yourpc on your Android phone that you wish to link with the Windows laptop.
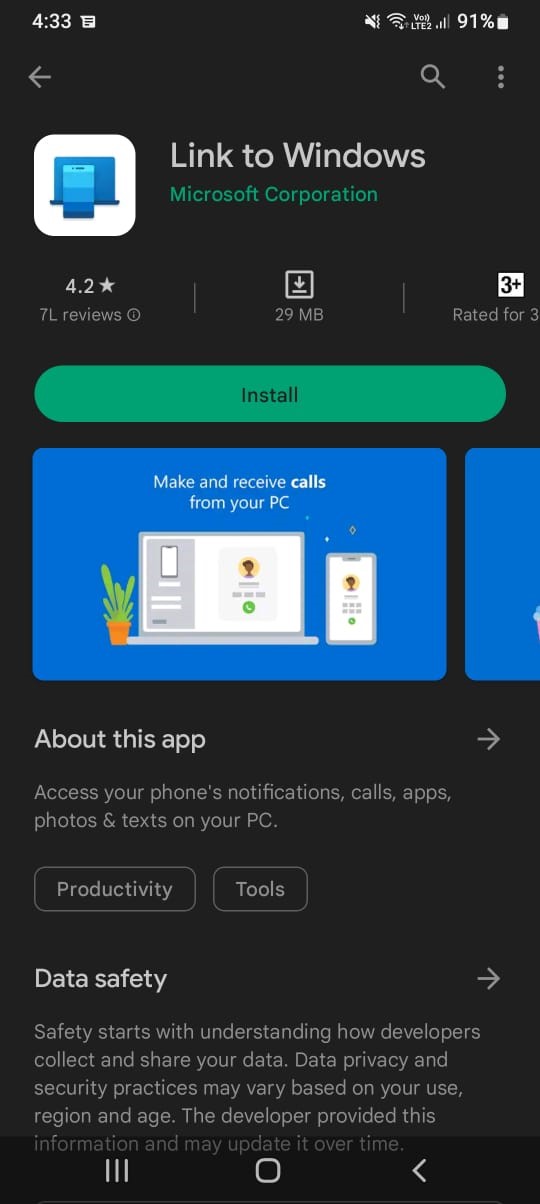
- Now install the Link to Windows app (Opens in the Play Store from the link given in the previous step) on your Android phone.
- Once the app is installed, open the app and link your phone with the PC by either scanning the QR code or manual pairing. Scanning the code is quicker, so tap the Is there a QR code on your PC? link and tap Continue at the next screen.

- The QR code to link the devices will display on your desktop. Use your smartphone camera to scan the QR code.
- Once done, tap Continue in the mobile app and then grant the necessary permissions for Your Phone to access your contacts, phone calls, media, and messages. Tap Continue to finish the process.
How to Transfer Photos from iPhone to Mac via Airdrop?
Transferring photos from iPhone to Mac using AirDrop is a simple and quick process. Here are the steps to follow:
- Turn on Wi-Fi and Bluetooth on both your iPhone and Mac.
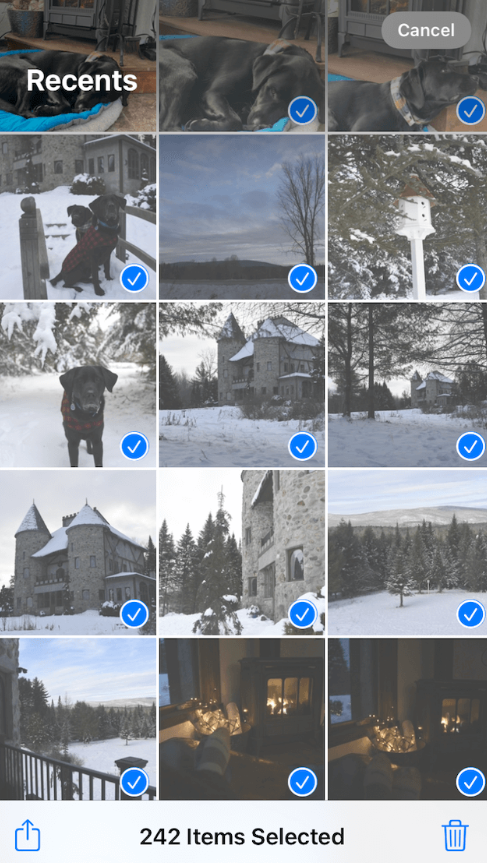
- On your iPhone, open the Photos app and select the photo(s) you want to transfer.
- Tap the share button that looks like a square with an upward-pointing arrow.
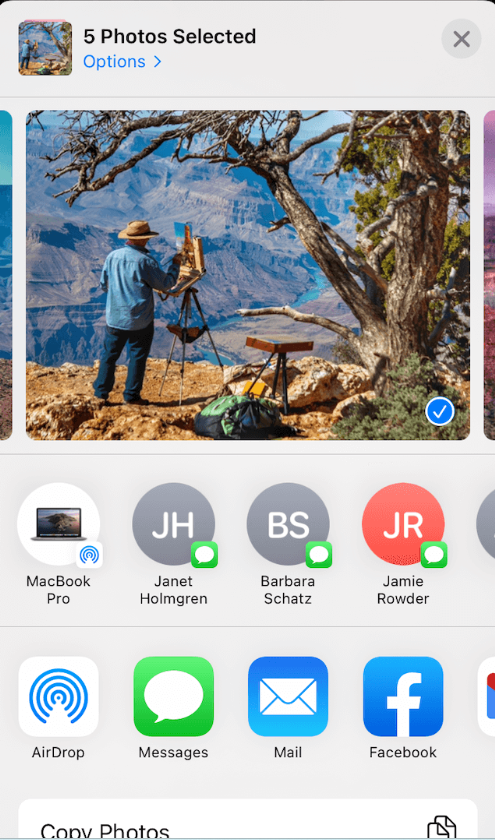
- Your iPhone will search for available AirDrop devices. Tap on Mac once it appears.
- On your Mac, a pop-up window will appear asking if you want to accept the AirDrop transfer. Click “Accept.”
- The photo(s) will be transferred wirelessly from your iPhone to your Mac and saved in the Downloads folder by default.
Once the transfer is complete, you can open the Downloads folder on your Mac to access the transferred photos.

Note: If your Mac doesn’t appear in the AirDrop window on your iPhone, make sure both devices are using the same iCloud account and are within close proximity to each other. You can also adjust the AirDrop settings on your Mac by going to Finder > AirDrop > Allow me to be discovered by: > Everyone.
How to Transfer Photos from Phone to Laptop Wirelessly Via Photo Transfer App?
The Photo Transfer App is a unique free-to-use application available for both iPhone and Android users. This app allows you to move photos from your iPhone or Android device to your computer using a Wi-Fi connection.
There is a free version of the mobile app available that lets the users transfer up to 10 photos at a time. However, in case there is a requirement, the paid version can be used as it adds more features including no transfer limits and full-resolution transfers.
Here’s how you can use the Photo Transfer App to transfer photos from phone to laptop wirelessly –
- Install the app on your phone and use the dedicated web page to transfer photos onto your computer.
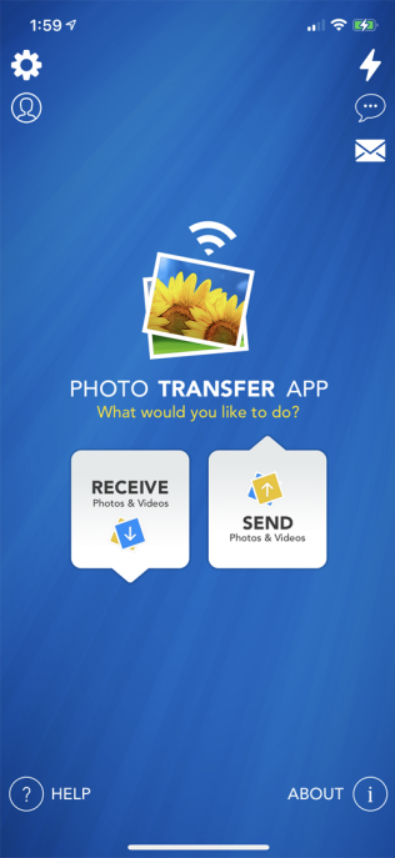
- Open the app on your phone and click the Send button. Although many options are available, we suggest you try to Send photos over the Wi-Fi option for this app.
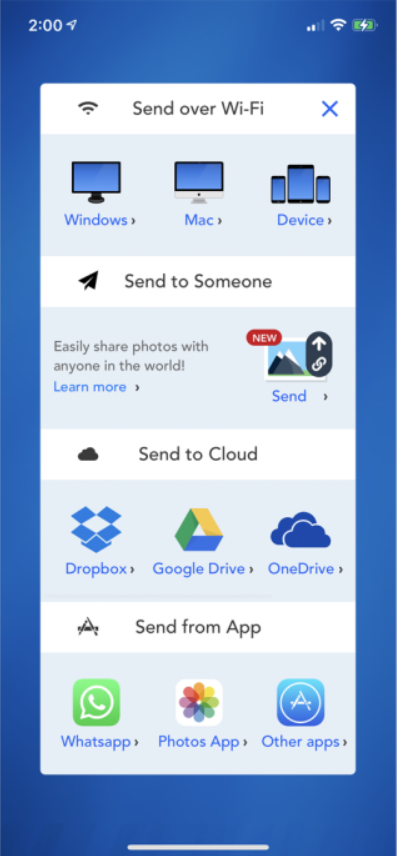
- Next, if you’re using a Windows PC, tap the Windows icon.
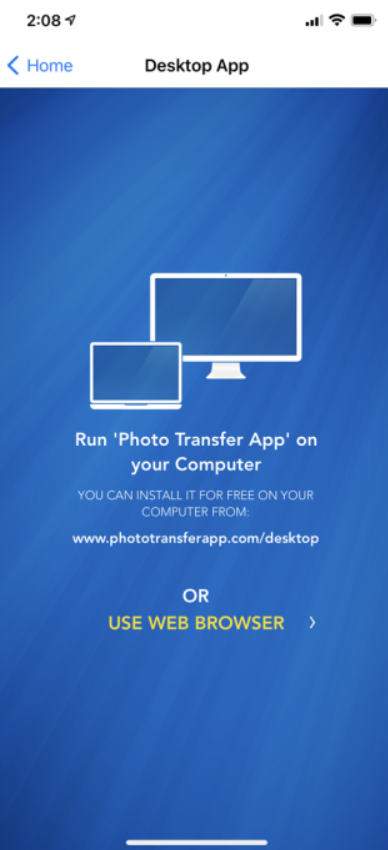
- The app will ask whether you wish to run the Photo Transfer App on your computer or use your web browser. If you plan to use the software on a regular basis, installing the free Windows or Mac version is the best option as it’s easier to use compared to the web page.
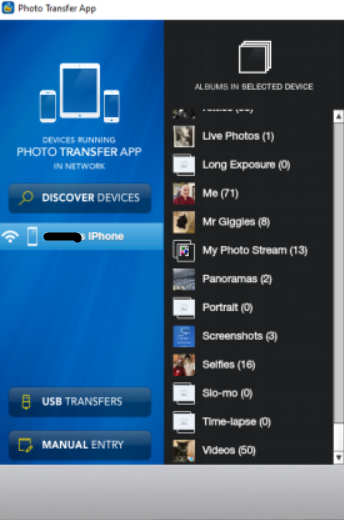
- Open the app on your computer, click the Discover Devices button and then select your phone.
- Select either Wi-Fi or Bluetooth to run the transfer.
- On your phone, authorize the connection. Your phone’s photo albums and libraries should appear in the app on your computer.
Once connected, you can browse through your photos on your computer. Right-click a specific photo to download it to your computer
How to Transfer Photos from Phone to Laptop Wirelessly?
There are several methods you can use to transfer photos from your phone to your laptop wirelessly. Here are three common ways:
Using Cloud Storage Services
Cloud storage services like Google Drive, Dropbox, and OneDrive are great options for transferring photos from your phone to your laptop wirelessly. Here are the steps:
- Install your preferred cloud storage app on your phone and laptop.
- Upload the photos you want to transfer to the cloud storage from your phone. This can be done either automatically or manually depending on the app settings.
- Open the cloud storage app on your laptop and log in to your account.
- Download the photos from the cloud storage to your laptop.
Using Bluetooth
If your phone and laptop both have Bluetooth, you can use it to transfer photos wirelessly. Here are the steps:
- Turn on Bluetooth on both your phone and laptop.
- Pair your phone and laptop by going to the Bluetooth settings and selecting your laptop from the list of available devices.
- On your phone, select the photos you want to transfer and tap the share icon.
- Select Bluetooth from the list of sharing options and choose your laptop as the recipient.
- Accept the file transfer on your laptop when prompted.
Using Wi-Fi Transfer Apps
There are several Wi-Fi transfer apps available on both the App Store and Google Play Store that allow you to transfer photos wirelessly from your phone to your laptop. Here are the steps:
- Install a Wi-Fi transfer app on your phone and laptop. Some popular options include AirDroid, Feem, and Shareit.
- Open the app on both devices and connect them to the same Wi-Fi network.
- On your phone, select the photos you want to transfer and choose the Wi-Fi transfer app as the sharing option.
- On your laptop, open the app and accept the file transfer when prompted.
That’s it! These are three common methods for transferring photos from your phone to your laptop wirelessly. Choose the one that works best for you based on your preferences and devices.
How to Wirelessly Transfer Photos From Your Phone to Your PC

If you need to send photos from your phone to a computer, you can use email, Google Photos, or even a direct cable connection. However, you may find it quicker and more convenient to transfer them wirelessly from phone to PC.
Microsoft once offered an app called Photos Companion, which allowed iPhone and Android users alike to tr ansfer photos to Windows 10 PCs, but it has been discontinued. In its place, Android users can use Microsoft’s Your Phone app, while iPhone users will need to find third-party options that can perform the task.
Your Phone
To get started with Your Phone, first open Settings > Phone and click the Add a phone button in Windows 10.
The Your Phone desktop app will open, and ask you to choose your phone type. Choose Android and click Continue. Your Phone will ask you to confirm your Microsoft Account. Click Continue.
Now install the Your Phone Companion app
(Opens in a new window) on your Android phone. Open the app and link your phone with your PC by either signing into your Microsoft Account or scanning the QR code. Scanning the code is quicker, so tap the Is there a QR code on your PC? link and tap Continue at the next screen.
Back at the Your Phone desktop app, check the box for Yes, I finished installing Your Phone companion. Click the Open QR Code button.
AQR code will display on your desktop. Use your smartphone camera to scan the QR code.
In the mobile app, tap Continue and then grant the necessary permissions for Your Phone to access your contacts, phone calls, media, and messages. Tap Continue.
Choose to allow the app to run in the background for now. You can always change this later. Tap Allow to let your phone connect to your Windows PC. At the next screen, tap Done. The next screen confirms that your phone and PC are linked.
On your PC, tap the Let’s Go button. You should then see your linked phone listed in the Your Phone app.
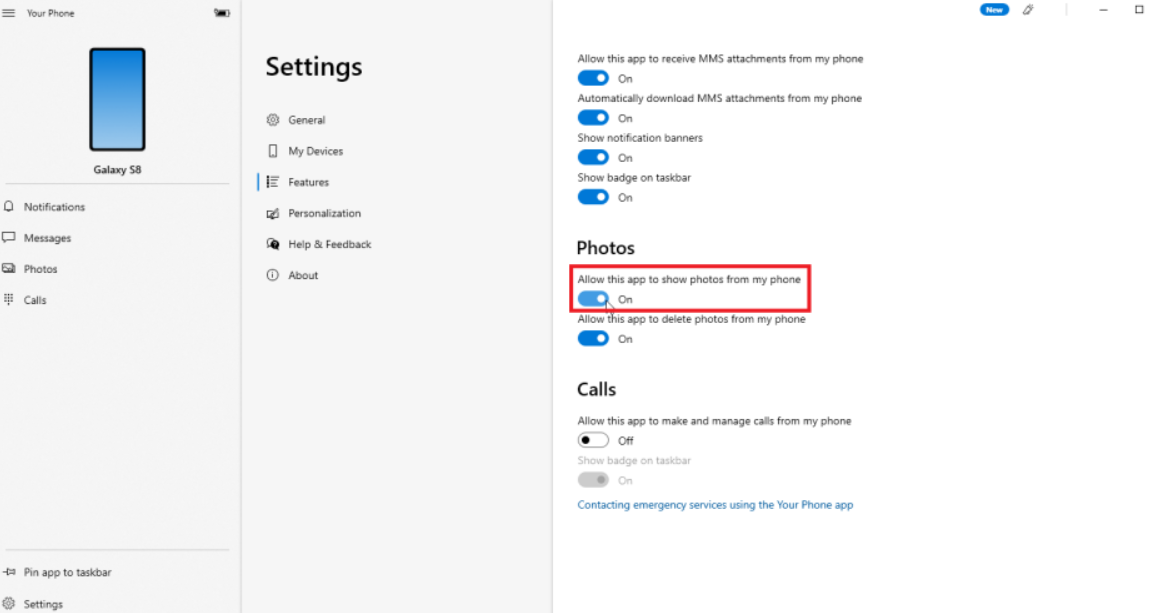
In the Your Phone app, click Settings > General and turn on the switch under Allow this app to show photos from my phone, if it’s not already enabled.
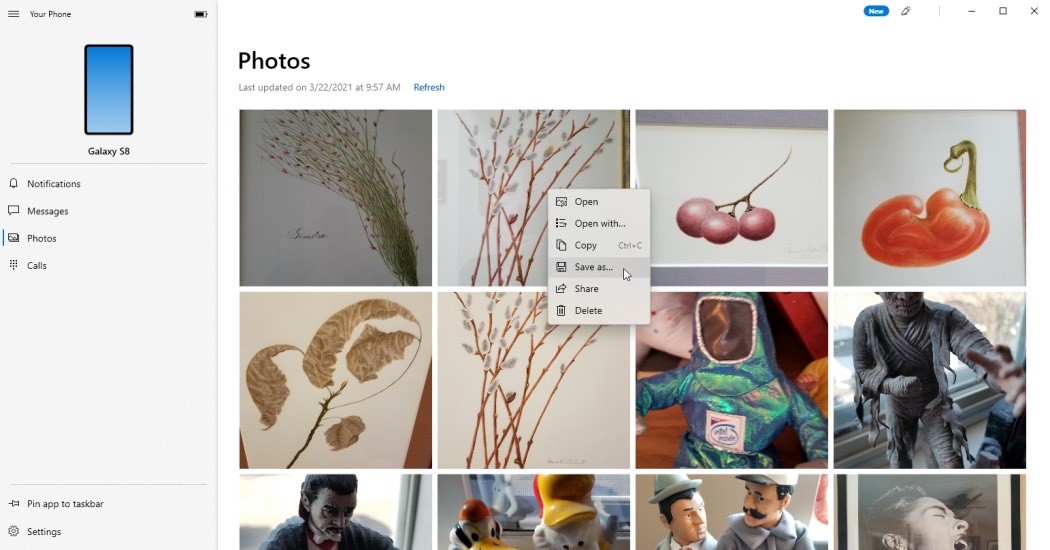
Your last 25 photos and screenshots should automatically appear on the main screen in the app. If not, click the entry for Photos and then select the See photos button. Click on any photo to open it. For more settings, right-click on an image to open a pop-up menu with options to copy, share, or save the photo to your computer.
Now, let’s look at a few third-party photo transfer apps for the iPhone, iPad, and in some cases, Android devices.
FAQs on Transfer Photos from Phone to Laptop Wirelessly
Q1. Why is AirDrop not working on Mac?
Answer. Here are some possible reasons and solutions. You can also try the methods outlined in the “Why is my Mac not showing up on AirDrop?” section above.
- Aeroplane mode is turned on – Airplane mode disables the cellular radio within your device, in addition to Wi-Fi. Try turning off Airplane mode to ensure that AirDrop will work.
- You’re using a Personal Hotspot for your Mac’s Wi-Fi – If your Mac is using your phone’s Personal Hotspot, AirDrop will be disabled. That’s because Personal Hotspot and AirDrop require Wi-Fi for themselves. To turn off this feature in iOS, navigate to Settings > Personal Hotspot and toggle it to off.
- There is a glitch in your Bluetooth connection – Unknown problems happen from time to time. When all else fails, toggle Bluetooth off and then on again on your Mac.
Q2. How to get a photo or video from Mac’s Finder to your Camera Roll?
Answer. Here’s the step-by-step process to get a photo or video from Mac’s Finder to your Camera Roll –
- First, ensure that both of your devices have Wi-Fi and Bluetooth enabled.
- Navigate to the Finder on your Mac and open the folder where your photos and videos are stored.
- Select a photo or video to highlight it. If you want to send more than one photo or video using AirDrop, hold down the Command key while clicking each photo or video to highlight them.
- Click the share button at the top of the screen and choose AirDrop.
- Select the name of the device you want to AirDrop to.
- Click Done.
- Your photo or video will open in the Photos app on your iPhone.
Q3. What is the easiest way of transferring photos from one device to another?
Answer. The easiest way of transferring photos from one device to another depends on the devices and the transfer method you prefer. Some common methods include:
- Using cloud storage services: Services like Google Photos, iCloud, and Dropbox allow you to back up and access photos from anywhere with an internet connection.
- Using built-in software: Devices like iPhones and Macs have built-in software like AirDrop and Nearby Sharing that let you transfer photos without cables or additional software.
- Using third-party apps: Apps like Shareit and Xender offer a comprehensive wireless transfer solution with additional features like cross-platform transfers and group sharing.
Overall, the easiest method will depend on the devices you’re using and your personal preferences. For example, if you’re an iPhone user and your friend has an iPhone too, using AirDrop may be the easiest and quickest option. If you want to transfer photos between an iPhone and a non-Apple device, using a third-party app like Shareit or Dropbox may be the easiest way to go.
Q4. What is the best way to transfer photos to digital?
Answer. Using a flatbed scanner to digitize photos is the best option for people who have physical photos that may not be in the best condition, such as photos that have come out of photo albums. It is also a good choice for people who want to scan a lot of pictures at once.
Q5. How do I transfer photos over the Internet?
Answer. Uploading files to cloud storage is a great way to transfer large files such as photos and videos. Popular cloud services providers like Google Drive, Files.com, ExaVault, Dropbox, and OneDrive offer mountains of online storage. Each of these products is accessible with more than enough space to cover most file types.
Q6. How do I transfer photos to a memory card?
Answer. Here are simple steps to transfer photos to memory card
- On your Android device, open Files by Google. Learn how to view your storage space.
- At the bottom left, tap Clean.
- On the “Move to SD Card” card, tap Select files.
- Select which files you would like to move.
- Tap Move to SD Card.
7) How to transfer photos from your Android device to your Windows computer?
Ans) You may have snapped thousands of photos on your Android phone over the years. Maybe you’re preparing to wipe your old phone to trade it in for a new Samsung Galaxy or just want to look at your photos on a big screen instead of the little black slab in your hand. No problem. You can transfer your photos to your Windows computer in a few different ways.
You can plug your device into your PC via a USB cable and access the photos from your phone.
You can use the Windows Photos app to import the photos from your phone.
By default, your photos are automatically saved to Google Photos, from which you can download them to your PC.
If you tap into OneDrive, you’re able to automatically upload new photos from your phone to the OneDrive Pictures folder.
And you can use Microsoft’s Phone Link app to transfer your photos.
Each method works the same in Windows 10 and Windows 11. Let’s go through each one.
Plug your phone into your PC
The simplest way to transfer your photos is to copy them directly from your phone.
Also: How to turn an old Android phone into a security or pet cam
First, plug your phone into a USB port on your PC.
On your phone, swipe down from the top of the screen until you see an option for your USB connection. It may tell you that it’s currently charging your device via USB.
Tap that setting and change it to File transfer.
Next, open File Explorer on your Windows PC and navigate to your Android device.
Drill down through the Internal Storage or Internal Shared Storage folder to the DCIM subfolder and then open the Camera folder. You should see all of the phone’s photos here.
Open another window in File Explorer to a local folder on your PC. You can then copy and paste or drag and drop the photos from your phone to your computer.
Use the Windows Photos app
You can also import photos from your mobile phone using the Windows Photos app.
Open the app on your PC. Click the Import button and select the option for From a connected device.
Select your Android phone and allow the app to generate all the photos from the device.
Click the link for Change destination to choose a different folder for importing the photos.
Click the drop-down menu for Select and choose the option for All items.
Check the box for Delete original items after import to remove the photos from your phone.
When ready, click the Import button.
Use Google Photos
First, make sure that the photos on your phone are being backed up and synchronized to Google Photos.
Open the Photos app.
Tap your profile icon and select Photos settings.
Choose Back up & sync and confirm that the switch is turned on for Back up & sync.
Make sure you have enough space in your Google cloud storage to accommodate all your photos. You can also change the Upload size to upload your photos in a compressed format to save space.
Browse and sign in to the Google Photos website on your computer. You should there see the photos synced from your Android phone.
Now let’s assume you want to download all the photos to your PC. Select the first photo, hold down the Shift key, and then select the last photo.
Click the three-dot icon in the upper right and select Download. Your photos are saved in your default Download folder as a ZIP file.
Use Microsoft OneDrive
Here’s a helpful option if you already use Microsoft OneDrive in Windows. Install the OneDrive app on your Android phone if you haven’t already done so.
Open the app and sign in with your Microsoft account.
Tap the Photos icon at the bottom.
Tap the option for Camera upload and tap the Turn On button.
Then flip the switch for Camera upload.
After the photos have been synced, open the OneDrive folder on your computer and you should see all the photos.
Use Microsoft’s Phone Link
Yet another option is to use Microsoft’s Phone Link, which lets you view and retrieve photos and other items from an Android phone.
Your first step is to link and sync your Android phone with Windows.
After your phone is linked, select the option for Photos in the Phone Link app on your Windows PC. You’ll then see all the photos from your phone.
Right-click on a photo you wish to download and select Save as.
The downside with Phone Link is that there’s no way to select and download multiple photos to your PC in one shot. So this tool is useful more for downloading just a few photos at a time.
8) What Is Wi-Fi Direct? The Wireless File Transfer Method That’s Faster Than Bluetooth
Ans) Wireless data sharing has made rapid strides over the past few years. Thanks to Wi-Fi, Bluetooth, and NFC, data can be moved from one device to another with little effort.
But Windows 10 boasts another feature that most people don’t know about, called Wi-Fi Direct, a wireless connectivity system that helps you effortlessly hook devices up and transfer huge amounts of data.
MAKEUSEOF VIDEO OF THE DAY.
What Is Wi-Fi Direct?
Wi-Fi Direct is a peer-to-peer wireless technology that lets your computers or smartphones connect to each other without a shared public network.
You can think of Wi-Fi Direct as a sort of Bluetooth over Wi-Fi. That is, it carries the same “discover and send” functionality of Bluetooth, but the data is sent using wireless networking. And, as you might’ve guessed, this offers much greater speed for your file transfer.
Bluetooth has been around since 1994, and although it’s useful for transmitting audio and connecting devices, it isn’t ideal for transferring larger files. Wi-Fi Direct, in contrast, has no such issues and looks set to completely supplant Bluetooth in the following years.
At this stage, though, Wi-Fi Direct isn’t yet as universal as Bluetooth. However, it’s a very useful feature for transferring data between Windows 10 and other devices.
How Does Wi-Fi Direct Work?
For Wi-Fi Direct technology to work, you’ll need at least a single device that’s compatible with its protocols. You can then seamlessly use it for things ranging from file transfer to intercommunication.
When you establish a connection between two devices in Wi-Fi Direct, one of the devices acts as an Access Point, to which the other device connects. All of this is an automated process, so you don’t have to worry about getting your hands dirty.
Wi-Fi Direct is built on top of Wi-Fi. The only thing that separates it from regular Wi-Fi is that while you need a router to connect your devices to the internet, Wi-Fi Direct doesn’t have any such limitations. In fact, the sole purpose of Wi-Fi Direct is to facilitate a connection between local devices instead of accessing the internet.
But then you might wonder: How does this make Wi-Fi Direct any different from Bluetooth? We already had Bluetooth for connecting devices locally, so why invent new technology for the same thing?
The reason is speed.
You see, while Bluetooth works great, it really isn’t quick enough to keep up with our fast-paced lives anymore. If you’ve used Bluetooth, you know what we’re talking about; files can take ages to move from one device to another. With Wi-Fi Direct, however, there are no such hiccups. It is, instead, as fast as a Wi-Fi network, even exceeding it in some cases.
Where Can You Use Wi-Fi Direct?
Due to its blazing fast speed (with maximum speed up to 250 Mbps) made possible by its peer-to-peer wireless technology, Wi-Fi Direct can be used anywhere where you would’ve used Bluetooth before. This makes it perfect for:
Sharing multimedia files: It can be used for sharing big multimedia files from one device to another. For example, if you have a big video file—such as a movie—Wi-Fi Direct should be your go-to tool due to the big size of the file.
Gaming: Most high-quality multiplayer games on smartphones require fast connectivity for a lagging-free experience. Direct can be helpful in cases like these.
External devices: Computer devices like keyboards, mice, printers, etc., can also be connected with the help of Wi-Fi Direct.
Check if Your Windows 10 PC Is Wi-Fi Direct Compatible
Using Wi-Fi Direct to send a file is faster and simpler than Bluetooth. First, however, you’ll need to check that your device is Wi-Fi Direct-compatible. You can do this with the help of Command prompt. To do that, go to the Start menu search bar, type in ‘cmd,’ and select the best batch.
Once you’re in the Command prompt, type in ‘ipconfig /all,’ and hit Enter.
If Wi-Fi Direct is available, you should see an entry labeled Microsoft Wi-Fi Direct Virtual Adapter.
Next, you’ll need to start transferring data over Wi-Fi Direct. However, this isn’t as obvious as you would expect…
How to Transfer Files From Android to Windows With Wi-Fi Direct
To transfer your data using Wi-Fi Direct, you’ll need a third-party app; choosing the right option for this is important, as this would’ve a big impact on your transfer speed.
Feem is a software that has provided Wi-Fi Direct support to Windows PC and laptop users since the days of Windows 7 and Windows 8.
Feem is free to use, although it comes in various premium options. Wi-Fi Direct in Feem is free, as is live chat. However, you can pay to have iOS support, unlimited file transfers, and remove ads.
Using Feem to transfer data from Android to PC or laptop is straightforward.
Set your Android device as a mobile hotspot via Settings > Network & Internet > Hotspot & tethering. Connect your Windows computer to this network.
Launch Feem on Android and Windows. You’ll notice that both devices are given unusual names by the app (e.g., Junior Raccoon) and a password. Keep a note of the password, as you’ll need it to establish the initial connection.
Send a file from Android to Windows using Wi-Fi Direct, choose the destination device, and tap Send File. Browse for the file or files, then tap Send.
Moments later, the data will be sent to your PC. It’s as simple as that—and it works backwards, too.
Download: Feem (for Windows, macOS, Linux, Android, iOS, Windows Phone)
Don’t Have Wi-Fi Direct? Transfer Files With Bluetooth!
If your devices don’t support Wi-Fi Direct, a smart solution (in the absence of a USB cable) is Bluetooth. This is particularly useful if you’re trying to use Wi-Fi Direct on Windows 7 or 8 and find that the feature isn’t there or it doesn’t work.
First, ensure your computer is paired to a suitable Bluetooth device (phone, tablet, computer, etc.) before sending a file to it. The methodology for this is largely the same across devices and requires that both are set to “discoverable.”
Both devices will then search for one another and, if successful, connect following input of a confirmation code.
For more information, here’s a list of how you can transfer data between a PC and Android.
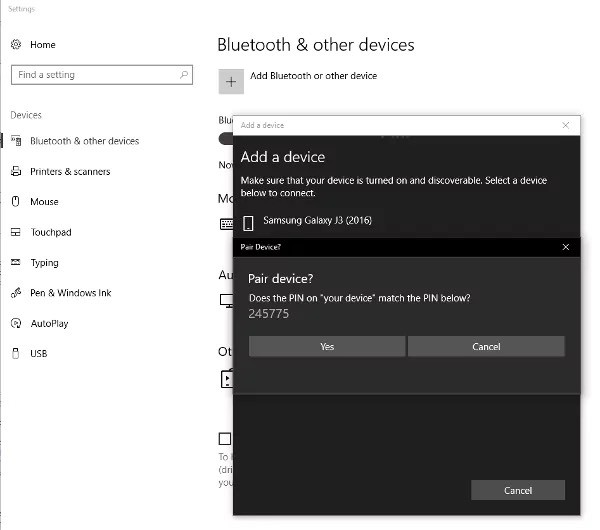
If you’re not sure where the controls for Bluetooth can be found on your Windows 10 computer, open Settings > Devices. After you’re in the Bluetooth & other devices section, turn on the Bluetooth, and pair your device with the computer. For that, click on Add Bluetooth or other device and go ahead with the pairing up.
Then click on Send or receive files via Bluetooth > Send Files. Next, select a device that you want to share files with, choose the file to be sent, and click on Next to go ahead with the transmission.
On sending the file, the device receiving your data file will ask you to confirm that you wish to save the data. Agree to this, and wait for the transfer to complete.
Note that due to the shorter range of Bluetooth, the best results will be enjoyed by keeping both devices close together.
No Wi-Fi Direct? Transfer Files From Android to Windows PC With FTP
FTP is another handy file transfer option for Android users attempting to transfer files to their Windows 10 PC (or other operating systems, for that matter).
ES File Explorer is a popular third-party file manager for Android. This comes with several file management features for local and network use. One such feature among them is FTP, which provides a direct network connection between two devices.
Use ES File Explorer’s Network > FTP feature to display your Android device’s IP address.
Paste this into a file transfer program such as FileZilla to browse the contents. You can then effortlessly transfer files between the two devices.
So, try ES File Explorer if you want to transfer the data from a mobile device to your laptop through Wi-Fi and don’t have Wi-Fi Direct.
Data Transfer Speeds: Which Is Best?
While trying your hands on the two methods above, you’ll notice that Wi-Fi Direct is considerably quicker than Bluetooth. Indeed, as recent tests have demonstrated, Bluetooth’s speed is no match in comparison.
While Wi-Fi Direct isn’t quicker than any cable data transfer (such as USB 2.0 or USB 3.0), it’s certainly capable of transferring a 1.5 GB file within 10 minutes; in contrast, Bluetooth takes almost 125 minutes to shift the same data.
Start Using Wi-Fi Direct in Windows 10 Today
The data transfer option you choose will depend on the data you want to move. A USB 3.0 cable with compatible hardware is the fastest option. Wi-Fi Direct is a close second, with Bluetooth standing at third place. Wi-Fi direct makes a good middle-ground option, but as it is not as widely available (or known) as Bluetooth, you might opt for a cable instead.
Perhaps the most important aspect of using Wi-Fi Direct in Windows 10 is its ease of use today. After all, early implementations of any technology were somewhat difficult to use. But, with time, this will hopefully change.
9) 12 simple ways to transfer files from your Android to your PC or Mac?
Ans) Although the top Android phones come with a minimum of 128GB storage as standard, it may not be sufficient for everyone. Perhaps you’d like to back up photos to free up storage space or move music to your desktop that you downloaded on your phone. Because of Android’s open and transparent nature, there are many ways to do it. You can use a USB cable, Bluetooth, a third-party app, or a local wireless connection.
With so many options, it’s not always immediately clear which one you should go for, so we’re here to show you the 12 easiest ways to transfer your files from an Android phone to a Windows PC or a Mac.
USB cable
Using the USB cable that came with your smartphone is probably the easiest way to connect and transfer files to your computer. You may need a different one if your phone has the newer USB Type-C-to-Type-C cable and your desktop or laptop doesn’t have a USB-C port. However, if this isn’t an issue, the bundled charging cable should be all you need to move files between the two devices.
The transfer speed depends on the type of cable and storage you have on both devices. For example, the transfer speed is slower if your phone uses eMMC storage but faster if it comes with UFS. Similarly, transferring files to a SATA drive on a PC takes longer than an SSD.
Use a USB cable to transfer files to Windows
If you’re transferring to a Windows PC, it couldn’t be easier.
Connect your phone and PC using the USB cable.
You’ll see a notification or pop-up on your phone where you can choose a USB preference. Select the radio button beside File transfer / Android Auto.
A file transfer window opens on your PC, or you may need to navigate to This PC via File Explorer and find the folder named after your phone.
From here, you can browse the contents of your phone and drag files across to a folder on your PC. Photos are usually in the Camera > DCIM folder, while downloaded files will be in the Downloads folder.
You can also select and copy one or more files, then paste them into the desired folder on your PC.
Use a USB cable to move files to a Mac
Using a USB cable to transfer files to a Mac is not as straightforward. You’ll first install the official Android File Transfer app on your Mac. Once you’ve done that, the steps are fairly simple.
Connect your phone and Mac with the USB cable.
Select File transfer / Android Auto from the USB preferences notification or pop-up.
Open the Android File Transfer app (if it doesn’t open automatically).
You can now browse your phone’s contents and drag files to a Finder window to transfer.
Bluetooth
You can also use Bluetooth to transfer files if you don’t have a USB cable handy. But fair warning, the transfer speeds are super slow, so it’s best to use this method when transferring smaller sizes. A single attachment or a photo from your gallery should be fine, but we wouldn’t recommend using Bluetooth for a long video or a large album full of photos.
Enable Bluetooth on your phone and PC or Mac. Enable it on Android from the Quick Settings by pulling down the Notification Shade. Look for the Bluetooth icon on the status bar or control center on Mac and Windows.
On your PC or Mac, search for available devices. Select your phone to pair with it.
The system asks you to accept the connection by checking a pin that matches on both devices.
If you’re on a Mac, there’s an additional step. Go to System Preferences > Sharing and check Bluetooth Sharing to turn it on.
Locate the file or photo on your phone that you want to transfer. Tap the Share icon, then select Bluetooth.
On a PC, right-click the Bluetooth icon on your Taskbar and click Receive a File. Then select the device you’re sharing from, and the file is sent to your Documents folder. On a Mac, the file is sent to the Downloads folder, where you can access it immediately.
Microsoft Phone Link
If you want to transfer several photos from your phone to your Windows PC, Microsoft’s Phone Link app (formerly known as Your Phone) is a fantastic tool. While Your Phone was limited to Samsung Galaxy phones, the rebranded app is compatible with all phones running Android OS 7.0 or later.
Install the Link to Windows app on your phone. Newer versions of Windows have the Phone Link app preinstalled on the PC, but you can grab it here if it’s not there.
Open the Phone Link app on Windows and connect your Android phone via the QR code. Allow the necessary permissions to the Link to Windows Android app.
Once you’ve paired your phone to your PC using the app, transferring images is as easy as dragging and dropping the files.
Either drag and drop photos from the Phone Link app to the desktop or right-click on an image and select Save as from the context menu.
Select the folder on your PC to export the image.
Microsoft’s Phone Link can do more than transfer files. You can also use it to mirror your notifications, make calls, and more. Check out our full guide to the powerful Phone Link app.
ShareDrop
ShareDrop is a free, open source web app to transfer files from your Android phone to your PC or Mac and vice versa. You don’t need to install an app on either of the devices. The entire solution is web-based and uses an encrypted peer-to-peer connection. The software uses WebRTC (Web Real-Time Communication) technology to complete the transfer process. First, make sure your phone and PC or Mac are connected to the same network and follow the steps below.
Visit ShareDrop on your preferred desktop browser.
Click + in the upper-right corner.
Copy the web address and open the same on your Android phone. You can also scan the QR code using your Android device.
Your phone opens ShareDrop in the default browser. Select your avatar.
Tap Files. Select images and videos you want to send. Tap Send.
ShareDrop on the desktop asks you to save files. Tap Save.
You can find your downloaded files from the File Explorer (Windows) or Finder (Mac) app.
Google Drive
Another easy option for sharing files is via the cloud. The Google account you used to set up your Android phone comes with 15GB of Google Drive storage by default, and it’s easily accessible on a PC or Mac, allowing you to send multiple files at once. Google Drive is readily available to every Android user. Follow the steps below to use it.
Open the Google Drive app on your Android device.
Click on the + button in the lower-right corner, and tap Upload.
Select the files you want to share from the list, and wait while they’re uploaded. This could take some time for large files.
Go to drive.google.com in your desktop browser and make sure you’re logged in with the same Google account as your phone.
Your uploaded files are ready to download.
If you frequently use Google Drive to transfer files from Android to Windows or Mac, download and set up Drive for desktop and integrate Google Drive with the File Manager (Windows) or the Finder (Mac) menu. You can also upgrade to one of the Google One plans to enjoy more storage space and premium customer support.
OneDrive
All Microsoft 365 subscribers get 1TB of OneDrive storage. The cloud storage service is built into Windows. If you are an existing Microsoft 365 subscriber, you might prefer OneDrive over Google Drive to transfer files from your Android phone to Windows or Mac.
Download the OneDrive app on your Android phone.
Open OneDrive and sign in with your Microsoft account credentials.
Select the + icon at the top, tap Upload, and upload files to OneDrive from the following menu.
Open File Explorer (press Windows+E) on Windows and select your OneDrive account from the left sidebar.
Your uploaded files are ready to use on the desktop.
Snapdrop
Snapdrop is an easy-to-use local file-sharing solution to transfer files from Android to Windows or Mac.
Download Snapdrop on your Android phone.
Visit Snapdrop.net on your desktop.
Connect your Android phone and desktop to the same Wi-Fi connection. Open the Snapdrop app, and your desktop appears.
Tap the Desktop icon and select the files you want to transfer.
Snapdrop transfers selected media files and documents from your Android phone to the desktop.
Use an FTP server
You can set up an FTP (File Transfer Protocol) server and easily move files from Android to Windows or Mac. We’re using the Solid Explorer app on Android as an example.
Set up an FTP server and move files to Windows
Download the Solid Explorer app on Android.
Tap the hamburger menu in the upper-left corner.
Select FTP Server.
Make sure the server status is active. Make a note of the server address.
Launch File Explorer on Windows.
Type the server address in the address bar at the top. It should look like ftp://192.168.xx.xx:xxxx/. Then press Enter.
You can check all your phone folders on the desktop.
Copy or move files from Android folders to a relevant destination on Windows.
Set up an FTP server and move files to a Mac
Open Finder on Mac.
Select Go in the menu bar.
Select Connect to Server.
Type the server address (find it from the Solid Explorer app, as shown in the steps above) and click the Connect button.
Check your Android folders in the Finder menu. You can now move or copy them to your Mac.
OpenMTP for Mac
OpenMTP is an advanced Android File Transfer App for macOS. Follow the steps below to use OpenMTP to transfer files from Android to Mac.
Download OpenMTP on your Mac from the official website.
Launch OpenMTP on your Mac.
Connect your Android phone to your Mac using a data cable.
Open USB Preferences from the Notification Center. Select the radio button beside File transfer / Android Auto.
You can check your Android phone storage with all the folders that appear in the OpenMTP app.
Drag and drop files from the phone folder to the Mac storage and complete the transfer process.
Google Photos
Google Photos is ideal for transferring images and videos from your Android phone to a PC or Mac. You must enable Google Photos backup on your phone and download the same using Google Photos web on the desktop.
Open Google Photos on your Android phone.
Tap your circular account picture in the upper-right corner.
Select Turn on backup (you must have sufficient Google Drive storage to upload media).
Once you upload media from your phone, go to Google Photos web on your desktop.
Select the photos and videos you want to download on your computer and press the Shift+D keys.
Google Photos downloads a ZIP file that you can extract from the Finder (Mac) or File Explorer (Windows) app.
Once you get the hang of Google Photos, read our top tips and tricks to use it like a pro.
Sharik
Sharik is one of the fastest ways to transfer files from your Android phone to a Windows PC or Mac. It’s an open source, cross-platform solution for sharing files via Wi-Fi or a mobile hotspot. Your phone and the desktop must be connected to the same Wi-Fi network to complete the transfer process.
Download Sharik on your Android phone.
Open the app and tap Send on the main page.
Select Files from the dialog box.
A file picker menu opens. Select multiple files.
Sharik asks you to open an IP address on your desktop browser.
Enter the IP address in the address bar of your web browser.
The browser automatically starts the download process if it’s a single file. If you transfer multiple files, you can check the list and download them on your PC or Mac.
Commander One
Commander One is a feature-rich alternative to the Finder app on Mac. If you want to manage thousands of files like a pro, the default Finder app may be limited in certain ways. You can get Commander One, which comes with a better dual-pane interface, more organization options, and an option to transfer files from your Android phone. Let’s check it in action.
Download Commander One from the Mac App Store.
Open the app and grant permission to access your Mac files. The app may ask you to enable full disk permission from Mac Settings.
Connect your Android phone to a Mac via a cable.
Your Android phone should appear at the top. Select it to check your phone’s internal storage and folders.
Select your files and drag and drop them to your Mac storage.
10) How to connect Android phone to Windows laptop and transfer files
Ans) Although Google makes Android (the operating system that more than 2/3rd smartphones in the world use) and Microsoft makes Windows, the two companies have made it easy to use the devices together. Take a look:
In this, an Android phone can be connected to a Windows laptop via charging cable. Plug your phone’s charging cable to laptop’s USB Type-A port and you’ll see ‘USB Debugging’ in the notification panel. By default, the USB Debugging will be set to charging; however, with a tap, you can change it to “Files” and “Photos” – the wording may vary depending on your device.
Selecting any of the options will pair the device with the laptop. Windows is likely to automatically install any necessary drivers to allow your Android phone to communicate with your computer. However, in case it doesn’t, perform a Google search for “phone model drivers” and then follow the link of your manufacturer to manually download the drivers. Make sure that you don’t download drivers from an unknown source.
After that, a small window will appear to access the files of your smartphone from the laptop. Otherwise, you can find the paired smartphone as a drive in the “Computer –> This PC” from where you can transfer files and more.
Once you’re done with that, make sure you safely eject your smartphone from the computer. To do so, click on the ‘Safely Remove Hardware’ button in the System Tray in the lower-right corner of the desktop and select “Eject” option.
Connecting an Android phone to a Windows laptop wirelessly:
You can also connect an Android phone to a Windows laptop and transfer files wirelessly.
This can be done either by Bluetooth or third-party program AirDrop. The former requires you to turn on Bluetooth on both devices, make them discoverable, and search for the nearby devices. Select the device, which is yours, to establish a connection between your PC and smartphone to transfer files. However, we must tell you that the transfer speed via Bluetooth will be quite slow.
That’s where AirDroid comes in. The third-party program pairs a laptop with any smartphone securely over Wi-Fi connection to transfer files across the devices. For that, you’ll have to create an account on AirDroid, download the app or use the web version on both devices.
After doing that, you’ll be able to transfer files from laptop to smartphone or vice versa wirelessly at a much faster speed than Bluetooth.
How to connect Android phone to macOS laptop and transfer files
Connecting an Android phone to macOS is not as easy as Windows. You’ll require a third-party program. For wireless connectivity, follow the same AirDroid steps as listed above. The AirDroid app may not work on macOS, but you should have no trouble using the web version. You can also add AirDroid to Google Chrome extension for seamless pairing.
As for the wired connection between Android phone and macOS, download and install Air File Transfer on macOS. The app works on Mac computers with Mac OS X 10.5 or later and connects to your Android phone using your charger’s USB cable.
Once you’re set, double-click on Android File Transfer and connect your Android phone to macOS laptop/ PC with charging cable
Select File transfer option from the USB debugging in the notification panel of the phone
After that, your phone will appear as a drive on the computer to transfer files and do other things.
How to connect iPhone to Windows laptop and transfer files
To connect an iPhone to Windows laptop and transfer files, you will require iTunes apps. iTunes can manage files, back up data, and collect together all the music and videos it can find on your system that can be transferred to the paired iPhone on non-proprietary laptops such as Windows.
To download iTunes on Windows 10 laptop, open your web browser and go to www.apple.com/itunes
Click ‘Download iTunes’, then ‘Download now’. In between, the process may ask you to opt-in or opt-out of the newsletter.
Open your Downloads folder and launch the iTunes6464Setup.exe installer. Follow the installation instructions and open iTunes. Click Agree to the licence window. Agree in the Welcome window.
The first time you’ll need to use the cable to attach the iPhone to your computer. This will prompt messages “Trust this Computer?” Click Trust and “Do you want this computer to access your iPhone?” Click Continue.
The device will be ready now and you can transfer files from Windows laptop to iPhone.
Additionally, you can also use AirDroid option as stated in the wireless approach on ‘How to connect Android phone to Windows’ to transfer files from an iPhone to Windows 10 laptop. The AirDroid app is available on the App Store for iPhone users to download. Similarly, you can install the app on the Windows laptop or use the web version to forge the connection.
How to connect an iPhone to a macOS laptop and transfer files
Pairing an iPhone to macOS laptop/ PC is relatively easy as both the devices are manufactured and shipped by Apple. You don’t need a special program. Just plug your iPhone to macOS using the lightning cable and you’re good to go. The phone’s drive will appear within the ‘Finder’ folder to transfer files and manage other things such as software and back-up.
As far as the wireless method goes, an iPhone can be paired with macOS using AirDrop. AirDrop is a default service from Apple, which uses both Wi-Fi and Bluetooth to transfer files between devices.
To AirDrop from iPhone to macOS, select the files you want to share and tap the ‘Share’ icon. On the sharing menu, a round icon will be displayed for each device that has AirDrop turned on and is within AirDrop range of you.
Tap the icon of the device you want to send to. The receiver’s device will prompt a message to accept or decline the file.
If it’s accepted, the file will be transferred wirelessly from iPhone to macOS. Once the transfer is complete a sound alert will also play on the target device. This sound can be customised in Settings > Sounds > AirDrop. Similar steps can be performed for sharing a file from one iPhone to another.
As for sending the files from macOS to iPhone, right-click the file you wish to share –> select ‘Share’, then ‘AirDrop’ from the menu. Make sure that the iPhone with which you’re trying to share the file has AirDrop turned on – to do so, access Control Center by swiping up from the bottom of the screen.
11) How To Transfer Photos From Samsung Phone To Computer Wirelessly?
Ans) If you do want to transfer images from your phone to your computer wirelessly, here’s exactly what you need to do:
Start by going into Settings > Connections > Bluetooth on your phone, and make sure that Bluetooth is turned on.
On your PC, go to Settings > Devices. From here, make sure Bluetooth is active on your PC.
At this point, your phone should be able to detect your PC as a device to pair with, and vice versa. Make sure the two devices are visible to one another before proceeding.
Once connected, select Send or receive files via Bluetooth on your PC.
Because we are moving photos from your phone to the PC, select Receive files.
Go back to your phone and open the Gallery app.
In the Gallery app, tap and hold on the image you want to transfer. If you want to transfer multiple images, then simply tap on all the other photos you wish to move.
Tap Share.
Choose Bluetooth.
Select your computer as the device you wish to connect with.
Your computer will start downloading the images you have selected.
You can then decide where you want the files to be saved in your computer. Press OK > Finish.
Once the process is finished, you can then go to whichever folder you saved your photos in, and they’ll all be there, ready and waiting for you. It really is that simple.
Use Phone Link
Microsoft does offer an app called Phone Link. This allows your PC to access your phone for things like viewing and sending text messages, making and receiving calls, and crucially, sharing photos.
Once you’ve paired your phone and your PC via the app, you can then access your photos, and choose any that you want to transfer to your computer.
Using The Cloud
An alternative method that we’ll touch on briefly, is to use a cloud-based storage system, that you can then access from whichever computer you are using, and download it from there.
There are multiple examples of this, but one example of this is Google Photos. This option makes a lot of sense on a Samsung device, which is underpinned by Google’s Android operating system. This means that you will almost certainly already have a Gmail account. And therefore, you’ll almost certainly already find that many of your photos have been backed up to Google Photos automatically.
To access these on your computer, simply sign in to the relevant Gmail account on your PC. Then open Google Photos, and select any photos you wish to download onto your computer. It’s very simple. There are other cloud-based services that offer the same features. But Google Photos on a Samsung device makes a lot of sense.
Whichever option you go for, these are both straightforward methods to transfer images from your Samsung phone to your computer wirelessly.
12) Which devices support cross-device copy and paste?
Ans) Cross-device copy and paste is supported on Surface Duo and Android devices that are running One UI version 2.1 or above or select HONOR devices (1.22036.14.0 or later). On your Android device, go to Settings > About > Software Information. A few examples of devices with this version are: Samsung Galaxy Note20 5G, Samsung Galaxy Note20 Ultra 5G, Samsung Galaxy S21 5G, Samsung Galaxy S21+ 5G, Samsung Galaxy S21 Ultra 5G, and Samsung Galaxy Z Flip devices. Supported HONOR devices: HONOR Magic4 Pro.
13) Does copying and pasting between my devices use data?
Ans) Cross-device copy and paste requires the exchange of data between your PC and Android device. If you’ve allowed your devices to sync over mobile data, and you’re not connected to a Wi-Fi network, then copy and paste will use data. If this setting is turned off, you’ll only be able to copy and paste when both your Android device or Surface Duo and PC are connected to a Wi-Fi network.
If you have the Link to Windows (pre-installed) app on your Android device, you can check this by going to Settings > Advanced Features > Link to Windows and toggle Use mobile data. On some Android devices, go to Settings > Sync over mobile data, and check to see if this is turned on.
If you have the Link to Windows (pre-installed) app on your Surface Duo, you can check this by going to Settings > Link to Windows and toggle Use mobile data.
Also Read: WhatsApp Latest Feature will let you transfer chats in Android without Google Drive backup
Also Read: WhatsApp Message Transfer from Android to iOS, No Factory Reset Required