More than ever, PC users rely on having access to a microphone and camera. After all, tools like Zoom and Microsoft Teams open the door for remote work. They also make staying in contact with far-off family members and friends smoother than ever.
But the quality of these apps depends entirely on the technology you’re utilising. To prepare your microphone for speaking with friends, family, and coworkers, you might need to alter the settings for your surroundings.
Windows 11 has a built-in application to make it simple for you to test your mic. Here’s how to test a microphone on a Windows 11 computer if you’re not sure how.
There is a convenient way to test your audio input device and check its input level in Windows Settings if a microphone attached to your Windows 11 computer is too loud, too quiet, or simply not working. We’ll demonstrate how.
In order to set up a new microphone, do the following:
- Make sure your microphone and desktop are paired.
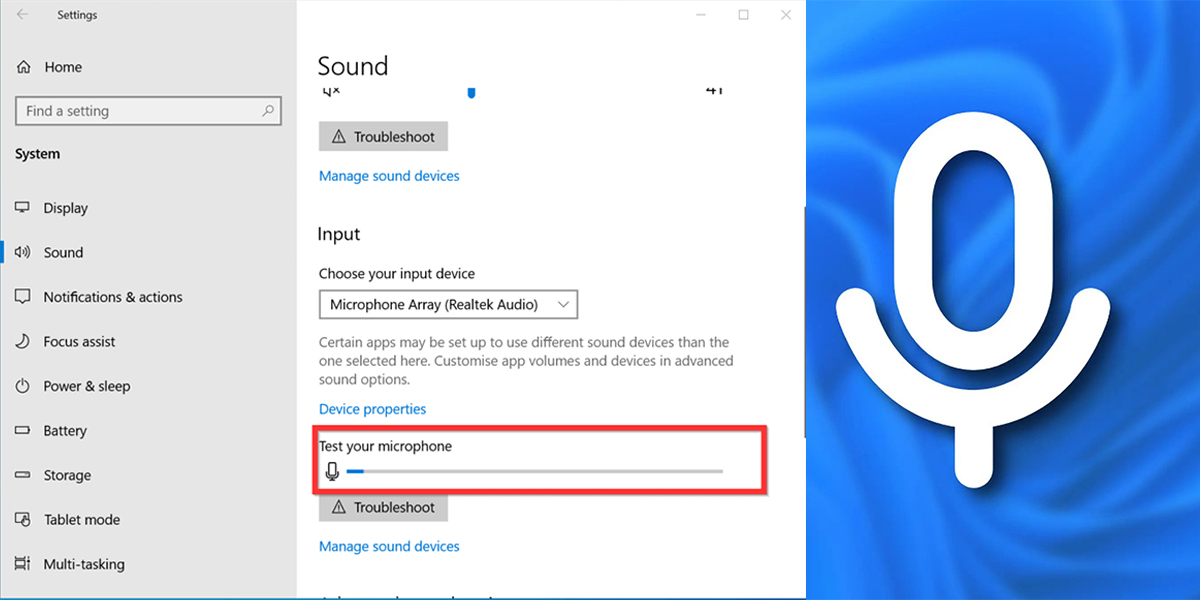
- From the menu, choose Start > Settings > System > Sound.
- Navigate to Input in the Sound settings to see your connected microphones. If the device is a Bluetooth microphone, choose Add device.
You should always check your microphone to make sure it is in functioning order and is adjusted to an ideal audio input level before every crucial meeting, call, or interview.
Using the Windows settings interface, you can quickly test the microphone in Windows 11 to make sure it is functioning properly. I’ll address that in this guide and demonstrate how to test the microphone on Windows 11 PCs.
Testing of Micro Phone on Windows 11
- Launch the Start menu, then choose Settings.
- Select Sound under System in Settings.
- In the Input section, choose your microphone.
- Verify the input volume settings are accurate by adjusting the slider in the Properties menu for your microphone.
- Verify further options as necessary, such as the audio format settings.
- Press the Start test button to start testing your microphone.
- Press Stop test after speaking into your microphone for a few seconds.
- If your microphone accurately captured the sound, a result % should appear next to the Start test button.
- You must raise the input volume slider to increase the loudness if the result percentage is less than 75%.
Also Read: Here is how to take a screenshot on your Windows 11 PC